Posted on

How to Make a Mullet Look Good: Shape, Texture and Styling

How to Make a Mullet Look Good: Shape, Texture and Styling

A mullet doesn’t look good just because it’s bold. It looks good when the proportions feel deliberate on you. If you’re wondering how to make a mullet look good, start with the balance between the fringe and sides, the layers at the crown and the length at the back. Get that relationship right, and the contrast feels like a choice, not a haircut gone rogue.

It’s fair to wonder whether the shape will suit your face, work with your natural texture or demand a complicated routine every morning. There isn’t one template to suit everyone. A mullet can be softened, sharpened, layered or kept subtle to work with your features, hair and personal style. This guide will help you choose proportions, find styling approaches that fit your day-to-day and explain the details you want to your stylist. Think less copy-and-paste trend, more personal shape with just the right amount of attitude.

Key Takeaways

  • Learn how to make a mullet look good by balancing the fringe, sides, crown and back to suit the effect you want.
  • See how straight, wavy, curly, fine or thick hair can shape the cut’s movement and silhouette.
  • Build a simple styling routine that brings out your natural texture without weighing it down.
  • Spot common choices that can make a mullet feel unbalanced, including copying a reference without adapting it to your hair.
  • Prepare clear references and details about your daily routine so your stylist can shape a mullet around you.

How to Make a Mullet Look Good: Start with Shape, Not Hype

Worried a mullet will look dated or leave you feeling awkward? The cut isn’t locked to one era or one extreme silhouette. Learning how to make a mullet look good starts with treating it as a shape designed to work from every angle, rather than a trend to copy blindly. The contrast between short and long can be soft and blended, sharply defined or somewhere in between. What matters is that the parts feel connected and intentional on you.

There’s no universally flattering version. A bold, high-contrast outline might feel right for one person; another may prefer a quieter shift in length. Neither is more authentic. Your preferred attitude, your hair’s natural movement and the way the cut sits around your head all help determine the proportions.

What makes a mullet look balanced rather than accidental?

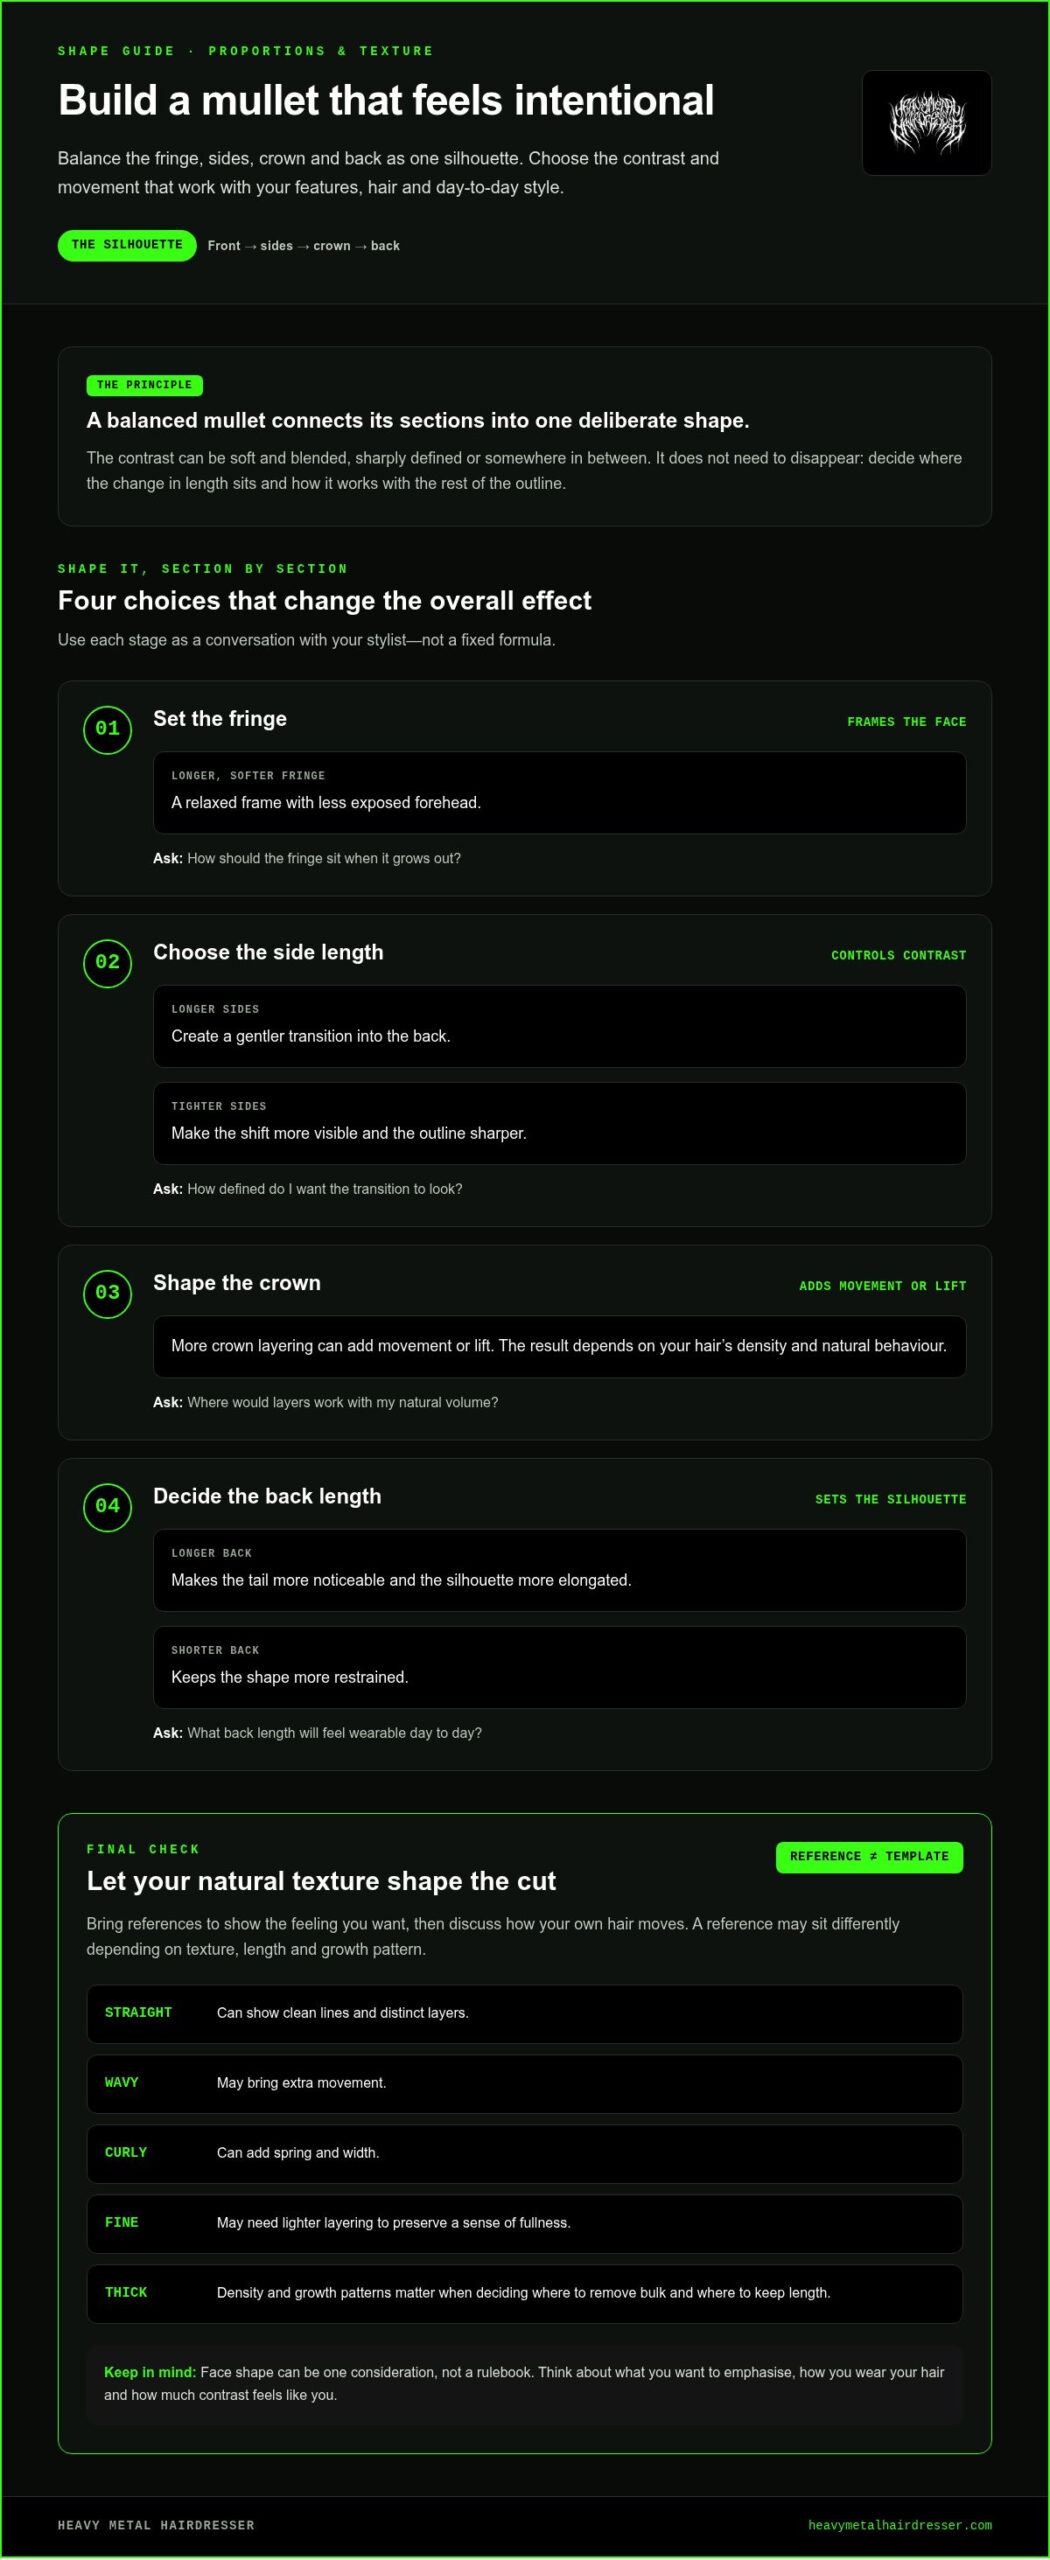
Think of the front, sides, crown and back as one silhouette. The fringe frames your face. Side length controls how much contrast you see, while crown layers connect the shorter sections to the longer back. If those areas fight each other, the shape can feel disconnected. Thoughtful blending or a deliberate, crisp break makes the contrast look like a choice.

A balanced mullet connects the front, sides, crown and back into one intentional shape, whether its contrast is soft or sharp.

That doesn’t mean every section has to blend seamlessly. A visible change in length can be the point. Decide where that change sits and how it works with the rest of the outline.

How do modern mullets differ from the stereotype?

The familiar retro silhouette is part of the cut’s story, not a rulebook. The history of the mullet shows how its look and cultural meaning have shifted over time. Contemporary versions can keep a strong short-front, long-back contrast while personalising the details instead of defaulting to one exaggerated shape.

Fringe, side length, layering and texture each change the attitude. A softer fringe and blended sides can make the outline feel relaxed; shorter sides and stronger separation create a sharper statement. Shaggy layers bring movement, while a cleaner outline can feel more controlled. For a wider look at different cut variations, explore this modern mullet haircut guide.

Use references to show the feeling you’re after, not to demand an exact copy. The same outline can sit very differently depending on hair texture, length and growth pattern. A textured cut can translate those visual cues into a shape that feels like yours, with the contrast dialled up or down to match your preference.

Choose Mullet Proportions That Work with Your Features and Hair

The same mullet can look soft and understated on one person, then sharp and full of attitude on another. The difference often comes down to proportion: fringe shape, side length, crown layers and how far the back falls. Face shape can be one consideration, but it isn’t a rulebook. Think about what you’d like to emphasise, how you wear your hair and how much contrast feels like you.

Which mullet details can change the overall effect?

A longer fringe can bring more focus to the eyes, while a shorter or more open fringe reveals more of the face. Sides left longer create a gentler transition into the back; tighter sides make the shift more visible. Crown layers can add lift and movement, though the result depends on your hair’s density and natural behaviour. More length at the back makes the silhouette more pronounced, while a shorter tail keeps it restrained.

Use the table as a starting point for discussing the feel you want, not as a fixed formula.

Design choice Possible visual effect Discussion prompt
Longer, softer fringe A relaxed frame with less exposed forehead How should the fringe sit when it grows out?
Shorter sides Stronger contrast and a sharper outline How defined do I want the transition to look?
More crown layering Extra movement or lift, depending on density Where would layers work with my natural volume?
Longer back A more noticeable tail and elongated silhouette What back length will feel wearable day to day?

How should hair texture influence your mullet?

Texture changes how the cut moves, so the finished shape won’t always match a reference exactly. Straight hair can show clean lines and distinct layers; wavy hair may bring extra movement. Curls can add spring and width, while fine hair may need lighter layering to preserve a sense of fullness. Thick hair can carry more weight, so its density and growth patterns matter when deciding where to remove bulk and where to keep length.

Bring references, then talk through what your hair does naturally and how much styling you’re happy to do. A wolf cut shares a layered, textured feel with some mullets, but shifts the overall balance; explore this wolf hair cut guide if you’re weighing up those shapes. For a cut shaped around your texture and preferences, explore Heavy Metal Hairdresser.

Style a Mullet So the Texture Looks Intentional

Styling shouldn’t bury the cut under product or turn your morning into a wrestling match. The goal is to make the shape readable: bring out the layers, give the fringe direction and let the back move naturally. Start with a small amount of suitable styling product to add definition without flattening the hair. You can always add more.

How can you bring out texture without overworking the hair?

Begin with clean, damp hair and work with its natural movement. Your routine will depend on your texture and the finish you want, but this simple sequence gives you room to adjust:

  1. Remove excess water. Gently towel-dry so your hair is damp, not dripping.
  2. Apply a small amount of product. Warm it between your hands, then spread it through the areas that need definition. Use less at first, especially if your hair is fine or easily weighed down.
  3. Shape with your fingers. Separate a few layers, guide the fringe and encourage movement through the crown and back. Avoid combing everything into place if you want a lived-in finish.
  4. Check the outline. Let the hair settle, then add a little more product only where the texture needs extra control.

Finger styling is one option, not a rule. Wavy or curly hair may need a gentler touch to keep its movement; straighter hair might benefit from more deliberate separation. Follow what your hair does rather than forcing it into a finish it won’t hold comfortably.

What everyday styling choices make the cut feel like yours?

Small changes shift the mood. Try a different parting, sweep the fringe to one side or leave it loose. For a piecey finish, separate a few strands with your fingertips. Tousle the crown for a more relaxed feel, smooth the surface for a cleaner outline, or add definition selectively for a sharper, more controlled shape.

A lived-in finish can still look intentional. Keep the overall silhouette clear, even if individual strands fall freely. If the fringe and crown have movement while the longer back keeps its shape, the cut reads as considered rather than unfinished. That’s a practical way to make a mullet look good without repeating the exact same styling every day.

For a deeper routine and more ways to work with texture, read how to style a modern mullet. To explore personalised alternative cuts and texture, visit Heavy Metal Hairdresser.
How to Make a Mullet Look Good: Shape, Texture and Styling

Avoid the Mullet Mistakes That Make the Shape Feel Unbalanced

A mullet doesn’t have to be extreme to look deliberate. A softer transition, a shorter back or sides that keep more length can still give the cut its distinct character. The common mistake is assuming bigger contrast automatically means a better mullet. Strong proportions matter more than pushing every feature to its limit.

An intentional mullet makes its contrast feel designed; an unfinished shape looks as if its different lengths weren’t considered together. If yours feels off, notice where the balance breaks down. The fringe may feel too heavy beside close-cut sides, or the back may seem disconnected from the crown. Naming the issue gives you a clearer starting point than deciding the whole cut is wrong.

Why can a mullet look different from the reference photo?

A photograph captures one person’s texture, density, length, growth patterns and styling. Your hair brings a different mix, so even a similar cut can fall another way. Use references to communicate what attracts you, rather than expecting an identical result. Is it the fringe, the length around the sides, the crown layers or the shape at the back? Pointing to those details helps turn inspiration into a cut that works with your hair.

Styling affects the comparison, too. A reference might show carefully defined texture, while your hair is air-dried or brushed smooth. Before changing the cut, try styling it to bring out the intended movement. If the outline still feels wrong, discuss which proportion you’d like adjusted.

Can you make a mullet softer or easier to grow out?

Yes, you can dial back the contrast through proportion and blending. Keeping more length at the sides or choosing a less pronounced back can create a gentler silhouette. If you have future length goals, mention them before settling on the strongest contrast. That gives the shape a direction beyond its first day.

Growing out depends on the starting cut and how your hair grows, so there’s no universal timeline or guaranteed smooth transition. Between cuts, keep the look readable with a styling approach that suits your texture. If the outline starts to lose its shape, a refresh can focus on the areas that feel bulky or disconnected rather than making everything shorter. Let how the cut sits for you, rather than a fixed schedule, guide the timing.

If you want a mullet shaped around your references, texture and plans for growing it out, explore a personalised mullet cut with Heavy Metal Hairdresser.

Get a Mullet Cut That Feels Like You

A reference photo is a starting point, not a blueprint. The best way to explain how to make a mullet look good for you is to show what you’re drawn to, then add the details that make the cut wearable in your everyday life. A stylist can translate those preferences into a shape that works with your hair, rather than reproducing someone else’s silhouette.

What should you tell your stylist before getting a mullet?

How does a personalised alternative cut come together?

A considered cut brings your preferences, texture and upkeep into the same conversation. Your stylist can use your references to understand the mood you’re after, then adapt the layers and proportions to how your hair naturally sits. That might mean keeping more length in one area, changing the fringe or adjusting the contrast so the shape feels cohesive on you.

At Heavy Metal Hairdresser, alternative haircutting and textured styling centre individuality rather than a one-template result. It’s an inclusive space where self-expression is welcome, but that doesn’t mean every mullet should look the same. The aim is to find a version that feels expressive and comfortable for the person wearing it.

Before you settle on the details, make sure the conversation covers both the look you want and the effort you’re happy to put into it. A cut that suits your texture and routine is easier to make your own.

If you’re ready to explore a mullet shaped around your preferences, take a look at the expressive cuts and textured styling at Heavy Metal Hairdresser.

Make the Mullet Your Own

Knowing how to make a mullet look good comes down to more than chasing dramatic contrast. Choose proportions that work with your features and hair, style to bring out its natural texture, and use references to explain the details you want rather than demand an exact copy. A strong cut should feel like you, not a template.

Heavy Metal Hairdresser was founded by barber and creative stylist Simon Tuckwell, bringing alternative haircutting and textured styling to an inclusive space where individual expression is celebrated. The salon’s backstage festival work includes Download and Bloodstock, but the starting point for your cut is your own style, texture and daily routine.

Ready to explore a mullet shaped around your expression? Explore a mullet cut shaped around you. Bring your references, share what feels right and make the look your own.

Frequently Asked Questions

Can anyone make a mullet look good?

A mullet can be adapted to many hair types and personal styles, but no single version suits everyone. The key is finding proportions that work with your natural texture, preferred level of contrast and everyday routine. Bring reference images and point out what you’d keep or soften, such as the fringe or length at the back. The aim is a shape that feels like you, not a copied template.

How do I make a mullet look less extreme?

Ask for a softer balance between the sides and back, and discuss fringe length, layering and blending before the cut. A mullet can still read clearly without dramatic contrast. Reference images can help show the level of boldness you prefer. Your current length and natural texture also affect how subtle the finished shape can be, so talk through how the cut is likely to sit and move with your hair.

Does a mullet suit fine or thin hair?

A mullet can work with fine or thin hair, but the cut should account for its density, movement and natural volume. Talk through how much layering will create shape without making the ends feel too sparse. Styling can help define texture, but it can’t change your hair’s underlying density. Bring examples you like and explain how much daily styling feels realistic, so the proportions can be tailored accordingly.

How do I style a mullet at home?

Start with clean, damp hair and work with its natural movement. Apply a small amount of suitable styling product, then add more only if needed. Use your fingers to separate layers or guide the fringe, and choose a finish that suits you, from tousled to defined or smooth. Your cut and hair type will affect the routine, so ask your stylist to show you a technique you can manage at home.

Can curly or wavy hair work with a mullet?

Yes, waves and curls can give a mullet natural movement and a distinct silhouette. The cut should account for how your hair sits when dry, along with its density and growth pattern. Think about whether you want to define your texture or keep it softer, and share your usual styling routine. Reference images with a curl or wave pattern similar to yours can help communicate the finish you have in mind.

How often should you get a mullet trimmed?

There’s no single trim schedule that works for every mullet. It depends on how quickly your hair grows, how sharply defined the cut is and how much change you’re comfortable with between appointments. A softer, lived-in shape may feel different from a highly structured one as it grows. Notice which areas lose their outline first, then use that as a guide when deciding when a refresh would help.

Can a mullet be grown out if I change my mind?

Yes, but growing out a mullet takes patience and depends on its starting length, layers and contrast. Mention your future length goals before choosing the cut, so the strongest proportions can take them into account. As it grows, occasional reshaping may help the changing lengths feel more intentional. There’s no single quick trim that makes every section grow evenly, so expect the transition to vary with your hair.
Posted on

Styling a Wolfcut as It Grows Out: Keep the Shape in 2026

Styling a Wolfcut as It Grows Out: Keep the Shape in 2026

A growing wolfcut doesn’t need to be wrestled back into its original shape. Styling a wolfcut as it grows out means working with its new proportions, not fighting every flipped-out end or shifting layer. If shorter pieces sit differently and the overall shape feels less defined, you’re not imagining it. As your hair grows, your routine can change too.

The aim is to keep the texture and movement that make the cut yours, without turning every morning into a styling battle. This guide covers adaptable ways to wear your wolfcut through changing lengths, from encouraging natural texture to giving stubborn layers direction. You’ll also learn what to try when the shape feels off and when a conversation with a stylist about a reshape could help. A small styling adjustment may be enough. If you want expert support, Heavy Metal Hairdresser specialises in wolfcuts and alternative cuts, with options to discuss what suits your look and comfort.

Key Takeaways

  • Learn why the balance between shorter layers, longer lengths and fringe shifts as your wolfcut grows.
  • Use a simple damp-hair routine to encourage movement without forcing every layer into place.
  • Match your styling approach to whether your cut is in a shorter, in-between or longer grow-out stage.
  • Track changes in your silhouette with occasional photos taken in similar light.
  • Find out when styling a wolfcut as it grows out may be enough, and when a reshape conversation could help.

Styling a wolfcut as it grows out: why the shape changes

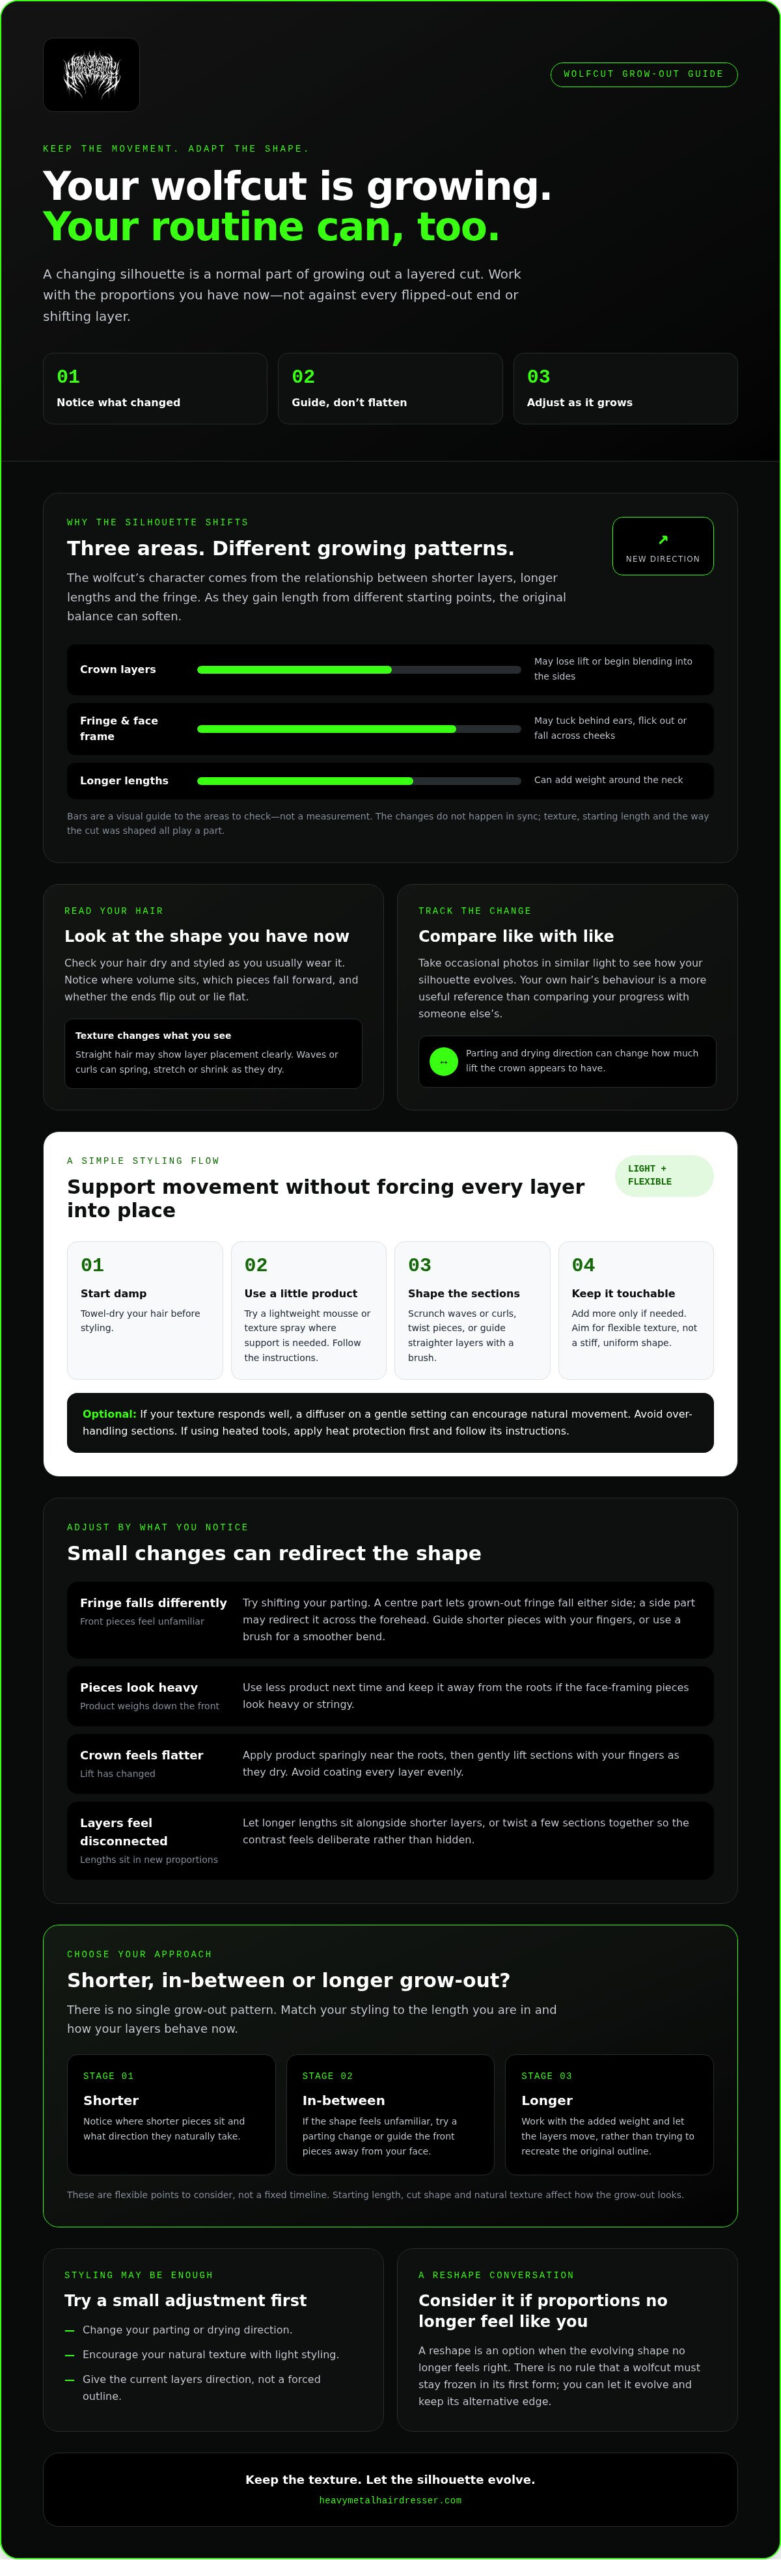
A changing silhouette is a normal part of growing out a layered cut, not a sign that you’ve done anything wrong. A wolfcut’s shape comes from the relationship between shorter crown layers, longer lengths around the sides and back, and the fringe or face-framing pieces. As these sections gain length from different starting points, the balance that made the original cut distinctive can soften.

That structure is part of the cut’s character. A wolfcut is a modern variation of the shag, with layers that create movement and a deliberately undone shape. As the layers lengthen, they may sit closer to the head, blend into surrounding sections or fall in a new direction. The original silhouette can become less obvious, even when the hair still has texture and personality.

There’s no single grow-out pattern. Your starting length, the way the cut was shaped and your natural texture all affect what you see. Straight hair may show changes in layer placement clearly; waves or curls can spring, stretch or shrink as they dry. Styling habits matter too. A parting or drying direction that once lifted the crown might now make it sit flatter. Start by noticing what your hair is doing now, rather than expecting it to follow a fixed timeline.

What changes first as wolfcut layers grow?

The crown layers may lose some lift or begin blending into the sides. Face-framing pieces might reach a length where they tuck behind your ears, flick out or fall across your cheeks, while the longer sections add weight around the neck. These changes don’t happen in sync because each area started at a different length and may behave differently with your texture.

Look at your hair when it’s dry and styled as you usually wear it. Notice where the volume sits, which pieces keep falling forward, and whether the ends flip out or lie flat. This gives you a more useful picture of your shape than comparing your progress with someone else’s hair.

Is the awkward wolfcut stage unavoidable?

Some lengths may feel unfamiliar, especially when the fringe and face-framing sections no longer sit as they did. That doesn’t mean the stage is a failure. Try changing your parting, directing the front pieces away from your face or bringing out your natural texture. A small change in direction can give the layers a different kind of energy.

Growing it out doesn’t mean giving up its alternative edge. You can keep the movement loose and lived-in, let the shape evolve or explore a reshape if the proportions no longer feel like you. There’s no rule that says a wolfcut must stay frozen in its first form.

How to style a growing wolfcut without flattening its texture

Keep your routine light and let the lengths move. Start with damp, towel-dried hair, then work a small amount of suitable styling product through the areas that need support. A lightweight mousse or texture spray can help encourage lift and definition. Follow the product instructions, and add more only if your hair needs it.

Shape sections according to how they sit now. Scrunch waves or curls, twist a few pieces around your fingers, or guide straighter layers into place with a brush. You’re not trying to recreate the exact outline of the original cut. Give the current layers enough direction to look intentional.

Lightweight, adaptable styling helps preserve movement by supporting the layers without weighing them into a stiff, uniform shape. For more upkeep ideas, see this wolf cut maintenance routine, then adjust the approach to suit your hair and preferred finish.

How to shape the fringe and face-framing layers

Try shifting your parting before adding more product. A centre part can let grown-out fringe fall on either side, while a side part may redirect it across the forehead. Use your fingers to separate and guide shorter pieces, or a brush for a smoother bend. If those pieces look heavy or stringy, use less product next time and keep it away from the roots.

How to work with crown layers and longer lengths

For soft lift at the crown, apply product sparingly near the roots and gently lift sections with your fingers as they dry. Avoid coating every layer evenly; varied, touchable texture often looks more natural. Let longer lengths sit alongside the shorter layers, or twist a few sections together so the contrast feels deliberate rather than hidden.

If your texture responds well, a diffuser can help dry your hair while encouraging its natural movement. Try a gentle setting and avoid over-handling the sections; results vary with hair texture and drying technique. If you use heated tools, apply heat protection first and follow its instructions. Aim for a flexible finish, not a locked-in shape.

Styling a wolfcut as it grows out doesn’t require a complicated kit or a perfect blow-dry. To explore how an alternative-cut specialist might approach your current shape, learn more about Heavy Metal Hairdresser’s wolfcut expertise.

Which styling approach suits each wolfcut grow-out stage?

Use the shape in front of you as your guide, not a calendar. “Shorter”, “in-between” and “longer” describe how your layers sit in relation to each other, not how long you’ve been growing your hair. The table offers starting points, not strict rules. Your texture, density and preferred finish all affect what works.

What you notice Low-effort option More defined option
Shorter layers still dominate; the crown has more shape than the lengths. Let the crown dry naturally and guide the longer pieces around your face with your fingers. Separate a few crown sections for texture, then shape the fringe in the direction you want it to fall.
In-between lengths are beginning to blend, but some layers still stand apart. Change your parting and scrunch or smooth the hair according to its natural texture. Use fingers or a brush to define selected sections, keeping the finish varied rather than uniform.
Longer lengths now carry more of the silhouette, with softer or less obvious layering. Wear the lengths loose and let the remaining layers move around them. Give a few face-framing or crown pieces extra direction to bring definition back into the outline.

When the shorter layers still dominate

Let the crown texture do its thing while the longer sections frame your face. Don’t try to make every layer match. For a softer finish, leave the sections less separated; for a pieceier effect, define a few strands with your fingers and a small amount of suitable product. Directing the fringe to the side, forward or away from your face can change the balance without changing the cut.

When the lengths begin to blend together

As layers merge, define a few pieces and leave others relaxed. This keeps movement visible without making the style look overly arranged. Try a different parting or finish before deciding you need to trim back towards the old shape. If an experiment doesn’t work, wash it out or reset your hair with your usual routine. Not every look has to stick.

As the cut gets longer, resist hiding the shorter layers beneath the lengths. Let them sit together, or bring out a few selectively to keep some contrast. These are options, not universal fixes. Choose an approach that suits your hair today, whether that’s barely-there texture or a more deliberate shape.

Styling a Wolfcut as It Grows Out: Keep the Shape in 2026

A practical routine for managing wolfcut growth between trims

A repeatable routine makes it easier to tell whether your wolfcut needs a styling tweak or simply more time. Keep the steps flexible: your texture, preferred finish and available time matter more than following a strict schedule. For more context on the cut and its terminology, explore the ultimate wolfcut guide.

A repeatable wash-day and refresh routine

On wash day, start with clean, damp hair. Choose styling support for the result you want: texture for separation, hold for more definition or smoothing support for a softer finish. Use products according to their instructions, and don’t assume you need the same amount or approach every time.

Change one thing at a time as you style. Try a new parting, a different drying direction or a lighter hand with product, then notice how your hair responds. When you’re short on time, focus on the sections that most affect the outline, such as the fringe or crown, and let the rest settle naturally.

For a useful visual check, take an occasional photo in similar light and from a similar angle. Compare the overall silhouette, not every strand. Are the front pieces sitting differently? Has the crown lost the lift you like? Photos can help distinguish a temporary styling frustration from a change in shape that keeps bothering you.

When should you ask for a reshape?

Consider speaking with a stylist if the outline persistently feels difficult to style or no longer feels like you. A reshape conversation doesn’t automatically mean losing length. It’s a chance to explain the direction you want and discuss what might work with the hair you have now.

Make the conversation specific. Bring your photos and describe your desired length, the sections that frustrate you and the features you want to keep, such as crown texture or face-framing layers. If you’re unsure whether to keep growing it or bring back a more layered shape, comparing related cuts may help. The shag haircut guide offers context on another textured shape.

Styling a wolfcut as it grows out doesn’t mean managing every stage alone. Heavy Metal Hairdresser specialises in wolfcuts and alternative textured cuts. You can explore its wolfcut expertise if you’d like a stylist’s perspective on your current shape.

Keep your growing wolfcut yours: styling support and next steps

Choose what feels right for your hair: keep growing, change how you style the layers or explore a reshape that suits the length you have now. There’s no single correct finish, and you don’t have to preserve the cut exactly as it was on day one.

Styling a wolfcut as it grows out can mean trying small changes and seeing what works. If you’d like another perspective, a stylist experienced with wolfcuts and textured cuts can talk through options for your current shape. Heavy Metal Hairdresser specialises in alternative cuts, including wolfcuts. Any discussion should start with your preferences, not a promised result.

What to bring to a wolfcut reshape conversation

Reference images can help make your ideas clear. Bring examples of shapes you like, as well as details you’d rather avoid. Be open about how much time you want to spend styling, how your hair behaves and how much length you’d like to retain. You know what feels like you; a stylist can discuss how those preferences might work with your hair as it is now.

How to choose your next move

If a change of parting, direction or styling finish makes the shape feel more like yours, an adjustment at home may be enough for now. If the outline repeatedly frustrates you, certain sections remain difficult to wear or the cut no longer reflects how you want to look, a conversation with a stylist could help clarify your options. It’s a discussion, not a commitment to cut.

There’s no rush to decide. Explore wolfcut and alternative styling to learn more about Heavy Metal Hairdresser’s approach and consider what feels right for your hair. Whether you keep growing, restyle or reshape, the best wolfcut is the one you want to wear.

Let your wolfcut evolve on your terms

As your layers change, the shape shifts too. The key to styling a wolfcut as it grows out is adapting your routine to the proportions you have now. Light, flexible styling can keep movement without forcing every piece into its old place. If a parting or texture tweak brings the cut back into balance, keep growing. If the shape persistently feels wrong, a reshape conversation can help you consider your options without committing to a particular result.

Heavy Metal Hairdresser specialises in wolfcuts, shags, mullets and textured styling. Founder Simon Tuckwell is a barber and creative stylist, with backstage experience at Download and Bloodstock. That alternative-cutting background can inform a conversation about what may suit your current length and the look you want to wear.

Explore alternative wolfcut styling and discuss your next cut with Heavy Metal Hairdresser. Keep growing, restyle or reshape. Your hair, your call, and the best wolfcut is the one that feels like you.

Frequently Asked Questions

How do you style a wolfcut while growing it out?

Style the lengths you have now rather than trying to recreate the original outline. Start with damp hair, use a little suitable product for your preferred finish, then shape selected sections with your fingers or a brush. You might redirect the fringe, encourage texture at the crown or let the longer pieces fall naturally. Adjust one thing at a time and see how your hair responds.

How long does it take to grow out a wolfcut?

There’s no fixed timeframe. It depends on your starting length, how much length you want and how your hair grows. A wolfcut also has several layers, so the shape can change before the overall length feels substantially different. Rather than relying on a calendar, notice how the fringe, crown and longer sections sit in relation to each other. Occasional photos in similar light can help you track those changes.

Can you grow out a wolfcut without cutting it?

Yes, you can let a wolfcut grow without cutting it. The layers and fringe will continue to change as they gain length, and you can adapt your parting or styling to suit the evolving shape. Some people prefer to leave every section untouched; others choose to discuss a reshape if the outline becomes difficult to wear. A cut isn’t required to grow it out, and the choice is yours.

What should you do with wolfcut layers as they grow?

Let the layers work with their new proportions instead of forcing them into their original positions. If the crown still has visible texture, bring out a few pieces; if the layers are blending, try a different parting or define selected sections. Keep the finish flexible, and avoid adding more product if shorter pieces start to look heavy or separated. Let your hair’s texture and the look you enjoy guide your approach.

How do you style wolfcut bangs when they get longer?

Experiment with the direction and parting. Longer fringe can be guided to either side, worn across the forehead or blended into face-framing pieces, depending on its length and how it naturally falls. Use your fingers for a relaxed finish or a brush for a smoother bend. Apply product sparingly, especially if the fringe is fine or easily weighed down. If it keeps falling in a way you dislike, ask a stylist about options.

Does a wolfcut look good at every length?

A wolfcut can evolve through different lengths, but whether you like the look is personal. As it grows, the balance between crown layers, fringe and longer sections changes, so the original silhouette may soften or take on a different character. Styling can help you explore the in-between shape, but there’s no obligation to love every stage. Choose the length and finish that feel comfortable and expressive for you.

When should you get a wolfcut reshaped?

Consider discussing a reshape if the outline persistently feels difficult to style or no longer reflects the look you want. Bring reference images, explain which sections bother you and say how much length you’d like to keep. A conversation with a stylist experienced in wolfcuts and textured cuts can help clarify possible directions, but it doesn’t commit you to a cut. If a styling change is working, there’s no need to rush.

Posted on

Sea Salt Spray: Alt-Styling Guide for Gritty Volume

Sea Salt Spray: Alt-Styling Guide for Gritty Volume

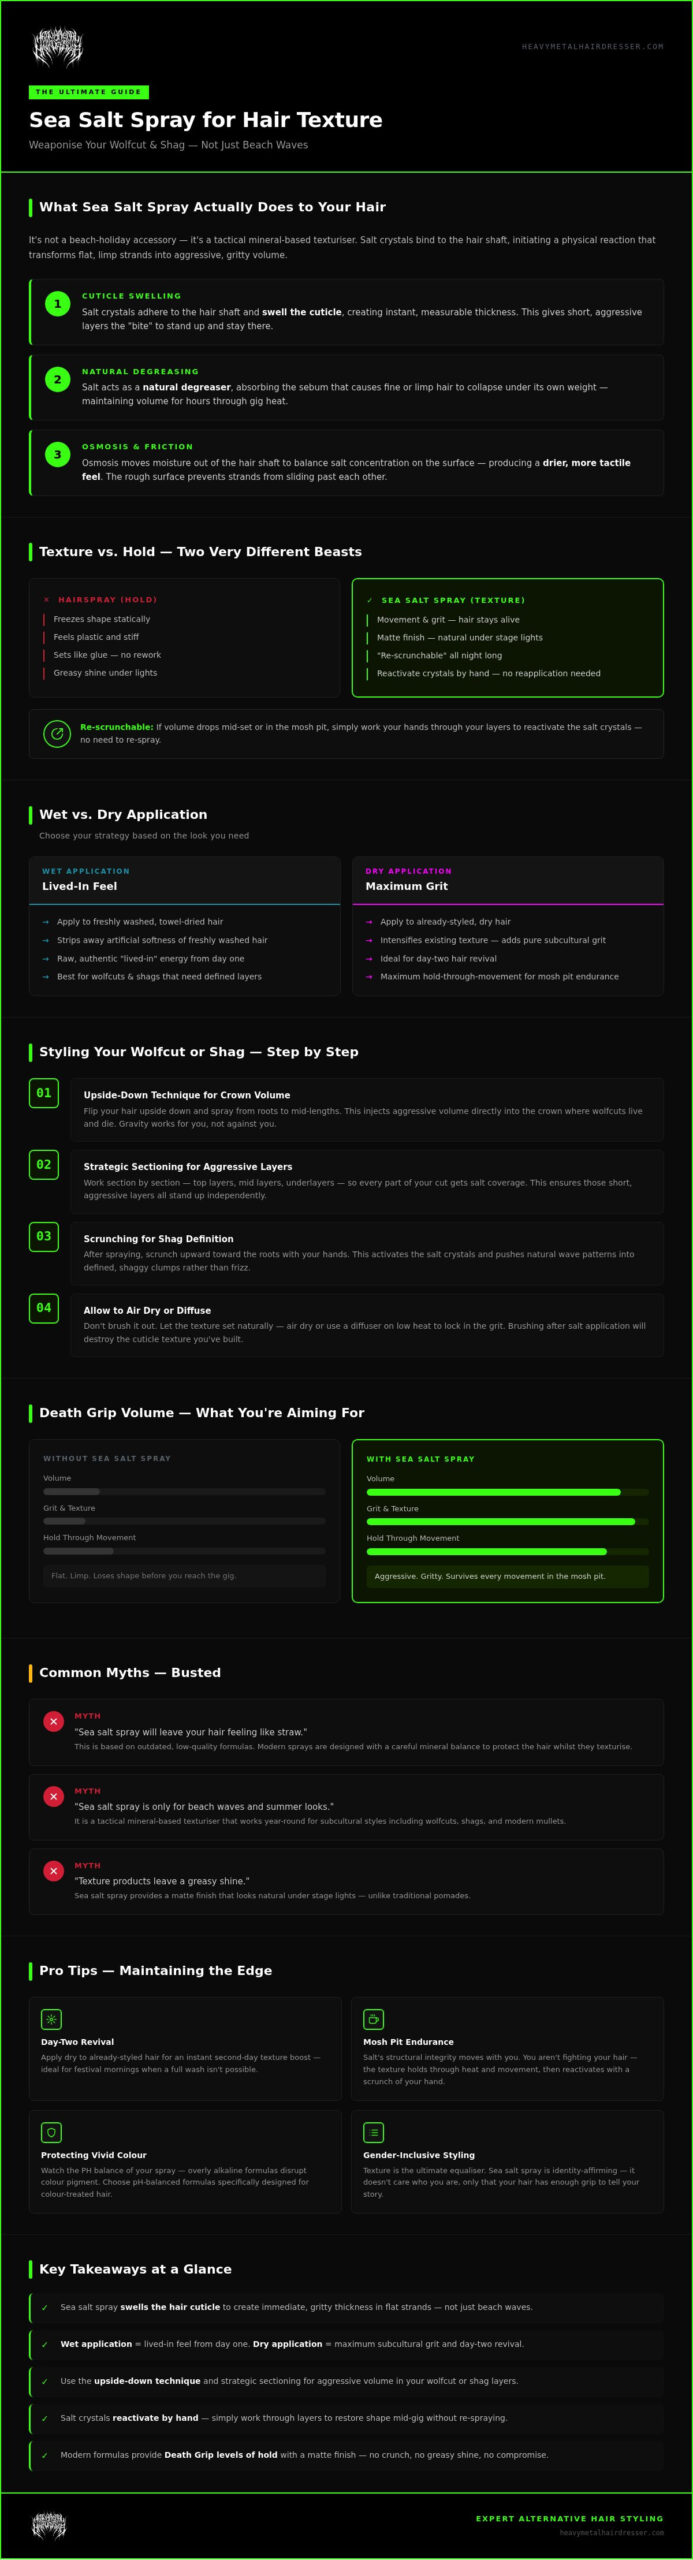
Stop treating your sea salt spray like a holiday accessory. Most tutorials promise sun-kissed waves, but we know you aren’t looking for a trip to the coast; you’re looking for a riot. If you’ve been struggling with flat, limp hair that loses its shape before you’ve even reached the gig, you need a different approach. Using sea salt spray for hair texture isn’t about looking soft; it’s about weaponising your wolfcut with aggressive, gritty volume that actually stays put.

It’s frustrating when your alternative style feels more polite than punk because your product leaves your strands feeling like a crunchy, dry mess. We agree that generic beauty industry advice just doesn’t cut it for subcultural styles like shags and wolfcuts. This guide promises to transform your routine by teaching you the expert art of injecting raw, long-lasting grit into your hair. We will explore the specific techniques needed to master wet versus dry application and how to achieve Death Grip levels of volume that hold through every movement.

Key Takeaways

  • Forget beach waves; learn how sea salt spray for hair texture works by swelling the hair cuticle to create immediate, gritty thickness in flat strands.
  • Master the difference between wet and dry application to choose between a lived-in feel or maximum subcultural grit.
  • Use the “upside down” technique and strategic sectioning to inject aggressive volume into the crown and layers of your wolfcut or shag.
  • Discover how to revive your style for day two and keep your texture sharp through the intensity of a festival mosh pit.
  • Level up your styling game with “Death Grip” levels of hold that celebrate your individuality without the dreaded crunch of traditional products.

Beyond the Beach: Why Sea Salt Spray is the Ultimate Alt-Hair Weapon

Most brands want you to believe that sea salt spray belongs on a breezy coastline during a summer holiday. They’re wrong. For those of us in the alternative scene, sea salt spray for hair texture is a tactical tool used to weaponise a wolfcut or a shag. It’s a mineral-based texturiser designed to mimic the rough, gritty feel of ocean air without the annoying sand. The unique mineral composition of sea salt allows it to bind to the hair, creating a tactile roughness that makes aggressive layers stand out rather than falling flat.

This isn’t just about ‘beach waves’. That’s a limited marketing term that ignores the raw potential of subcultural styling. Using sea salt spray for hair texture allows you to bypass the generic advice and focus on what matters: grit. Whether you’re a metalhead, a punk, or someone who simply refuses to conform, texture is the ultimate equaliser. It’s gender-inclusive and identity-affirming; it doesn’t care who you are, only that your hair has enough ‘grip’ to tell a story.

The Anti-Polished Aesthetic

The mainstream is currently obsessed with the ‘clean girl’ look, featuring slicked-back buns and high-shine finishes. We aren’t. Our aesthetic is deliberately rebellious and unapologetically gritty. For us, ‘messy’ isn’t an accident; it’s an expert-led style choice that signals you belong in the pit, not a corporate office. Sea salt spray is essential for creating that ‘lived-in’ vibe from day one. It strips away the artificial softness of freshly washed hair, replacing it with a raw energy that feels authentic to the underground.

Texture vs. Hold: Understanding the Difference

It’s vital to understand that texture and hold are different beasts. Hairspray is designed to freeze a shape in time; it’s static and often feels plastic. Sea salt spray is about movement and grit. It provides a matte finish that looks natural under stage lights, helping you achieve those Death Grip levels of texture without the greasy shine of traditional pomades.

Because it doesn’t set like a glue, your hair remains ‘re-scrunchable’ throughout the night. If your volume starts to drop mid-set or whilst you’re in the mosh pit, you can simply work your hands through your layers to reactivate the salt crystals. This flexibility is what gives alternative styles their longevity. You aren’t fighting against your hair; you’re giving it the structural integrity to move with you.

The Science of Grit: How Salt Transforms Flat Strands

Don’t just spray and hope for the best. To master your style, you need to understand why salt works. When you apply sea salt spray for hair texture, you’re initiating a physical reaction on every individual strand. Salt crystals adhere to the hair shaft and swell the cuticle, creating instant thickness. This structural change is essential for anyone sporting a modern mullet haircut, as it provides the necessary “bite” for those short, aggressive layers to stand up and stay there.

Sea salt also acts as a natural degreaser. It absorbs the natural oils that usually cause fine or limp hair to collapse under its own weight. By soaking up sebum, the salt allows your hair to maintain its volume for hours. This is particularly useful amongst alternative subcultures where hair needs to survive the heat of a gig without turning into a greasy mess. It’s about creating a foundation of friction that keeps your hair from lying flat.

Cuticle Swelling and Volume

At a microscopic level, salt crystals create a rough surface on the hair. This friction prevents strands from sliding past each other, which is how you achieve that coveted shaggy look. Osmosis in hair care is the process where moisture moves out of the hair shaft to balance the salt concentration on the surface, resulting in a drier, more tactile feel. Whilst this sounds intense, it’s the secret to that “rough” texture that defines the alt-aesthetic.

Many fear that salt will leave their hair feeling like straw. This is a common myth based on outdated, low-quality formulas. Modern sprays are designed with a careful mineral balance to protect the hair whilst they texturise. If you want to dive deeper into how products interact with different hair types, our Hair Courses offer expert insight into the technical side of alternative styling.

Protecting Your Vivid Colour

Maintaining vivid hair colour requires a specific strategy when using salt products. Salt can be abrasive, but the real danger to your pigment is a disrupted PH balance. Sprays that are too alkaline will blow the cuticle wide open, causing your neon pinks or deep teals to bleed out in the shower. Always look for PH-balanced formulations that keep the cuticle tight whilst still providing that gritty finish.

To avoid long-term pigment fade, rinse your hair thoroughly after a day of heavy styling. Letting salt sit on your strands for days can lead to dehydration, which makes the hair porous and less able to hold onto dye. A quick rinse with cool water is usually enough to remove the crystals without stripping your identity-affirming shades. This keeps your colour punchy and your texture sharp for your next session.

Wet vs. Dry Application: Mastering Your Texture Strategy

Don’t limit yourself to one method. The way you apply sea salt spray for hair texture dictates whether you look effortlessly cool or ready for a riot. It’s about control. Applying to damp hair builds a foundation of volume from within the strand, whilst dry application creates a surface-level grit that looks unapologetically raw. Understanding when to use each technique is what separates a professional finish from a flat mess.

For those seeking maximum root lift, the “blow-dry hack” is your secret weapon. Mist the spray directly onto damp roots before drying. The heat expands the salt crystals, propping up the hair at the base for a structural height that won’t collapse. You can also “cocktail” your spray by layering it with other products. If you need more hold, apply salt spray first for grit, then finish with a small amount of Death Grip to lock the shape. Dosage matters too: start with 3 to 5 pumps for fine hair, whilst thicker manes can handle 8 to 10 sprays without feeling weighed down.

The Damp Start: Subtle, Natural Flow

Applying to damp hair is the best route for a softer, wavy shag. It allows the product to distribute evenly as the hair dries, preventing any “patchy” texture. Follow these steps for a natural alternative aesthetic:

  • Mist towel-dried hair from mid-lengths to ends.
  • Scrunch the hair upwards towards the scalp to encourage natural movement.
  • Let it air-dry to achieve that “woke up like this” vibe.

This method is particularly effective for those with naturally curly or wavy hair types. It defines the curl pattern whilst adding enough “bite” to keep the layers from looking too polished. It’s the perfect foundation for a lived-in look that feels authentic.

The Dry Finish: Aggressive, Gritty Chaos

When you need instant impact, go for a dry finish. This technique is the absolute secret to a wolf hair cut with maximum “bite” and separation. Spraying onto bone-dry hair creates immediate friction, allowing you to piece out specific sections and create that iconic, jagged silhouette. It’s less about flow and more about aggressive, textured chaos.

The “scrunch and blast” technique involves squeezing the hair with your palm whilst applying a quick burst of heat from a hair dryer to instantly freeze the gritty texture in place. This creates a matte, high-impact finish that stays sharp through a full day of movement. It’s the go-to method for anyone who wants their alternative cut to look as rebellious as it feels. By focusing on the ends and the crown, you can create a silhouette that defies gravity and celebrates your individuality.

Sea Salt Spray: Alt-Styling Guide for Gritty Volume

How to Style Your Wolfcut or Shag with Sea Salt Spray

Forget the round brush. Polished finishes are for people who want to look like they’ve never been to a gig. To get the best out of sea salt spray for hair texture, you need to use your hands; brushes only smooth out the grit you’ve worked so hard to create. Start by sectioning your hair into manageable chunks. Focus your energy on the crown and those face-framing layers that give your cut its aggressive shape.

The “Upside Down” technique is your best friend for injecting volume into the under-layers. Tip your head forward, mist the spray through the lengths, and scrunch upwards towards the scalp. This creates a foundation of lift that supports the top layers. Once you’re upright, manipulate individual “flicks” in your wolfcut to sharpen the silhouette. Pinch the ends of the disconnected layers with a small amount of product to create a jagged, intentional look that refuses to blend in.

Defining the Wolfcut Layers

Wolfcuts rely on the contrast between the short, choppy top and the longer “tail” at the back. If that tail looks limp, the whole aesthetic falls apart. Use sea salt spray for hair texture to bridge the gap between these disconnected sections. By adding grit to the longer lengths, you ensure the hair has enough “bite” to hold its shape without looking stringy or greasy. Focus on the mid-lengths to keep the movement fluid but controlled; this prevents the hair from hanging flat against your neck.

The Shag Resurrection: 70s Grit, 2026 Style

Our shag hairdressers know that the secret to a modern shag is the “halo” of texture around the head. You want volume that radiates outwards. To avoid “flat-head” syndrome, concentrate your product on the mid-lengths rather than just the very top. This creates a balanced silhouette that feels heavy in the right places whilst maintaining that rebellious, non-conformist edge.

If you have a heavy fringe or curtain bangs, salt spray is a game-changer. A light mist provides a non-greasy finish that keeps hair from clumping together. It allows your fringe to move naturally whilst maintaining enough structure to stay out of your eyes during a set. If you’re ready to commit to a new look, book your next Wolfcut with our expert team to get the perfect foundation for your style.

Maintaining the Edge: Pro Tips for Long-Lasting Texture

Your style shouldn’t die just because the gig ended. Mastering the use of sea salt spray for hair texture means knowing how to keep that grit alive through the aftermath. Day two hair is often where the best alternative shapes are born. If your layers feel flat after a night of sleep, don’t reach for the shampoo. Instead, apply a light mist of salt spray and hit it with a blast of cool air from your dryer. This reactivates the minerals, lifting the hair away from the scalp without the need for a full restyle.

Embracing the “Death Grip” mindset means accepting that your hair will have a tactile, slightly tangled quality. This isn’t a mistake; it’s the foundation of the identity. The friction created by the salt is what allows a wolfcut to maintain its height and separation through movement. If you’re constantly trying to brush it smooth, you’re fighting the product. Let the texture build. The more “lived-in” it feels, the more authentic the silhouette becomes.

Eventually, every style needs a reset. You’ll know it’s time for a deep cleanse when your hair starts to feel “tacky” or heavy rather than gritty. Mineral buildup can eventually dull your colour if left too long. Use a clarifying treatment once a week to strip back the salt and product residue; this gives your strands a fresh start for your next round of styling.

Festival and Gig Readiness

When you’re three days deep into a festival, salt spray is your best friend. It’s a superior alternative to dry shampoo for alt-styles because it adds volume whilst absorbing sweat and oil. We’ve seen this in action with stage hair for musicians, where texture has to survive the intense heat of stage lights and mosh pits. Organise a small “touch-up kit” with a travel-sized spray to keep your fringe from clumping during long days in the pit.

The Heavy Metal Hairdresser Philosophy

We believe hair is the ultimate form of self-expression. It’s why we champion gender-neutral styling and encourage our community to experiment with unconventional shapes. Whether you’re rocking a shag or a jagged mullet, your hair should be a reflection of your subcultural pride. We provide the technical expertise, but the attitude is all yours. Ready to take your texture to the next level? Book in for a textured cut and let’s weaponise your style.

Weaponise Your Style

Mastering sea salt spray for hair texture is about more than just volume; it’s about reclaiming your identity from the polished mainstream. You’ve learned that grit is a tactical choice. By understanding the science of cuticle swelling and the difference between wet and dry application, you can now inject aggressive, long-lasting energy into every layer of your wolfcut or shag. Don’t fear the tangles or the matte finish. Those are the marks of a style that refuses to conform.

We bring our backstage festival styling expertise directly to the chair, providing a gender-inclusive safe space for every alternative identity. As alternative hair specialists, we know that your hair is your loudest statement. It’s time to ditch the generic advice and embrace the raw, underground aesthetic you deserve. Your texture should be as loud as your music.

Book Your Textured Wolfcut or Shag at Heavy Metal Hairdresser and let us help you find your edge. Stay loud, stay gritty, and never settle for flat hair again.

Frequently Asked Questions

Does sea salt spray work on straight hair for texture?

Yes, sea salt spray is one of the most effective tools for adding grit to naturally straight hair. It works by creating friction between individual strands, which prevents them from sliding past each other and lying flat. For straight hair, applying to damp roots before blow-drying provides the most structural lift. It transforms “slippery” hair into a workable, gritty canvas that is perfect for maintaining the jagged layers of a mullet or shag.

Will sea salt spray dry out my hair or cause damage?

Salt is naturally dehydrating, but professional-grade formulas are balanced with conditioning agents to mitigate this effect. It won’t cause long-term damage if you use it correctly and maintain a solid hydration routine. If your hair is already chemically treated or naturally brittle, look for sprays that contain added oils. Using a hydrating mask once a week ensures your strands stay supple whilst you enjoy that rebellious, matte texture.

Can I use sea salt spray every day on my wolfcut?

You can use it daily, but we recommend “refreshing” your style rather than layering heavy amounts of new product every morning. Over-application can lead to mineral buildup, which eventually makes the hair feel heavy and tacky rather than gritty. A light mist on day two is usually enough to reactivate the salt crystals already in your hair. If you do style daily, ensure you use a clarifying shampoo once a week to reset your strands.

Is sea salt spray safe for bleached or vivid coloured hair?

It is safe, but you must be mindful of the pH balance of your chosen product. Some sea salt spray for hair texture options can be slightly alkaline, which might cause vivid dyes to fade faster by opening the hair cuticle. Always opt for professional, pH-balanced sprays to protect your neon or pastel shades. Rinsing with cool water after a long day of styling helps keep the cuticle closed and your identity-affirming colour punchy.

How do I stop sea salt spray from making my hair feel crunchy?

Crunchiness is usually a sign of over-application or a formula with too much alcohol. To avoid this, start with just a few pumps and build the texture gradually. You can also “cocktail” the spray by applying a tiny amount of hair oil to your ends first. Once the hair is dry, give it a final scrunch with your hands to break any “cast” formed by the salt. This leaves the hair feeling gritty and textured but still touchable.

What is the difference between sea salt spray and sugar spray?

The primary difference lies in the finish and the level of “bite” they provide. Sea salt spray creates a matte, gritty finish with significant volume, making it the go-to for aggressive alternative styles. Sugar spray offers a shinier finish and a softer, more “grippy” hold that feels less drying. While sugar is great for polished waves, salt is the undisputed king for anyone seeking that raw, lived-in energy essential for shags and wolfcuts.

Can I use sea salt spray with a hair dryer or diffuser?

Using heat is actually the secret to achieving maximum volume. When you apply sea salt spray for hair texture to damp hair and then use a diffuser, the heat causes the salt crystals to expand. This process props up the hair at the root, creating a structural height that air-drying alone cannot match. For an alternative, messy look, use a diffuser on a low heat setting to encourage jagged movement without creating unwanted frizz.

How do I wash out sea salt spray properly?

To fully remove mineral deposits, you should use a clarifying shampoo once a week. Regular shampoos can sometimes leave behind a residue, especially if you have been layering product for a festival or a long weekend. Focus the shampoo on your scalp and mid-lengths to break down the salt and sebum. Always follow up with a deep conditioner or a hydrating treatment to restore the moisture balance that the salt provides during the styling process.

Posted on

How to Add Texture to Fine Hair: Gritty Volume Guide

How to Add Texture to Fine Hair: Gritty Volume Guide

Fine hair isn’t a curse that condemns you to a lifetime of limp, child-like strands; it is a blank slate for absolute chaos. Most stylists will tell you to play it safe with volumising foams that leave you looking like a polished mannequin, but we know that doesn’t hold up when the pit opens at Bloodstock. You are likely tired of your style collapsing before the first set is even over. Learning how to add texture to fine hair isn’t about chasing shine or soft bounce. It’s about building a foundation of grit that refuses to quit.

We’re here to help you ditch the greasy, heavy products and embrace a high-impact, rebellious aesthetic. This guide reveals how to transform flat hair into a textured masterpiece using alternative styling techniques and products with a serious bite. We will dive into why the wolfcut is the ultimate weapon for fine-haired legends and how to master the Death Grip aesthetic for a look that stays aggressive all night. From gritty powders to layered cutting secrets, you’re about to get the blueprint for hair that finally matches your energy.

Key Takeaways

  • Learn how aggressive layers like the wolfcut remove weight to create natural lift and movement in flat hair.
  • Discover exactly how to add texture to fine hair using gritty, lightweight products that won’t leave your style feeling greasy or weighed down.
  • Master styling techniques like the ‘Rough Dry’ to ensure your hair maintains its chaotic, high-impact shape throughout the day.
  • Find out why ‘Death Grip’ levels of hold and vivid hair colours are essential for creating the perception of thicker, more aggressive texture.
  • Stop following traditional salon rules and start using a foundation of grit to build a look that reflects your independent spirit.

Understanding Fine Hair and the Quest for Gritty Texture

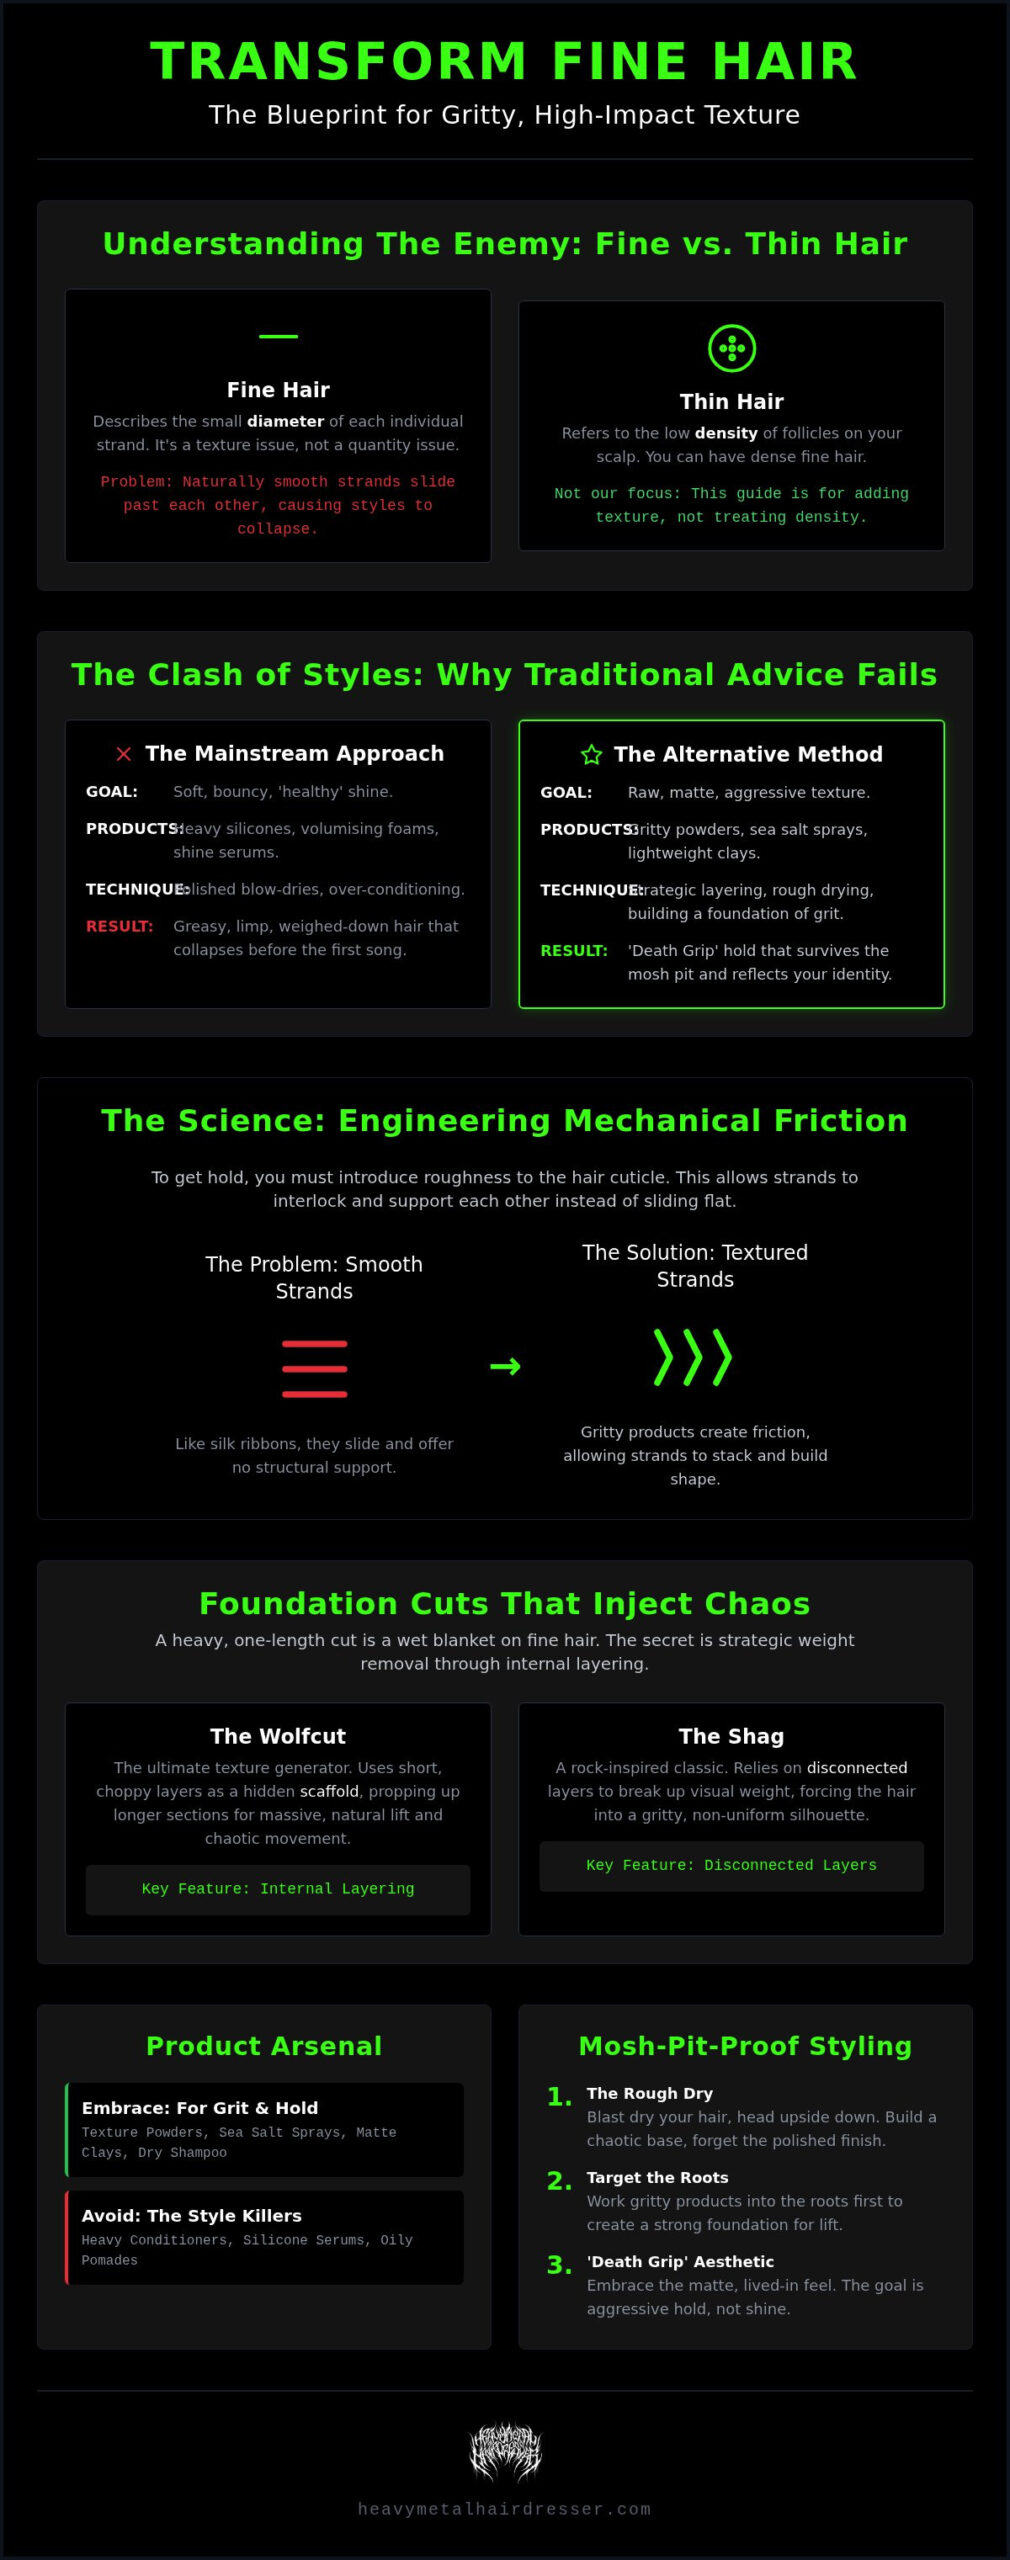
Fine hair is a diameter problem. It is a common mistake to confuse fine hair with thin hair, but they aren’t the same thing. Thin hair refers to the density of follicles on your scalp, whilst fine hair describes the actual thickness of each individual strand. You can have a massive amount of hair and it still feels limp because the strands themselves are delicate and lack structural integrity. This is why your hair often looks ‘child-like’ or loses its shape the moment you step out of the house. It’s frustrating to spend an hour styling only to see it collapse into a flat, uninspired mess before you’ve even reached the venue.

Traditional volumising products are usually designed for a mainstream, polished look. They focus on ‘plumping’ the hair with slippery polymers that create a soft, bouncy finish. This might work for a generic blow-dry, but it’s a disaster for alternative styles. When you’re trying to figure out how to add texture to fine hair for a shag or a wolfcut, you don’t want bounce; you want bite. You need a rebellious solution that replaces that unwanted silkiness with raw, unyielding friction.

The Science of Friction and Hold

Fine hair strands are naturally smooth. They slide past each other like silk ribbons, which is exactly why your style refuses to hold its height. To fix this, you have to introduce roughness to the hair cuticle. By creating microscopic levels of unevenness on the surface, the strands can finally stack and support one another instead of sliding into a heap. This mechanical interaction is what allows you to build a shape that actually stays put. Hair grit is the essential mechanical friction required to stop layers from sliding flat and maintain an aggressive, alternative shape.

Why Mainstream Advice Fails the Alt Scene

Most salon advice obsesses over ‘healthy shine’ and ‘silky results’. For those of us in the underground scene, shine is often the enemy of style. Over-conditioning is a frequent trap for fine-haired legends; it coats the strands in heavy silicones that weigh everything down and kill any chance of volume. We don’t want our hair to feel like a shampoo commercial. We want it to feel authentic, raw, and lived-in. Embracing matte finishes and gritty textures is the only way to achieve a ‘Death Grip’ level of hold. When you ditch the polish and start using products that provide real texture, you gain the confidence to wear bold, layered cuts that reflect your true identity.

The Foundation: Cuts That Inject Chaos into Thin Strands

Mainstream salons love a safe, blunt bob. They will tell you that layers are the enemy of fine hair and that keeping it all one length is the only way to avoid a ‘stringy’ look. It is a myth designed to keep you looking polished and predictable. In reality, a heavy, one-length cut is the fastest way to make fine hair look like a wet blanket. When you are figuring out how to add texture to fine hair, the secret lies in strategic weight removal. By carving out bulk from the internal sections, you create the space needed for the remaining hair to spring upward. It is about engineering lift, not just cutting length.

Removing weight isn’t about thinning the hair out until it’s transparent. It’s about a technical process called internal layering. This involves cutting shorter, hidden sections beneath the top canopy of your hair. These internal layers provide the structural integrity that fine hair lacks on its own. They literally push the outer layers out and up, creating the illusion of a much denser, more aggressive mane. It is a bold approach that prioritises movement and attitude over traditional perfection.

The Power of the Shag and the Wolfcut

The wolf hair cut is the ultimate texture generator for fine strands. It relies on a series of short, choppy layers that act as a scaffold. These shorter pieces sit underneath the longer ones, propping them up and preventing that dreaded limp appearance. Similarly, the shag haircut uses disconnected layers to create a gritty, rock-inspired silhouette. This disconnection is vital; it breaks up the visual weight and forces the hair to move in a chaotic, non-uniform way. If you want a style that survives the energy of a live show, you need a foundation that embraces this controlled mess.

Alternative Fringe Techniques

A fringe is a high-impact way to manipulate the perception of density. Instead of a wispy, safe bang, we opt for micro-fringes or heavy, shattered edges. Point-cutting is the weapon of choice here. By cutting into the ends at an aggressive angle, we remove the ‘ledge’ and create a jagged finish that looks thicker because of the varied lengths. A textured fringe draws the eye to the face and adds immediate visual weight where it matters most. It turns a flat style into a rebellious statement. If you’re ready to ditch the boring advice, explore our alternative styling world and find a cut that actually fits your identity.

Product Warfare: Choosing Tools for Maximum Grit

Fine hair is a lightweight fighter. It cannot handle the heavy hitters that thicker hair thrives on. If you load up on dense creams or buttery waxes, your style will surrender before you even leave the house. The golden rule for how to add texture to fine hair is simple: lightweight formulas with high-impact results. You want products that offer structural support without adding physical mass. It is about creating chemical friction, not heavy coatings that lead to a flat, greasy collapse.

Salt sprays are the gold standard for a reason. They provide that jagged, ‘crunchy’ grit that defines the alternative aesthetic. Whilst sugar sprays are an option, they often lean too far into the ‘soft’ category. Salt opens the cuticle slightly, giving you the raw edge needed for an aggressive wolfcut. Texture powders are your tactical weapon for targeted lift. They create ‘dirty’ grit at the roots, allowing you to sculpt height that refuses to budge. Do not wait for day three to use dry shampoo. Apply it to clean hair as a volume builder. It adds a matte, airy quality that makes the hair look twice as thick from the start. To find these types of high-performance formulas from a curated selection of modern beauty brands, check out BÆR.

Start your routine with a lightweight mousse whilst the hair is damp. This creates a ‘skeleton’ for the style to hang on once it is dry. You must avoid any product containing heavy oils or silicones. These ingredients are the primary causes of ‘slumping’ in fine strands. When applying your salt spray, mist it from a distance. Do not drench the hair or you will end up with a matted mess that is impossible to manage. You want a light, even coat to prep the surface for the heat and movement to come.

Finishing Tools for the Alternative Edge

Matte clays are the only choice for an authentic underground look. Greasy pomades will turn fine hair into a slicked-down disaster. A matte finish absorbs light, making the hair appear more dense and textured than it actually is. Texture sprays are the perfect alternative for people who hate the stiff, plastic feel of traditional hairspray. They offer a flexible hold that allows for movement whilst maintaining the ‘Death Grip’ you need to keep your shape. Layering is the final secret. A bit of powder at the roots, a mist of salt spray during the dry, and a touch of matte clay to finish. This multi-layered approach ensures your texture survives the energy of the mosh pit.

How to Add Texture to Fine Hair: Gritty Volume Guide

Styling Techniques for the Mosh Pit and Beyond

Once you have the right products, the real magic happens in the application. Traditional styling often relies on round brushes and precise sectioning. This is too polished for our scene. If you want to know how to add texture to fine hair that survives a headlining set, you need to get your hands dirty. Forget the smoothing nozzle. Your fingers are the best tools you own for creating natural, chaotic movement that doesn’t look like you’ve tried too hard. It is about working with the hair, not forcing it into a clinical shape.

Diffusing is often associated with curls, but it is a secret weapon for fine, straight hair too. By using a diffuser to ‘scrunch’ the hair whilst drying, you force the strands into irregular patterns. This creates a foundation of ripples and waves that adds massive visual volume. If you need even more height, try internal back-combing. Instead of teasing the surface, create small ‘knots’ at the root underneath the top layer. This provides invisible lift that keeps your style from looking flat without the obvious frizz of traditional teasing. It is a structural fix that stays hidden whilst doing all the heavy lifting.

The Art of the Scruffy Blow-Dry

A scruffy blow-dry is the antithesis of the salon blowout. Follow this three-step process for maximum grit:

  • Step 1: Apply your chosen prep product, like a lightweight mousse or salt spray, to damp hair.
  • Step 2: Flip your head upside down. This uses gravity to pull the roots away from the scalp.
  • Step 3: Blast with high heat but low airflow. High air will just blow the fine strands flat; low air allows the texture to set.

Avoid brushes entirely. Brushing smooths the cuticle, which is the opposite of what we want. Use your hands to rake and scrunch as you dry. Finally, use the ‘cool shot’ button. Cold air locks the hair cuticle in its new, chaotic position, ensuring the volume doesn’t immediately deflate. Investing in a dryer that offers precise speed and temperature controls makes dialling in this kind of rough texture much simpler; find out more about advanced styling appliances built for tailored control. This method builds a raw foundation that is ready for any alternative style.

Survival Styling: Keeping Texture at Festivals

Festivals are the ultimate test for fine hair. By day three, the combination of sweat and dry shampoo can make things tricky. To refresh your look without a shower, mist your hair with a tiny bit of salt spray and scrunch it back to life. If you know you won’t have time to style in the morning, sleep in braids. Use the ‘pancake’ technique by gently pulling at the edges of each braid loop to make it look massive and wide. When you undo them, you will have an aggressive, crimped texture that lasts all day. If a beanie has crushed your volume, flip your head and shake out the roots with some texture powder. For more expert tips on maintaining your edge, book a session with our alternative specialists.

Maintaining Your Alternative Edge and Professional Support

Fine hair maintenance is a constant battle against gravity and transparency. Whilst we have covered the specific cuts and gritty products needed for impact, professional upkeep is the final piece of the puzzle. Regular ‘dusting’ is vital. This isn’t a traditional trim that removes length; it is a precise removal of split ends that prevents your hair from looking wispy at the perimeter. Keeping the ends crisp and strong ensures that your internal layers have a solid foundation to sit on. It keeps the hair looking dense and intentional rather than neglected.

Communication is your best tool when you are in the stylist’s chair. Most mainstream hairdressers hear the word ‘volume’ and immediately think of soft, bouncy blow-dries. That is not our world. When discussing how to add texture to fine hair, tell your stylist you want ‘grit’ and ‘friction’. Use descriptors like raw, jagged, or aggressive. You want layers that stack on top of each other to create mechanical lift. A stylist who understands alternative subcultures will know exactly how to carve those shapes without trying to ‘beautify’ or smooth out your rebellious edge.

The Colour Illusion

Colour is a structural weapon in your quest for maximum texture. Opting for vivid hair colour does more than just signal your identity; it creates the perception of depth. Multi-tonal shades and ‘root shadows’ are particularly effective for fine-haired legends. By keeping the base of the hair slightly darker, you create an illusion of density at the scalp. There is also a physical benefit to lightener known as the ‘bleach swell’. The chemical process slightly expands the hair cuticle, making individual strands feel thicker and giving them a rougher surface that holds onto styling products with far more tenacity.

Finding Your Style Master

You need a specialist in alternative hair who won’t flinch when you ask for a disconnected mullet or a shattered shag. Finding a gender-neutral, inclusive salon is about more than just the aesthetic; it is about finding a safe space for authentic self-expression. Ask your hairdresser how they handle textured layering and whether they prioritise the ‘dry cut’ for fine hair. A dry cut allows the stylist to see exactly how your fine strands react to weight removal in real-time. This level of professional support ensures your style remains a high-impact masterpiece that reflects your independent spirit every single day.

Master the Chaos and Claim Your Texture

Fine hair is no longer a limitation once you stop fighting its nature and start manipulating its structure. You have ditched the slippery, mainstream products and embraced aggressive, internal layering. Now, you know exactly how to add texture to fine hair for a look that survives the loudest mosh pits. It is about building a foundation of grit that holds up from the first set at Bloodstock to the final encore. Your hair is a canvas for rebellion; it’s time to treat it like one.

Your style should be as loud as your music. Don’t settle for limp, child-like strands when you can have high-impact volume that reflects your true identity. As specialists in gender-neutral alternative cuts and expert vivid colour work, our team understands the nuances of subcultural style. We have styled bands for Download and Bloodstock; now it’s your turn. Book your transformation with the UK’s alternative hair experts and step into a space where being different is celebrated. Your most rebellious hair days are just beginning.

Frequently Asked Questions

Can I really have a wolfcut if my hair is very fine?

Yes. Wolfcuts are actually ideal for fine hair because the aggressive layering removes weight and creates structural lift. Instead of a flat curtain, you get a stacked, architectural shape. The key is internal layering that props up the top sections. This technique transforms limp strands into a high-impact silhouette that looks much denser than it actually is. It is the ultimate solution for anyone craving an alternative edge.

What is the best product to add grit to fine hair without it feeling greasy?

Texture powders and dry shampoos are the ultimate tools for non-greasy grit. These products absorb excess oils whilst providing a matte, ‘dirty’ friction at the roots. Unlike heavy waxes or pomades, powders are virtually weightless. They allow you to sculpt height that stays put without that dreaded clumping. For a maximum hold that survives the energy of a live show, we recommend a layered ‘Death Grip’ approach.

How often should I wash fine hair if I want to maintain texture?

You should aim to wash fine hair every two to three days to maintain the best gritty texture. Washing every day strips the hair of natural oils and any product build-up that actually helps hold a style. Use a dry shampoo on non-wash days to manage any unwanted shine. This keeps the strands feeling slightly rougher, which is exactly what you need for an authentic, lived-in alternative aesthetic.

Does sea salt spray damage fine hair over time?

Sea salt spray can be drying if used excessively, but it isn’t inherently damaging when applied correctly. The salt works by opening the cuticle to create friction. To protect your strands, use a lightweight, silicone-free conditioner on wash days. This balances the crunch of the spray whilst keeping the hair healthy. It is a vital tool for anyone learning how to add texture to fine hair without resorting to heavy creams.

How do I stop my fine hair from going flat after an hour?

The secret is layering your products and avoiding moisture-heavy finishes. Start with a lightweight mousse on damp hair to build a skeleton, then finish with a matte texture spray. If you rely on a single product, the weight will eventually cause the style to slump. Ensure you use a ‘cool shot’ on your hairdryer to lock the cuticle in place. This creates a structural bond that effectively resists gravity.

Is back-combing bad for fine hair?

Traditional back-combing can be harsh, but internal teasing is a safer way to get lift. Instead of roughly scraping the surface, create small, hidden knots at the base of the hair. This provides a structural cushion that supports the rest of the style. Always use a proper wide-tooth comb to gently brush it out before washing. This technique gives you that rebellious height without causing long-term breakage or unwanted frizz.

How can I add texture to fine hair without using heat?

Braiding damp hair overnight is the most effective heat-free method for adding texture. Use the ‘pancake’ technique by pulling the loops of the braids apart to create wide, irregular crimps. When you undo them in the morning, mist with a salt spray for an instant, gritty finish. This method creates a chaotic, non-uniform wave pattern that looks far more authentic than the results from a traditional curling iron or wand.

What’s the difference between volume and texture for thin hair?

Volume is about the physical height and space your hair occupies, whereas texture is about the surface feel and definition of the strands. You can have volume without texture, which often looks like a soft, polished bubble. For alternative styles, you want both. Texture provides the bite and separation that makes a wolfcut look aggressive. Understanding how to add texture to fine hair ensures your volume doesn’t look like a generic blowout.