
Posted on

Styling a Mullet as It Grows: Keep the Shape, Lose the Awkward Stage

Styling a Mullet as It Grows: Keep the Shape, Lose the Awkward Stage

What if the awkward stage isn’t a bad haircut, but a shape that hasn’t caught up with your growth? Styling a mullet as it grows means working with the changing layers, not fighting them. One month, the fringe behaves; the next, the sides kick out and the back feels like it belongs to another cut. That doesn’t mean your mullet’s lost its edge.

Different sections can sit and behave differently as they gain length, and a few practical tweaks can help the whole look feel intentional. Adjust the direction and finish to suit your current layers, and pay attention to how your hair settles as it dries. The aim isn’t to force every mullet into the same shape. It’s to keep yours feeling like you.

Here’s what to adjust as your layers shift, how to tell when styling is enough, and when a reshaping trim could bring the cut back into balance. You don’t have to surrender to the in-between stage. Give your mullet room to evolve while keeping the attitude intact.

Key Takeaways

  • Learn how dampness, sectioning and styling direction can shift your mullet’s shape at different lengths.
  • Build a simple at-home routine that you can adapt to your hair’s texture and changing layers.
  • See where styling a mullet as it grows can help, and where it can’t correct an imbalance on its own.
  • Know what a stylist can assess during a shape reset, from weight and texture to your preferred silhouette.
  • Use reference photos to show both your current cut and the direction you want it to take.

Why styling a mullet as it grows means working with the changing shape

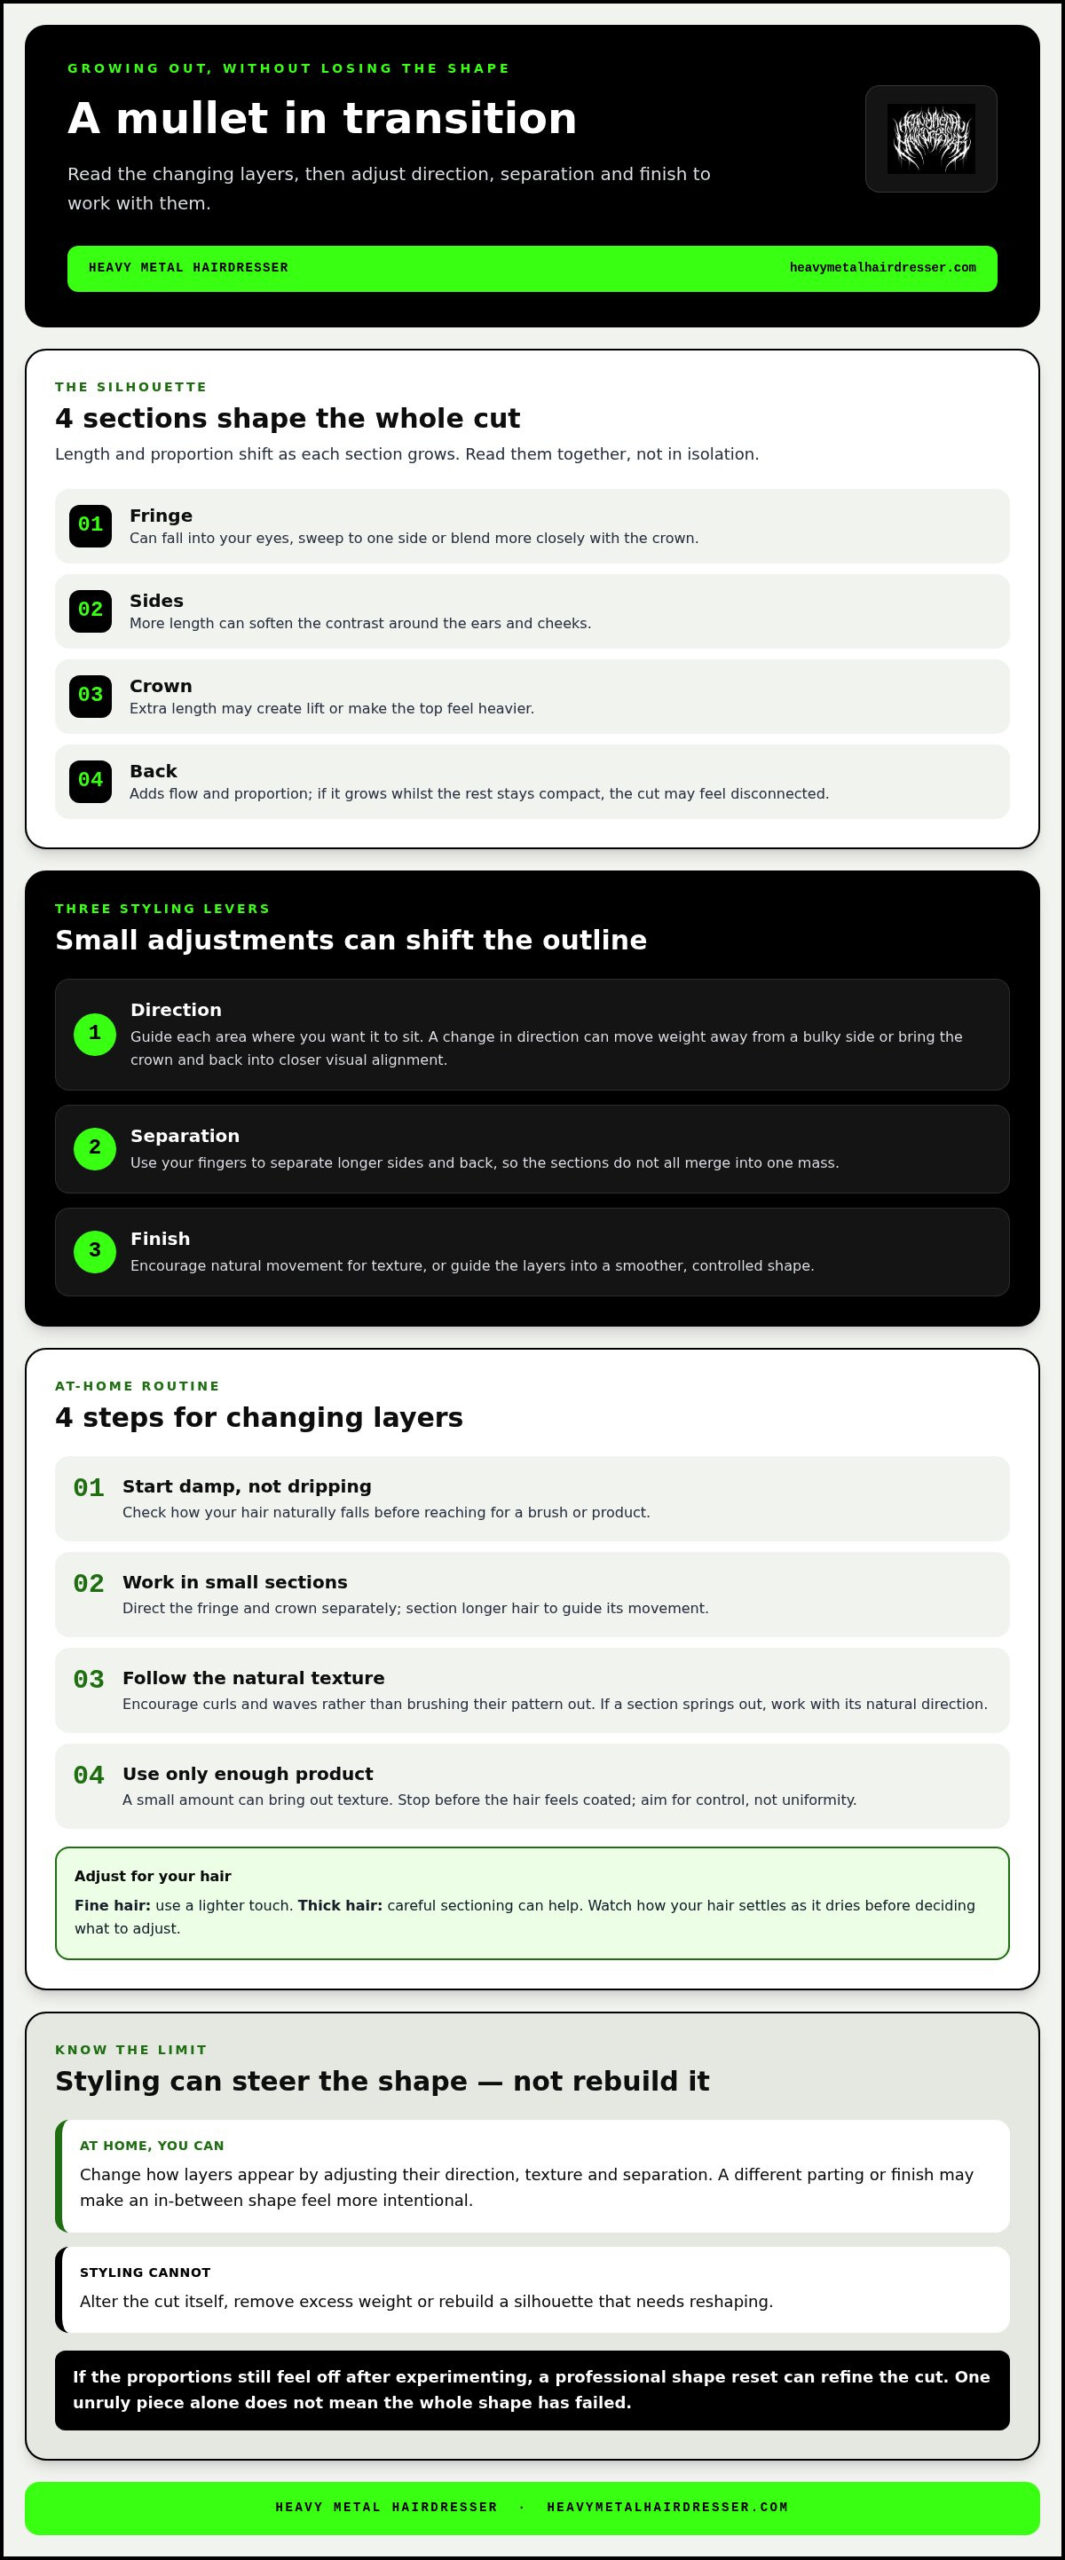
A mullet isn’t one length. Its identity comes from the relationship between the fringe, sides, crown and back. As each section gains length, that balance shifts. The outline that felt sharp after a cut can become softer, heavier or more tousled without the haircut having gone wrong.

A growing mullet is a cut in transition: its fringe, sides, crown and back change in length and proportion, altering the silhouette and movement. The classic contrast between shorter sections and a longer back has plenty of variations, as the history of the mullet haircut shows. There’s no single correct shape to preserve. Your version can evolve with you.

Hair doesn’t necessarily grow at dramatically different rates in different areas. The layers start at different lengths and sit differently as they extend. Texture, density, natural growth patterns and the original cut all affect how that change looks. Styling can steer the shape and bring out its movement, but it can’t remove excess weight or rebuild a silhouette that needs reshaping.

Which parts of a mullet change the look as they grow?

The fringe sets the face-framing outline. As it lengthens, it may fall into your eyes, sweep to one side or blend more closely with the crown. Longer sides can soften the contrast around the ears and cheeks, while thicker or outward-growing sections may obscure it. Extra length at the crown can create lift or make the top feel heavier. The back adds flow and proportion, but if it gains length while the rest stays compact, the cut may feel disconnected. Read the sections together, not in isolation.

What should a mullet look like between growth stages?

Judge the whole silhouette from the front, sides and back. One unruly piece doesn’t automatically mean the shape has failed. Check whether the fringe, sides and back still feel connected, and whether the overall movement suits the look you want. Your hair’s texture and density matter: waves may spread as they dry, curls can spring up, and finer hair may sit closer to the head. The same length can create a different outline on different people.

That’s where styling a mullet as it grows earns its keep. Small changes to direction, separation and finish can make an in-between shape look deliberate. If the proportions still feel off after experimenting, a professional shape reset can refine the cut in a way daily styling alone can’t.

How to style a mullet as it grows through each length stage

Let the current length set the plan. A growing mullet doesn’t need the same finish at every stage, and you don’t have to force it into the shape it had after the cut. Start with hair that’s damp, not dripping, then check how it naturally falls before reaching for a brush or styling product. Small shifts in direction can change the silhouette more than adding extra hold.

To style changing layers without weighing them down, start with damp hair, work in small sections, direct each area where you want it to sit, and use only enough product to support its natural texture. Fine hair may need a lighter touch; thick hair can benefit from careful sectioning. For curls and waves, encourage their pattern rather than brushing it out.

Styling shorter layers while the mullet settles

With shorter fringe and crown layers, use your fingers or a brush to guide the hair away from your eyes and towards the shape you want. Shape the roots to help lift the crown, or smooth the fringe to one side for a more deliberate outline. Add a small amount of a suitable styling product to bring out texture, then stop before the hair feels coated. The goal is control, not uniformity.

As the layers lengthen into the in-between stage, they may fall differently from one wash to the next. Try directing the fringe and crown separately, then let them settle before deciding whether anything needs adjusting. If a section keeps springing out, work with its natural direction instead of repeatedly pressing it flat.

Working with longer sides and back length

Longer sections can merge into one mass if they’re all pushed the same way. Separate the sides and back with your fingers while the hair is damp, then decide where you want movement and where you want a smoother line. For a textured finish, let the layers separate naturally as they dry. For a sleeker shape, guide them into place with a brush and keep the finish controlled rather than stiff.

Parting can shift the balance, too. A change in direction may move weight away from a side that feels bulky or bring the crown and back into closer visual alignment. Check the shape from the front and sides, not just straight on in the mirror. For ideas on cuts that work with your texture and silhouette, explore mullet and textured haircut inspiration.

There’s no single stage-by-stage formula. Watch how your hair behaves as it dries, adjust the direction of each section and keep the movement that makes your mullet yours.

Can styling a mullet as it grows prevent an awkward stage?

Styling can make a changing mullet look more intentional, but it can’t correct every imbalance. Redirecting the fringe, separating layers or adding texture may improve the outline for now. Styling products can’t alter the cut itself or remove weight that’s making the shape feel bulky.

An awkward phase doesn’t automatically call for a dramatic chop. Sometimes a small change in parting or finish is enough; sometimes the cut needs a considered reshape. The right move depends on what’s bothering you and where you want your mullet to go.

What styling can change, and what it cannot

At home, you can change the appearance of your layers by adjusting their direction, texture and separation. A fringe swept aside may feel less disruptive, while defined sections can help the sides and back read as part of one silhouette. These are visual adjustments, not a new haircut. Results also vary with your hair’s texture, density and length, so a technique that works for one mullet may not suit another.

Approach Pros Limits
At-home styling Quickly adjusts direction, texture and separation without changing the cut. Can’t remove unwanted weight or reliably correct persistent imbalance.
Professional reshaping Can refine the balance, weight and texture to suit your preferred silhouette. Changes the cut, so discuss how much length you want to keep.

Signs the shape needs more than a styling tweak

Look for a pattern, not one rogue strand. If the same section consistently sits outside the silhouette you’re aiming for, or heavy ends make the shape feel weighed down, styling may only disguise the issue. Pay attention if getting your fringe, sides and back to sit together is becoming a daily battle. That’s useful information about the cut, not a sign you’ve failed.

A shape reset doesn’t have to mean starting over. A stylist experienced with mullets and textured cuts can assess what’s happening and refine the outline around your preferred look. Be clear about the length you want to keep and the direction you’d like the cut to take. Styling a mullet as it grows can help you ride out change, but a targeted trim is a way to guide that change, not abandon it.
Styling a Mullet as It Grows: Keep the Shape, Lose the Awkward Stage

Simple routine for styling a growing mullet at home

A repeatable routine makes the changing shape easier to read. Start with clean hair, then choose your finish: towel-dried hair gives you a softer, less controlled result, while damp hair is easier to direct before styling. Curly or coily hair may respond best to working with its natural pattern; straight or wavy hair can take more brushing or finger-shaping to create movement.

The wash-day and styling sequence

  • Prepare: Gently squeeze out excess water. If you’re using heat, apply heat protection before drying.
  • Find the trouble spot: Start with the area that needs the most direction, such as a fringe falling forward or a crown that won’t lift.
  • Work in sections: Guide the fringe, crown, sides and back separately with your fingers or a brush. Direct each section where you want it to sit, rather than styling the whole cut as one block.
  • Add a light finish: Use a small amount of a suitable styling product, spreading it through your hands before applying. Add more only if needed. Too much can flatten fine hair or make longer layers clump together.
  • Check the shape: Once dry, look at the mullet from the front, side and back. Adjust only the sections that interrupt the silhouette.

Adjusting technique for texture and daily wear

For a softer, natural finish, use your fingers to encourage the hair’s own movement and keep product minimal. For more definition, separate small sections and apply a little styling cream or paste where you want extra control. Fine, straight hair may need less product; thicker hair may need more deliberate sectioning. Curly hair often benefits from moisture and definition, rather than techniques that disrupt the curl pattern. Let your texture lead.

You don’t need to restart the whole routine between washes. Dampen and reshape just the fringe, crown or ends that have lost their direction. Notice what works in different weather or on busy days; your best routine is the one you can repeat and that keeps your shape feeling like yours.

Quick troubleshooting

  • Flat roots: Lift the roots with your fingers or a brush as you dry, focusing on the crown.
  • Bulky sides: Direct the sides closer to the head, or try a different parting to shift the balance.
  • Unruly ends: Smooth or separate just the ends with a small amount of product, then check how they fall once dry.

For help deciding how your mullet’s shape can evolve, explore personalised mullet styling advice.

When a growing mullet needs a professional shape reset

Sometimes the issue isn’t how you style your mullet. It’s how the cut is sitting now. If the ends feel heavy, the layers no longer connect, or one area keeps breaking away from the silhouette you want, a stylist can assess the balance, weight and texture, then shape the next stage around your preferred look. A reset doesn’t have to erase your mullet or take off all the length. It can be a considered adjustment that makes the cut easier to wear as it grows.

For more context on how shape and texture can work together, explore this modern mullet haircut guide. You can also browse the modern mullet styling guide for ideas to help explain the finish you’re aiming for.

What to bring to a mullet reshaping appointment

Make the conversation specific. Bring reference images that show the front, profile and back, including a photo of your current cut and examples of the direction you’d like it to take. Pictures help show details that words like “shaggy” or “more balanced” can leave open to interpretation.

Talk about your real routine, too. Explain how you usually wear your hair, whether you style it daily and what feels difficult to manage. Be honest about how much length you want to keep. That gives your stylist a clearer starting point for discussing what can be refined without losing the parts of the mullet you love.

If you’re unsure what to ask for, use the images as a starting point, not a rigid blueprint. A shape should work with your own texture and habits, not just look right in a photograph. Your stylist can help translate the references into an approach that suits the hair you have now.

Keep the cut evolving with your identity

There isn’t one correct mullet to grow towards. Layers can be adapted to work with your natural texture, the proportions you like and the way you want to express yourself. Heavy Metal Hairdresser specialises in mullets and alternative textured cuts, shaping each look around the individual rather than forcing everyone into the same silhouette.

Styling a mullet as it grows can keep it workable between cuts, while a thoughtful reshape can guide where it goes next. For more ideas on how a mullet can evolve with you, explore Heavy Metal Hairdresser.

Keep your mullet moving in the right direction

Styling a mullet as it grows is about adapting, not forcing it to stay frozen in one shape. Direct shorter layers where you want them, work with your natural texture and use a light hand so movement stays alive. If styling stops making the silhouette feel balanced, a thoughtful reshape can guide the next stage without wiping out the cut you’ve been growing.

Every mullet should reflect the person wearing it. Heavy Metal Hairdresser specialises in mullets, wolfcuts, shags and alternative textured cuts, with an individual approach shaped by founder Simon Tuckwell’s experience as a barber and creative stylist. The salon’s work has also gained international recognition through social media and backstage festival work.

Ready to keep your shape evolving on your terms? Explore Heavy Metal Hairdresser and keep your mullet evolving. Your in-between stage isn’t a dead end. It’s part of the look taking shape.

Frequently Asked Questions

How do you style a mullet while it is growing out?

Style each section according to how it falls, rather than trying to force the whole cut into one shape. Start with damp or towel-dried hair, direct the fringe and crown with your fingers or a brush, then separate the sides and back. Use a small amount of product to support the finish you want. Styling a mullet as it grows is about working with its changing proportions and natural texture.

How often should you trim a mullet as it grows?

There’s no fixed schedule, as it depends on your preferred shape, texture and how quickly the cut feels out of balance. As a general guide, a trim every 6 to 8 weeks can help keep a growing mullet intentional without taking it back to its original length. Tell your stylist what you’re growing towards and how much length you want to keep, so any reshape supports that goal.

Can you grow a mullet without cutting it?

Yes, you can leave it untrimmed and allow all sections to gain length. The trade-off is that the fringe, sides, crown and back may become harder to balance as they change. Styling can help direct the hair, but it can’t remove weight or reshape the underlying cut. If you’re happy to let the silhouette evolve freely, keep growing; if not, a light shape adjustment is an option.

What should you do when the sides of a mullet get bulky?

Try directing the sides closer to your head while the hair is damp, or change your parting to shift where the weight sits. Use only a little product, since too much can make the area feel heavier. If the sides repeatedly push out or obscure the outline you want, styling may only disguise the bulk. A stylist can assess whether a targeted reshape would bring the silhouette back into balance.

Can you style a mullet with naturally curly or wavy hair?

Absolutely. Work with your natural pattern instead of brushing it into a finish that won’t last. For waves, guide sections with your fingers and let them settle; for curls, use a moisturising styling product suited to your hair and avoid disrupting the curl pattern as it dries. The same mullet can look different across textures, so adjust your technique to the movement and volume your hair naturally creates.

How can you make a growing mullet look less awkward?

Focus on the whole outline, not one section that’s misbehaving. Direct the fringe away from your face, separate layers that have fallen together and adjust the parting or direction to rebalance the shape. A small amount of product can add control without stiffening the hair. If the proportions still feel disconnected after styling, you don’t necessarily need a dramatic cut; a considered reshape may be enough.

When should you see a stylist about a growing mullet?

Consider a professional reshape if the ends feel heavy, sections persistently sit outside your preferred silhouette, or styling becomes increasingly difficult. Bring photos of your current cut and the direction you want, and be clear about the length you’d like to keep. Heavy Metal Hairdresser specialises in mullets and alternative textured cuts, shaping looks around individual style and natural texture rather than one fixed template.
Posted on

Reshaping a Grown Out Wolfcut: The 2026 Alternative Survival Guide

Reshaping a Grown Out Wolfcut: The 2026 Alternative Survival Guide

Why does every “low-maintenance” wolfcut eventually transform into a puffy, accidental bowl cut that looks more like a mushroom than a masterpiece? It is the classic alternative trap. One minute you are rocking a razor-sharp silhouette, and the next, your crown feels like a helmet whilst your ends look thin and accidental. You aren’t losing your edge, but you are losing the battle against gravity. We know the frustration of watching that aggressive shape melt into a shapeless mess that feels impossible to style.

Growing your hair out does not have to mean looking like a Victorian schoolboy. By mastering the art of reshaping a grown out wolfcut, you can reclaim your identity and pivot towards a longer, more intentional alternative look. This survival guide breaks down the professional technical pivots needed to manage internal weight and maintain that essential grit. We will explore strategic colour evolution, the power of Death Grip for texture, and how to survive the 2026 growth cycle without ever touching a boring, traditional salon chair. It is time to stop waiting for length and start active evolution.

Key Takeaways

  • Identify the “mushroom stage” physics where crown layers meet the ear line, causing unwanted puffiness and loss of your aggressive silhouette.
  • Learn the professional technical pivots for reshaping a grown out wolfcut, focusing on internal weight removal to flatten the sides without losing length.
  • Master “intentional chaos” styling techniques using Death Grip and Hair To the Throne to maintain grit and prevent a flat, lifeless crown.
  • Discover how strategic colour shifts, such as shadow roots and vivid money pieces, can slim down a puffy crown and distract from uneven growth.
  • Map your transition into a long shag or a modern mullet to ensure your hair stays intentional and alternative throughout the entire growth cycle.

The Physics of the Grow-Out: Why the ‘Mushroom’ Stage Happens

The wolfcut is a high-energy silhouette that relies on vertical tension and aggressive texture. When you stop cutting it, that tension collapses. The “mushroom stage” is the precise moment your shorter crown layers migrate south and collide with your ear line. Instead of a sharp, tapered look, you get a rounded, horizontal bulk that feels wider than it is long. Understanding these physics is the first step in reshaping a grown out wolfcut without losing your mind.

This happens because of how weight distributes as it moves. In a variation of the shag called a wolf cut, the layers are designed to be disconnected. This means the top doesn’t blend into the bottom. Whilst this looks incredible when fresh, the grow-out creates a literal shelf at the back of your head. British humidity only makes this worse. Our damp climate swells the hair cuticle, causing those unmanaged layers to expand outwards. Without proper internal weight removal, you aren’t just growing length; you’re growing a helmet.

The Disconnection Point and Visual Weight

Visual weight is about where the eye stops. In a fresh wolfcut, the eye moves vertically from the choppy fringe down to the wispy ends. As it grows, the weight shifts from the top of your head to the sides. Vertical flow turns into horizontal bulk. If your stylist didn’t manage the internal density, those layers sit on top of each other like bricks. Disconnection is the primary enemy of a graceful wolfcut evolution. When the gap between your shortest layer and your longest length becomes too heavy, the silhouette dies. You lose the aggressive edge and end up with a bottom-heavy shape.

Setting Your 2026 Style Goals

Reshaping a grown out wolfcut requires a clear roadmap for your next identity. You have two main routes: the “Long Shag” or the “Modern Mullet.” The Long Shag evolution focuses on blending disconnected layers into a more cohesive, 70s-inspired flow. If you want to keep the aggression, the Modern Mullet pivot is your best bet. This involves keeping the back length whilst your top layers catch up. Avoid blunt cuts at all costs during this transition. A blunt line will kill the movement and make the “mushroom” look even more pronounced. Tell your stylist you want edge-retention through internal thinning. You want to keep the length but lose the bulk.

The Technical Pivot: Reshaping Without Losing Your Length

The goal isn’t to start over. It’s to evolve. When you’re reshaping a grown out wolfcut, the biggest fear is losing those hard-won centimetres of length. Traditional stylists might try to “even it out,” which is often code for cutting it all off into a boring bob. We don’t do that. The technical pivot is about removing bulk from the inside out. By carving out the internal weight that creates the “mushroom puff,” we flatten the sides whilst keeping the perimeter long and jagged.

Maintaining the “V” or “U” shape at the back is non-negotiable for an alternative silhouette. Instead of a standard trim, we use “dusting.” This involves removing only the most damaged tips without sacrificing the overall length. It keeps the hair healthy but preserves the aggressive, tapered look you’ve spent months growing. This method ensures your hair continues to look intentional, even as it reaches new lengths.

Internal Texturising Techniques for Alt-Hair

Thinning shears are often the enemy of a gritty, lived-in texture. They can leave the hair looking frizzy rather than sharp. We prefer point-cutting. This technique allows us to break up heavy, horizontal sections by cutting vertically into the hair. It creates gaps for movement and removes the “shelf” effect mentioned in the previous section. By meticulously removing weight where the hair is densest, we ensure the style remains light and responsive to styling products like Death Grip.

Slide-cutting is another essential tool for reshaping a grown out wolfcut. It acts as a bridge between your short crown layers and the mid-lengths. By sliding the blade down the hair shaft, we create soft, diagonal lines that encourage the hair to lay flat. This is particularly effective when prepping for 2026 hair color trends, as a smoother internal surface allows vivid colours to pop without being obscured by unwanted bulk.

The Face-Framing Adjustment

Your fringe is the focal point of your identity. As it grows, that short “wolf-fringe” needs to evolve. We transition these into gritty, eyebrow-skimming curtain bangs. This involves connecting the temple layers down to the jawline. It creates a seamless flow that slims the face and hides the transition. It stops the hair from looking like two separate haircuts. For deeper insights into this process, check out our guide on how to maintain a shag haircut.

If you’re ready to stop fighting the mushroom and start embracing the evolution, you can book one of our specialised Wolfcut reshaping sessions to keep your edge intact.

Reshaping a Grown Out Wolfcut: The 2026 Alternative Survival Guide

Mastering the Mess: Styling Through the Awkward Growth Stages

Polished blow-outs are for bridal parties and office jobs. When you are reshaping a grown out wolfcut, trying to smooth everything down only highlights the disconnection we discussed earlier. Smooth hair makes that “mushroom shelf” look like a mistake. Instead, you need to embrace intentional chaos. By creating a gritty, lived-in texture, you blur the lines between your short crown layers and your longer ends. It’s about making the mess look like a choice.

The secret lies in preventing the “flat top, puffy sides” disaster. Gravity pulls the top layers down whilst the side layers expand. You need weightless volume at the roots to keep the silhouette vertical. Use products like Hair To the Throne to lift the crown. Then, use aggressive matte products to crush the volume at the ears. This creates a flatter, rockstar silhouette that feels more like a modern mullet than a helmet. High-end advice on maintaining a wolf cut often suggests heat styling to blend these layers. Loose, messy waves help bridge the gap between lengths. Use these tips to blend your layers:

  • Wrap sections of different lengths together around a large barrel wand to force them into a single wave.
  • Keep the ends straight to maintain that jagged, alternative edge.
  • Alternate the direction of your curls to prevent the hair from clumping into one big roll.

The Power of Gritty, Matte Texture

Salt sprays and styling powders are essential amongst the awkward stages of your grow-out. They provide the friction needed for layers to “grab” onto each other rather than sliding into separate shelves. Root powders are perfect for keeping the top of your head from looking like a landing strip. For the ultimate subcultural finish, our own Death Grip creates a matte, rebellious finish that holds your shape through a three-day festival. It kills the shine that often makes grown-out layers look greasy and flat.

Alternative Camouflage Techniques

Sometimes you just don’t have the energy for a full styling routine. This is where alternative camouflage comes in. Bandanas and beanies are your best friends for managing crown volume. They physically flatten the “mushroom” puff whilst letting your length peek out from the bottom. It’s a classic grunge look that never fails. If you want something more intricate, try the “half-up, half-down” style. By securing the top, disconnected layers in a messy knot, you remove the bulk from the sides and let the bottom length shine. Strategic use of chunky hair clips can also add a 90s alternative vibe whilst pinning back those awkward temple layers. Styling is just another tool for reshaping a grown out wolfcut without needing a pair of scissors every week.

Vivid Colour as a Strategic Distraction from Awkward Layers

Colour is your secret weapon for structural deception. When you are reshaping a grown out wolfcut, you can use high-contrast pigments to trick the eye into seeing a more balanced shape. If your crown feels too puffy, we don’t just cut it; we colour it. Darker tones recede, whilst lighter tones advance. By applying a deep shadow root, we create the illusion of depth at the top. This effectively slims down that awkward mushroom-shaped bulk that plagues the mid-growth stage. It’s about using alt-hair physics to your advantage.

Vivid money pieces around the face act as a visual anchor. They pull the focus toward your eyes and jawline, distracting from the wispy, accidental-looking ends that often occur during a grow-out. If those ends feel too thin, a bold dip dye effect can save them. Adding a saturated, high-pigment block of colour to the very tips makes them look intentional and physically thicker. It turns a frustrated transition into a deliberate alternative statement.

Placement Strategies for Visual Slimming

Placement is everything when managing volume. We place darker, moodier shades in the mid-section where the hair tends to poof out most. This “mushroom zone” becomes less noticeable when the colour is receding. Conversely, we use bright, neon pops on the longest layers to emphasise your growth progress. This makes the hair look longer and more energetic. You can discover more about vivid hair colour and how it manipulates texture to suit your specific subcultural identity.

The Root Melt and Blur

Regrowth is often the enemy of a polished alternative look, but it doesn’t have to be. A soft root melt or blur is the essential solution for 2026. It ensures that as your natural hair grows in, it blends seamlessly into your vivid shades. This technique avoids harsh horizontal lines that would otherwise highlight the disconnection between your layers. For the upcoming festival season, we are seeing a massive shift toward deep forest greens and burnt oranges. These shades provide a gritty, organic backdrop that masks uneven lengths. Maintaining the health of these vivids is vital; keep your hair strong so it can handle the weight of your new length.

Ready to manipulate your silhouette with pigment? Book your vivid colour transformation with our specialists today and skip the awkward phase entirely.

The Evolution Roadmap: Transitioning Your Wolfcut into Your Next Signature Shape

Mainstream hair guides are obsessed with bobs. They see a grown-out style and immediately suggest lopping it all off to “even it out.” we call bullshit. A bob is the safe choice for people who want to blend in. You didn’t get a wolfcut to blend in. Reshaping a grown out wolfcut is about active evolution, not surrender. Your current layers are the perfect foundation for a long, textured alternative mane. It is the ultimate base for a 70s rockstar silhouette that carries real weight and attitude.

The most natural path is the Wolf-to-Shag pipeline. This transition involves blending those aggressive, disconnected layers into a more cohesive but still heavily textured flow. It’s a softer approach that keeps the volume but loses the “mushroom” shelf. If you want to keep the aggression high, the Modern Mullet pivot is your best bet. You keep the back length as a priority whilst the top layers catch up. It allows you to maintain a subcultural edge through every awkward centimetre of growth. You are building a signature shape, not just waiting for a trim.

The Shag Resurrection

Your fringe becomes the new anchor of your identity. As it grows past your eyebrows, it transforms into heavy, face-framing curtain layers. You can evolve your wolfcut into a modern mullet haircut by keeping the temple areas shorter whilst letting the back reach for your shoulder blades. This transition relies on shifting the internal layers into a 70s-inspired rhythm. It feels organic and intentional. It’s about making the growth look like a choice rather than a lack of maintenance. The focus stays on the texture, not just the length.

The Rockstar Long-Game

When your hair finally hits shoulder length, the temptation to “tidy up” the ends is strong. Resist it. A perfectly straight hemline kills the alternative spirit. Keep the perimeter jagged and uneven. Maintaining Death Grip texture is essential here. It prevents your long hair from looking flat and conventional. It keeps that rebellious, matte grit alive. Reshaping a grown out wolfcut means you never have to settle for a boring, one-length style. Only “even out” the perimeter if the ends become truly wispy. Otherwise, embrace the unevenness. It’s your hair, your rules, and your identity. Stay loud through every stage of the grow-out.

Own Your Evolution: The Road to Your Next Signature Style

Your hair is a statement, not a waiting room. You’ve mastered the physics of the mushroom stage and learned that internal weight removal is the key to maintaining your edge. By using strategic vivid colour and gritty styling, you’ve turned an awkward transition into a deliberate alternative evolution. Don’t let a mainstream salon talk you into a boring bob. Reshaping a grown out wolfcut is about reclaiming your silhouette as you move towards a long shag or a modern mullet. You aren’t just growing hair; you’re building a new identity.

We are a gender-inclusive safe space for alternative identities. Our specialists live for aggressive textured cuts and high-pigment vivid colour. We have styled bands backstage at Download and Bloodstock, so we know how to keep hair looking gritty through every stage of growth. Your identity shouldn’t hit a plateau just because your layers are catching up. Trust the experts who understand the subcultural grit your hair requires.

Book your wolfcut evolution at Heavy Metal Hairdresser and own your next signature shape. Stay rebellious.

Frequently Asked Questions

How long does it take to grow out a wolfcut completely?

It takes roughly six to twelve months to transition from a choppy wolfcut to a more uniform long style. Hair grows at an average rate of 1.25cm per month; so your crown layers need significant time to reach your shoulders. Focus on maintaining health during this period. Regular dusting prevents breakage from eating away at your progress. Patience is vital, but active reshaping keeps the style intentional throughout the year.

Can I reshape my wolfcut without losing my current length?

You can absolutely achieve reshaping a grown out wolfcut without sacrificing your hard-earned centimetres. We focus on internal texturising and point-cutting to remove the bulk that creates a “shelf” effect. By thinning the hair from the inside, the silhouette flattens and flows better. This technical approach preserves the perimeter of your cut. You keep the jagged alternative edge whilst losing the unwanted roundness around your ears.

What exactly is the “mushroom stage” and how do I fix it?

The mushroom stage occurs when your short crown layers grow down to meet your ear line, creating horizontal bulk. It makes your head look round rather than edgy. You fix it by removing internal weight and using aggressive matte products like Death Grip. These products crush the volume at the sides whilst keeping the top textured. It’s about shifting the focus from width back to a vertical, rockstar silhouette.

Should I get a trim whilst I am growing out my wolfcut layers?

Trims are essential, but you should ask for “dusting” rather than a traditional cut. Dusting removes only the millimetre of damage at the very tips. This prevents split ends from travelling up the hair shaft and ruining your growth progress. It also allows your stylist to manage the internal density. Regular maintenance every eight to ten weeks ensures your evolution looks like a choice rather than a lack of effort.

What is the best product for styling a growing wolfcut in 2026?

For 2026, the gold standard for alternative texture is a combination of Hair To the Throne and Death Grip. You need Hair To the Throne at the roots to provide weightless lift and prevent a flat crown. Death Grip is then used through the mid-lengths to provide that essential matte grit. This combination allows you to manage the puffy sides whilst keeping the rebellious energy of your original wolfcut alive.

Is a wolfcut harder to grow out than a standard layered haircut?

Yes, a wolfcut is more challenging to grow out because the disconnection between layers is so aggressive. In a standard layered cut, the transition between lengths is smoother. The wolfcut features a massive gap between the short top and wispy bottom. This makes reshaping a grown out wolfcut a more technical process. You need a specialist who understands alt-hair physics to bridge that gap without resorting to a boring bob.

Can I turn my wolfcut into a mullet whilst it grows?

Transitioning into a mullet is the most effective way to keep your edge whilst growing length. You simply keep the back length as it is and have your stylist tighten the sides. This maintains the “party in the back” energy whilst the top layers catch up. It allows your crown layers to reach a manageable length without losing your alternative identity. It’s a classic power move for subcultural styles.

How do I stop my hair looking thin at the bottom during the grow-out?

Wispy ends are often a result of the original aggressive texturising. To fix this, ask for a blunt perimeter trim to thicken the baseline. You can also use vivid colour strategically. A saturated dip-dye or a bold block of colour at the ends creates a visual weight that makes the hair appear fuller. Combining a solid colour foundation with regular dusting will keep your long-game looking thick and healthy.