Posted on

Styling a Mullet as It Grows: Keep the Shape, Lose the Awkward Stage

Styling a Mullet as It Grows: Keep the Shape, Lose the Awkward Stage

What if the awkward stage isn’t a bad haircut, but a shape that hasn’t caught up with your growth? Styling a mullet as it grows means working with the changing layers, not fighting them. One month, the fringe behaves; the next, the sides kick out and the back feels like it belongs to another cut. That doesn’t mean your mullet’s lost its edge.

Different sections can sit and behave differently as they gain length, and a few practical tweaks can help the whole look feel intentional. Adjust the direction and finish to suit your current layers, and pay attention to how your hair settles as it dries. The aim isn’t to force every mullet into the same shape. It’s to keep yours feeling like you.

Here’s what to adjust as your layers shift, how to tell when styling is enough, and when a reshaping trim could bring the cut back into balance. You don’t have to surrender to the in-between stage. Give your mullet room to evolve while keeping the attitude intact.

Key Takeaways

  • Learn how dampness, sectioning and styling direction can shift your mullet’s shape at different lengths.
  • Build a simple at-home routine that you can adapt to your hair’s texture and changing layers.
  • See where styling a mullet as it grows can help, and where it can’t correct an imbalance on its own.
  • Know what a stylist can assess during a shape reset, from weight and texture to your preferred silhouette.
  • Use reference photos to show both your current cut and the direction you want it to take.

Why styling a mullet as it grows means working with the changing shape

A mullet isn’t one length. Its identity comes from the relationship between the fringe, sides, crown and back. As each section gains length, that balance shifts. The outline that felt sharp after a cut can become softer, heavier or more tousled without the haircut having gone wrong.

A growing mullet is a cut in transition: its fringe, sides, crown and back change in length and proportion, altering the silhouette and movement. The classic contrast between shorter sections and a longer back has plenty of variations, as the history of the mullet haircut shows. There’s no single correct shape to preserve. Your version can evolve with you.

Hair doesn’t necessarily grow at dramatically different rates in different areas. The layers start at different lengths and sit differently as they extend. Texture, density, natural growth patterns and the original cut all affect how that change looks. Styling can steer the shape and bring out its movement, but it can’t remove excess weight or rebuild a silhouette that needs reshaping.

Which parts of a mullet change the look as they grow?

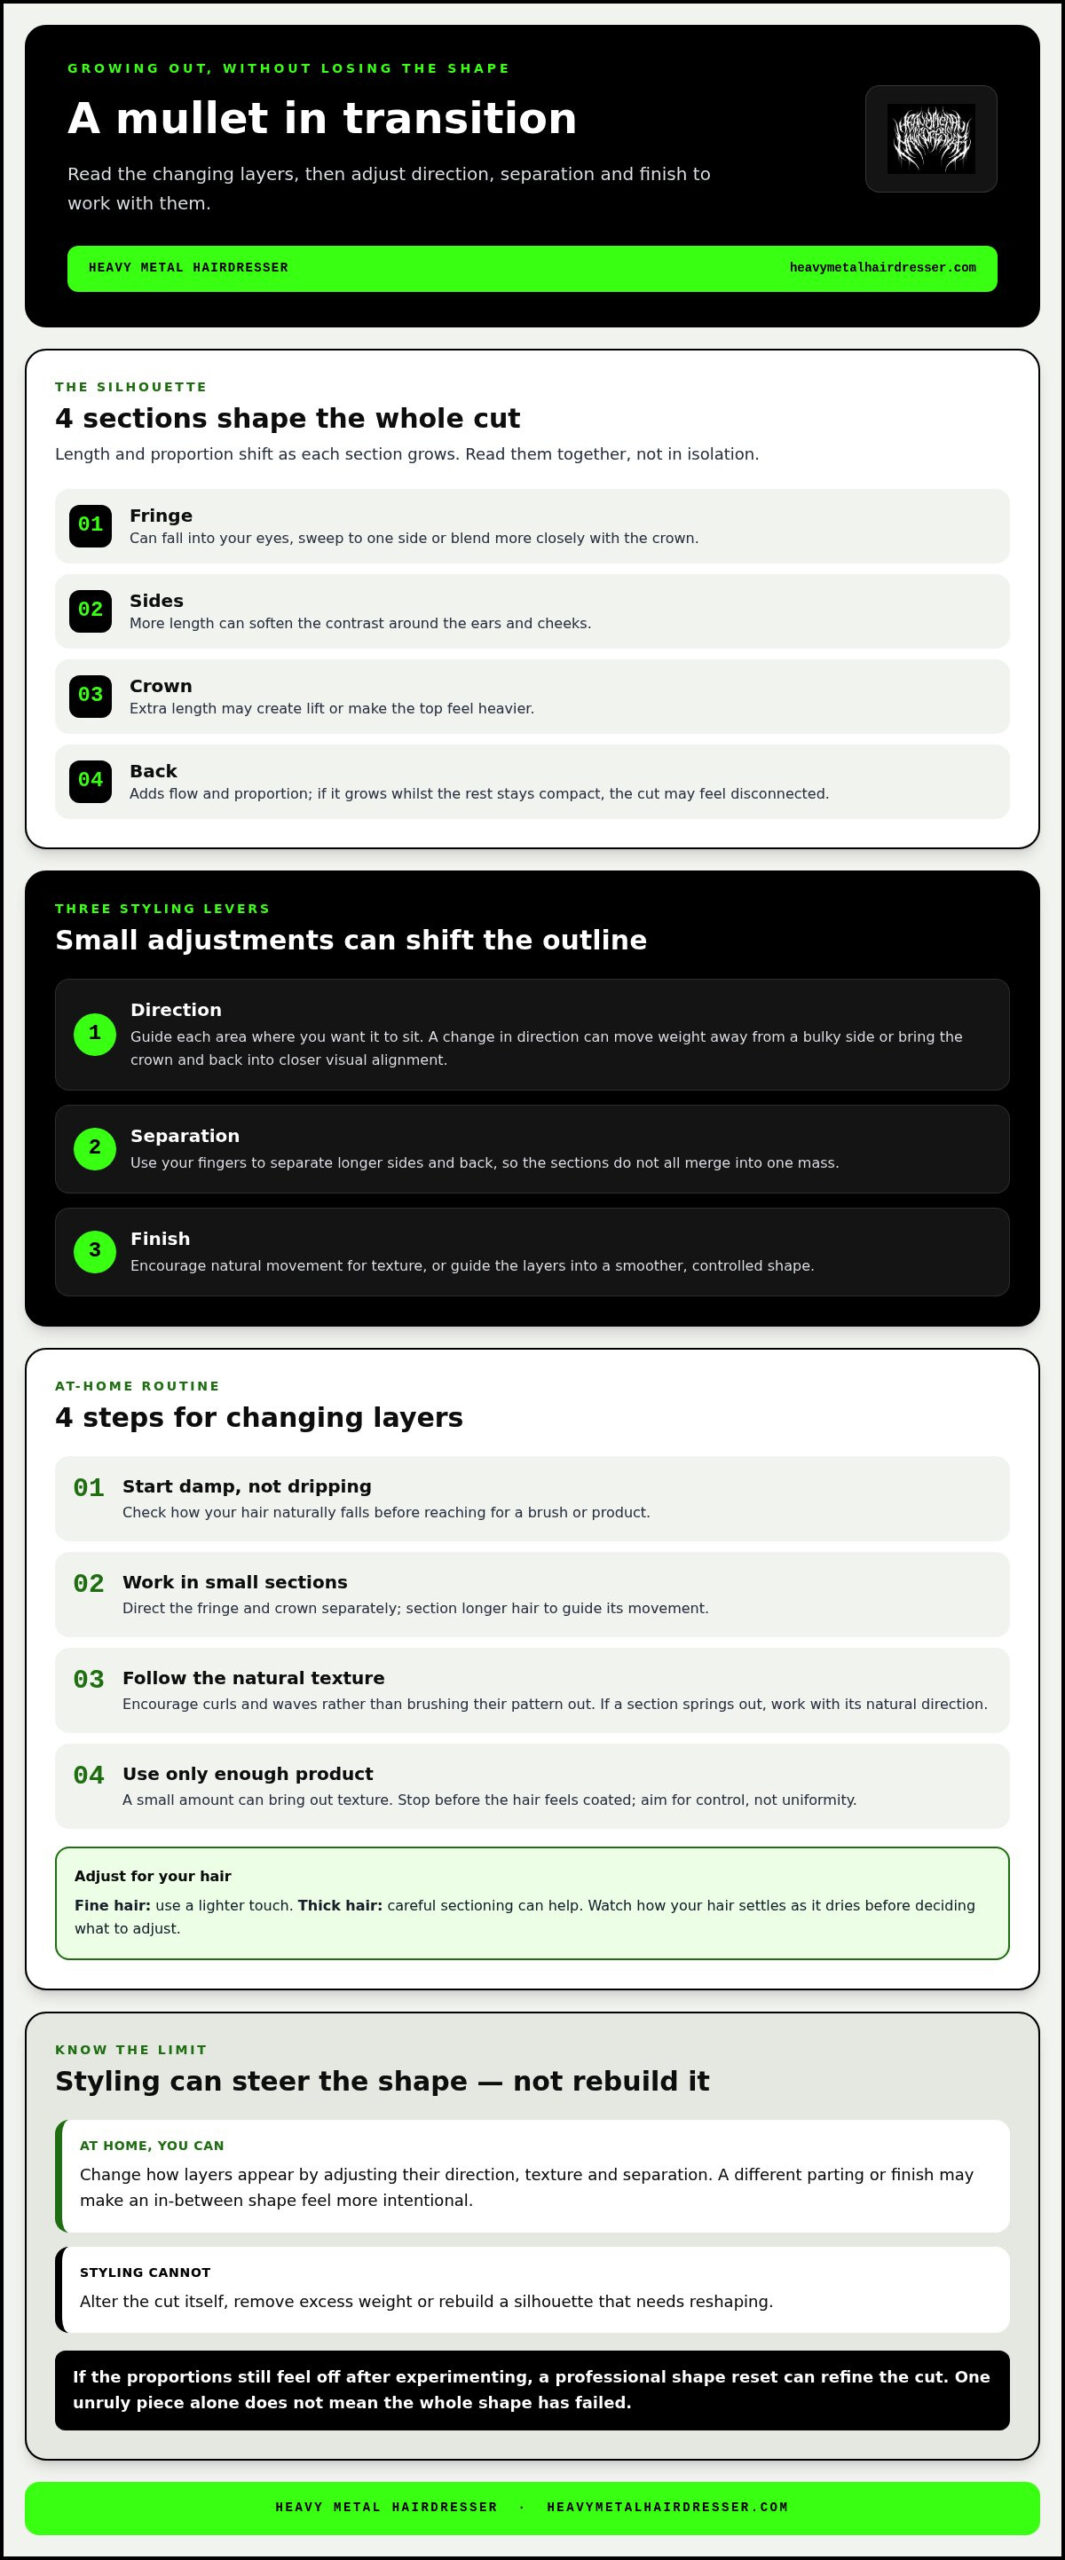
The fringe sets the face-framing outline. As it lengthens, it may fall into your eyes, sweep to one side or blend more closely with the crown. Longer sides can soften the contrast around the ears and cheeks, while thicker or outward-growing sections may obscure it. Extra length at the crown can create lift or make the top feel heavier. The back adds flow and proportion, but if it gains length while the rest stays compact, the cut may feel disconnected. Read the sections together, not in isolation.

What should a mullet look like between growth stages?

Judge the whole silhouette from the front, sides and back. One unruly piece doesn’t automatically mean the shape has failed. Check whether the fringe, sides and back still feel connected, and whether the overall movement suits the look you want. Your hair’s texture and density matter: waves may spread as they dry, curls can spring up, and finer hair may sit closer to the head. The same length can create a different outline on different people.

That’s where styling a mullet as it grows earns its keep. Small changes to direction, separation and finish can make an in-between shape look deliberate. If the proportions still feel off after experimenting, a professional shape reset can refine the cut in a way daily styling alone can’t.

How to style a mullet as it grows through each length stage

Let the current length set the plan. A growing mullet doesn’t need the same finish at every stage, and you don’t have to force it into the shape it had after the cut. Start with hair that’s damp, not dripping, then check how it naturally falls before reaching for a brush or styling product. Small shifts in direction can change the silhouette more than adding extra hold.

To style changing layers without weighing them down, start with damp hair, work in small sections, direct each area where you want it to sit, and use only enough product to support its natural texture. Fine hair may need a lighter touch; thick hair can benefit from careful sectioning. For curls and waves, encourage their pattern rather than brushing it out.

Styling shorter layers while the mullet settles

With shorter fringe and crown layers, use your fingers or a brush to guide the hair away from your eyes and towards the shape you want. Shape the roots to help lift the crown, or smooth the fringe to one side for a more deliberate outline. Add a small amount of a suitable styling product to bring out texture, then stop before the hair feels coated. The goal is control, not uniformity.

As the layers lengthen into the in-between stage, they may fall differently from one wash to the next. Try directing the fringe and crown separately, then let them settle before deciding whether anything needs adjusting. If a section keeps springing out, work with its natural direction instead of repeatedly pressing it flat.

Working with longer sides and back length

Longer sections can merge into one mass if they’re all pushed the same way. Separate the sides and back with your fingers while the hair is damp, then decide where you want movement and where you want a smoother line. For a textured finish, let the layers separate naturally as they dry. For a sleeker shape, guide them into place with a brush and keep the finish controlled rather than stiff.

Parting can shift the balance, too. A change in direction may move weight away from a side that feels bulky or bring the crown and back into closer visual alignment. Check the shape from the front and sides, not just straight on in the mirror. For ideas on cuts that work with your texture and silhouette, explore mullet and textured haircut inspiration.

There’s no single stage-by-stage formula. Watch how your hair behaves as it dries, adjust the direction of each section and keep the movement that makes your mullet yours.

Can styling a mullet as it grows prevent an awkward stage?

Styling can make a changing mullet look more intentional, but it can’t correct every imbalance. Redirecting the fringe, separating layers or adding texture may improve the outline for now. Styling products can’t alter the cut itself or remove weight that’s making the shape feel bulky.

An awkward phase doesn’t automatically call for a dramatic chop. Sometimes a small change in parting or finish is enough; sometimes the cut needs a considered reshape. The right move depends on what’s bothering you and where you want your mullet to go.

What styling can change, and what it cannot

At home, you can change the appearance of your layers by adjusting their direction, texture and separation. A fringe swept aside may feel less disruptive, while defined sections can help the sides and back read as part of one silhouette. These are visual adjustments, not a new haircut. Results also vary with your hair’s texture, density and length, so a technique that works for one mullet may not suit another.

Approach Pros Limits
At-home styling Quickly adjusts direction, texture and separation without changing the cut. Can’t remove unwanted weight or reliably correct persistent imbalance.
Professional reshaping Can refine the balance, weight and texture to suit your preferred silhouette. Changes the cut, so discuss how much length you want to keep.

Signs the shape needs more than a styling tweak

Look for a pattern, not one rogue strand. If the same section consistently sits outside the silhouette you’re aiming for, or heavy ends make the shape feel weighed down, styling may only disguise the issue. Pay attention if getting your fringe, sides and back to sit together is becoming a daily battle. That’s useful information about the cut, not a sign you’ve failed.

A shape reset doesn’t have to mean starting over. A stylist experienced with mullets and textured cuts can assess what’s happening and refine the outline around your preferred look. Be clear about the length you want to keep and the direction you’d like the cut to take. Styling a mullet as it grows can help you ride out change, but a targeted trim is a way to guide that change, not abandon it.
Styling a Mullet as It Grows: Keep the Shape, Lose the Awkward Stage

Simple routine for styling a growing mullet at home

A repeatable routine makes the changing shape easier to read. Start with clean hair, then choose your finish: towel-dried hair gives you a softer, less controlled result, while damp hair is easier to direct before styling. Curly or coily hair may respond best to working with its natural pattern; straight or wavy hair can take more brushing or finger-shaping to create movement.

The wash-day and styling sequence

  • Prepare: Gently squeeze out excess water. If you’re using heat, apply heat protection before drying.
  • Find the trouble spot: Start with the area that needs the most direction, such as a fringe falling forward or a crown that won’t lift.
  • Work in sections: Guide the fringe, crown, sides and back separately with your fingers or a brush. Direct each section where you want it to sit, rather than styling the whole cut as one block.
  • Add a light finish: Use a small amount of a suitable styling product, spreading it through your hands before applying. Add more only if needed. Too much can flatten fine hair or make longer layers clump together.
  • Check the shape: Once dry, look at the mullet from the front, side and back. Adjust only the sections that interrupt the silhouette.

Adjusting technique for texture and daily wear

For a softer, natural finish, use your fingers to encourage the hair’s own movement and keep product minimal. For more definition, separate small sections and apply a little styling cream or paste where you want extra control. Fine, straight hair may need less product; thicker hair may need more deliberate sectioning. Curly hair often benefits from moisture and definition, rather than techniques that disrupt the curl pattern. Let your texture lead.

You don’t need to restart the whole routine between washes. Dampen and reshape just the fringe, crown or ends that have lost their direction. Notice what works in different weather or on busy days; your best routine is the one you can repeat and that keeps your shape feeling like yours.

Quick troubleshooting

  • Flat roots: Lift the roots with your fingers or a brush as you dry, focusing on the crown.
  • Bulky sides: Direct the sides closer to the head, or try a different parting to shift the balance.
  • Unruly ends: Smooth or separate just the ends with a small amount of product, then check how they fall once dry.

For help deciding how your mullet’s shape can evolve, explore personalised mullet styling advice.

When a growing mullet needs a professional shape reset

Sometimes the issue isn’t how you style your mullet. It’s how the cut is sitting now. If the ends feel heavy, the layers no longer connect, or one area keeps breaking away from the silhouette you want, a stylist can assess the balance, weight and texture, then shape the next stage around your preferred look. A reset doesn’t have to erase your mullet or take off all the length. It can be a considered adjustment that makes the cut easier to wear as it grows.

For more context on how shape and texture can work together, explore this modern mullet haircut guide. You can also browse the modern mullet styling guide for ideas to help explain the finish you’re aiming for.

What to bring to a mullet reshaping appointment

Make the conversation specific. Bring reference images that show the front, profile and back, including a photo of your current cut and examples of the direction you’d like it to take. Pictures help show details that words like “shaggy” or “more balanced” can leave open to interpretation.

Talk about your real routine, too. Explain how you usually wear your hair, whether you style it daily and what feels difficult to manage. Be honest about how much length you want to keep. That gives your stylist a clearer starting point for discussing what can be refined without losing the parts of the mullet you love.

If you’re unsure what to ask for, use the images as a starting point, not a rigid blueprint. A shape should work with your own texture and habits, not just look right in a photograph. Your stylist can help translate the references into an approach that suits the hair you have now.

Keep the cut evolving with your identity

There isn’t one correct mullet to grow towards. Layers can be adapted to work with your natural texture, the proportions you like and the way you want to express yourself. Heavy Metal Hairdresser specialises in mullets and alternative textured cuts, shaping each look around the individual rather than forcing everyone into the same silhouette.

Styling a mullet as it grows can keep it workable between cuts, while a thoughtful reshape can guide where it goes next. For more ideas on how a mullet can evolve with you, explore Heavy Metal Hairdresser.

Keep your mullet moving in the right direction

Styling a mullet as it grows is about adapting, not forcing it to stay frozen in one shape. Direct shorter layers where you want them, work with your natural texture and use a light hand so movement stays alive. If styling stops making the silhouette feel balanced, a thoughtful reshape can guide the next stage without wiping out the cut you’ve been growing.

Every mullet should reflect the person wearing it. Heavy Metal Hairdresser specialises in mullets, wolfcuts, shags and alternative textured cuts, with an individual approach shaped by founder Simon Tuckwell’s experience as a barber and creative stylist. The salon’s work has also gained international recognition through social media and backstage festival work.

Ready to keep your shape evolving on your terms? Explore Heavy Metal Hairdresser and keep your mullet evolving. Your in-between stage isn’t a dead end. It’s part of the look taking shape.

Frequently Asked Questions

How do you style a mullet while it is growing out?

Style each section according to how it falls, rather than trying to force the whole cut into one shape. Start with damp or towel-dried hair, direct the fringe and crown with your fingers or a brush, then separate the sides and back. Use a small amount of product to support the finish you want. Styling a mullet as it grows is about working with its changing proportions and natural texture.

How often should you trim a mullet as it grows?

There’s no fixed schedule, as it depends on your preferred shape, texture and how quickly the cut feels out of balance. As a general guide, a trim every 6 to 8 weeks can help keep a growing mullet intentional without taking it back to its original length. Tell your stylist what you’re growing towards and how much length you want to keep, so any reshape supports that goal.

Can you grow a mullet without cutting it?

Yes, you can leave it untrimmed and allow all sections to gain length. The trade-off is that the fringe, sides, crown and back may become harder to balance as they change. Styling can help direct the hair, but it can’t remove weight or reshape the underlying cut. If you’re happy to let the silhouette evolve freely, keep growing; if not, a light shape adjustment is an option.

What should you do when the sides of a mullet get bulky?

Try directing the sides closer to your head while the hair is damp, or change your parting to shift where the weight sits. Use only a little product, since too much can make the area feel heavier. If the sides repeatedly push out or obscure the outline you want, styling may only disguise the bulk. A stylist can assess whether a targeted reshape would bring the silhouette back into balance.

Can you style a mullet with naturally curly or wavy hair?

Absolutely. Work with your natural pattern instead of brushing it into a finish that won’t last. For waves, guide sections with your fingers and let them settle; for curls, use a moisturising styling product suited to your hair and avoid disrupting the curl pattern as it dries. The same mullet can look different across textures, so adjust your technique to the movement and volume your hair naturally creates.

How can you make a growing mullet look less awkward?

Focus on the whole outline, not one section that’s misbehaving. Direct the fringe away from your face, separate layers that have fallen together and adjust the parting or direction to rebalance the shape. A small amount of product can add control without stiffening the hair. If the proportions still feel disconnected after styling, you don’t necessarily need a dramatic cut; a considered reshape may be enough.

When should you see a stylist about a growing mullet?

Consider a professional reshape if the ends feel heavy, sections persistently sit outside your preferred silhouette, or styling becomes increasingly difficult. Bring photos of your current cut and the direction you want, and be clear about the length you’d like to keep. Heavy Metal Hairdresser specialises in mullets and alternative textured cuts, shaping looks around individual style and natural texture rather than one fixed template.
Posted on

How to Make a Mullet Look Good: Shape, Texture and Styling

How to Make a Mullet Look Good: Shape, Texture and Styling

A mullet doesn’t look good just because it’s bold. It looks good when the proportions feel deliberate on you. If you’re wondering how to make a mullet look good, start with the balance between the fringe and sides, the layers at the crown and the length at the back. Get that relationship right, and the contrast feels like a choice, not a haircut gone rogue.

It’s fair to wonder whether the shape will suit your face, work with your natural texture or demand a complicated routine every morning. There isn’t one template to suit everyone. A mullet can be softened, sharpened, layered or kept subtle to work with your features, hair and personal style. This guide will help you choose proportions, find styling approaches that fit your day-to-day and explain the details you want to your stylist. Think less copy-and-paste trend, more personal shape with just the right amount of attitude.

Key Takeaways

  • Learn how to make a mullet look good by balancing the fringe, sides, crown and back to suit the effect you want.
  • See how straight, wavy, curly, fine or thick hair can shape the cut’s movement and silhouette.
  • Build a simple styling routine that brings out your natural texture without weighing it down.
  • Spot common choices that can make a mullet feel unbalanced, including copying a reference without adapting it to your hair.
  • Prepare clear references and details about your daily routine so your stylist can shape a mullet around you.

How to Make a Mullet Look Good: Start with Shape, Not Hype

Worried a mullet will look dated or leave you feeling awkward? The cut isn’t locked to one era or one extreme silhouette. Learning how to make a mullet look good starts with treating it as a shape designed to work from every angle, rather than a trend to copy blindly. The contrast between short and long can be soft and blended, sharply defined or somewhere in between. What matters is that the parts feel connected and intentional on you.

There’s no universally flattering version. A bold, high-contrast outline might feel right for one person; another may prefer a quieter shift in length. Neither is more authentic. Your preferred attitude, your hair’s natural movement and the way the cut sits around your head all help determine the proportions.

What makes a mullet look balanced rather than accidental?

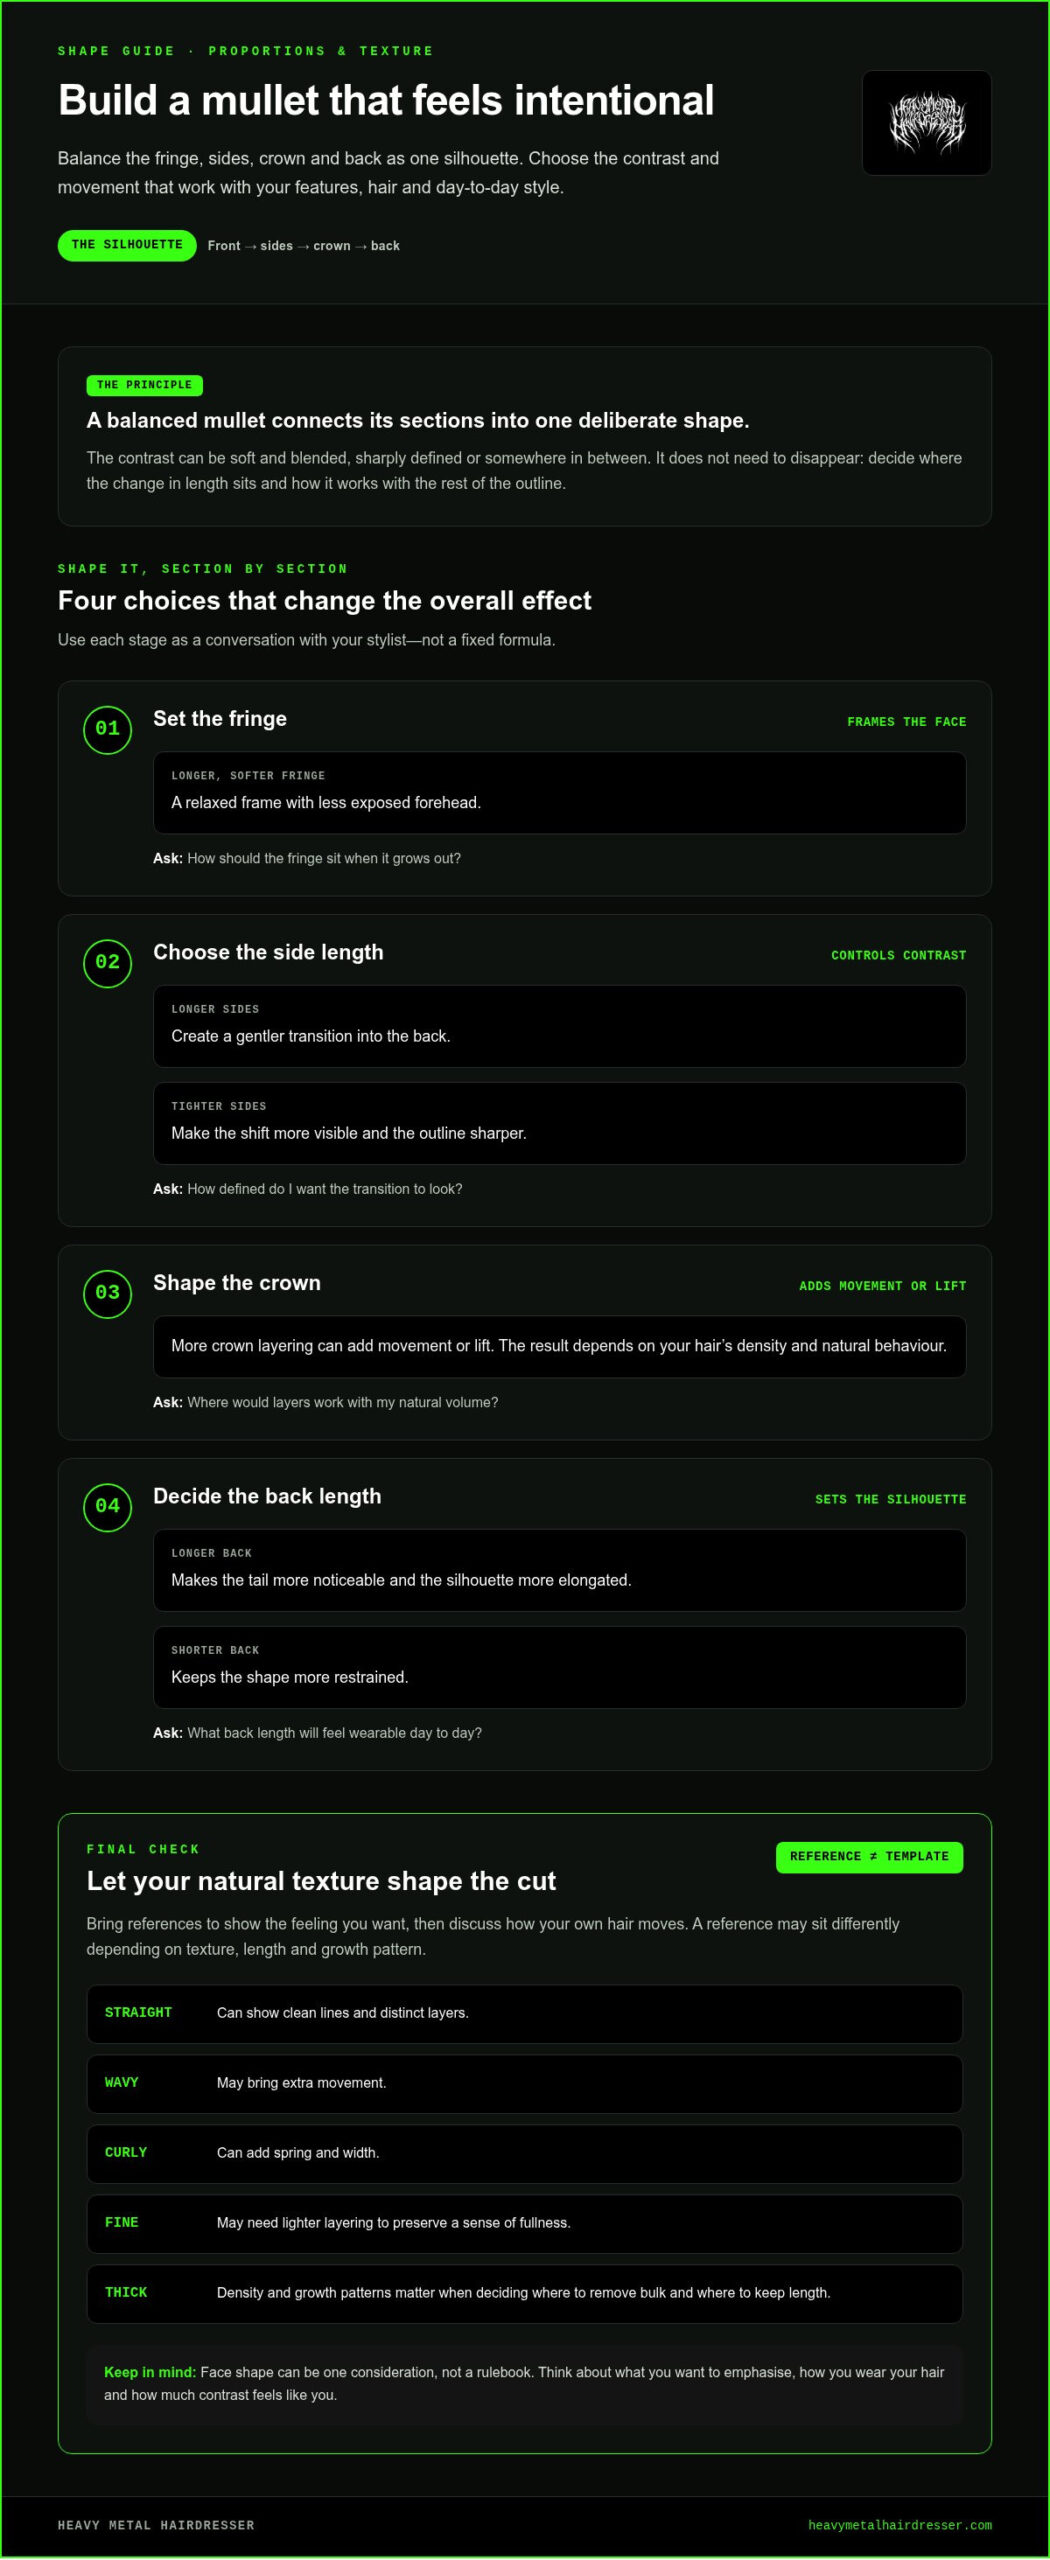
Think of the front, sides, crown and back as one silhouette. The fringe frames your face. Side length controls how much contrast you see, while crown layers connect the shorter sections to the longer back. If those areas fight each other, the shape can feel disconnected. Thoughtful blending or a deliberate, crisp break makes the contrast look like a choice.

A balanced mullet connects the front, sides, crown and back into one intentional shape, whether its contrast is soft or sharp.

That doesn’t mean every section has to blend seamlessly. A visible change in length can be the point. Decide where that change sits and how it works with the rest of the outline.

How do modern mullets differ from the stereotype?

The familiar retro silhouette is part of the cut’s story, not a rulebook. The history of the mullet shows how its look and cultural meaning have shifted over time. Contemporary versions can keep a strong short-front, long-back contrast while personalising the details instead of defaulting to one exaggerated shape.

Fringe, side length, layering and texture each change the attitude. A softer fringe and blended sides can make the outline feel relaxed; shorter sides and stronger separation create a sharper statement. Shaggy layers bring movement, while a cleaner outline can feel more controlled. For a wider look at different cut variations, explore this modern mullet haircut guide.

Use references to show the feeling you’re after, not to demand an exact copy. The same outline can sit very differently depending on hair texture, length and growth pattern. A textured cut can translate those visual cues into a shape that feels like yours, with the contrast dialled up or down to match your preference.

Choose Mullet Proportions That Work with Your Features and Hair

The same mullet can look soft and understated on one person, then sharp and full of attitude on another. The difference often comes down to proportion: fringe shape, side length, crown layers and how far the back falls. Face shape can be one consideration, but it isn’t a rulebook. Think about what you’d like to emphasise, how you wear your hair and how much contrast feels like you.

Which mullet details can change the overall effect?

A longer fringe can bring more focus to the eyes, while a shorter or more open fringe reveals more of the face. Sides left longer create a gentler transition into the back; tighter sides make the shift more visible. Crown layers can add lift and movement, though the result depends on your hair’s density and natural behaviour. More length at the back makes the silhouette more pronounced, while a shorter tail keeps it restrained.

Use the table as a starting point for discussing the feel you want, not as a fixed formula.

Design choice Possible visual effect Discussion prompt
Longer, softer fringe A relaxed frame with less exposed forehead How should the fringe sit when it grows out?
Shorter sides Stronger contrast and a sharper outline How defined do I want the transition to look?
More crown layering Extra movement or lift, depending on density Where would layers work with my natural volume?
Longer back A more noticeable tail and elongated silhouette What back length will feel wearable day to day?

How should hair texture influence your mullet?

Texture changes how the cut moves, so the finished shape won’t always match a reference exactly. Straight hair can show clean lines and distinct layers; wavy hair may bring extra movement. Curls can add spring and width, while fine hair may need lighter layering to preserve a sense of fullness. Thick hair can carry more weight, so its density and growth patterns matter when deciding where to remove bulk and where to keep length.

Bring references, then talk through what your hair does naturally and how much styling you’re happy to do. A wolf cut shares a layered, textured feel with some mullets, but shifts the overall balance; explore this wolf hair cut guide if you’re weighing up those shapes. For a cut shaped around your texture and preferences, explore Heavy Metal Hairdresser.

Style a Mullet So the Texture Looks Intentional

Styling shouldn’t bury the cut under product or turn your morning into a wrestling match. The goal is to make the shape readable: bring out the layers, give the fringe direction and let the back move naturally. Start with a small amount of suitable styling product to add definition without flattening the hair. You can always add more.

How can you bring out texture without overworking the hair?

Begin with clean, damp hair and work with its natural movement. Your routine will depend on your texture and the finish you want, but this simple sequence gives you room to adjust:

  1. Remove excess water. Gently towel-dry so your hair is damp, not dripping.
  2. Apply a small amount of product. Warm it between your hands, then spread it through the areas that need definition. Use less at first, especially if your hair is fine or easily weighed down.
  3. Shape with your fingers. Separate a few layers, guide the fringe and encourage movement through the crown and back. Avoid combing everything into place if you want a lived-in finish.
  4. Check the outline. Let the hair settle, then add a little more product only where the texture needs extra control.

Finger styling is one option, not a rule. Wavy or curly hair may need a gentler touch to keep its movement; straighter hair might benefit from more deliberate separation. Follow what your hair does rather than forcing it into a finish it won’t hold comfortably.

What everyday styling choices make the cut feel like yours?

Small changes shift the mood. Try a different parting, sweep the fringe to one side or leave it loose. For a piecey finish, separate a few strands with your fingertips. Tousle the crown for a more relaxed feel, smooth the surface for a cleaner outline, or add definition selectively for a sharper, more controlled shape.

A lived-in finish can still look intentional. Keep the overall silhouette clear, even if individual strands fall freely. If the fringe and crown have movement while the longer back keeps its shape, the cut reads as considered rather than unfinished. That’s a practical way to make a mullet look good without repeating the exact same styling every day.

For a deeper routine and more ways to work with texture, read how to style a modern mullet. To explore personalised alternative cuts and texture, visit Heavy Metal Hairdresser.

How to Make a Mullet Look Good: Shape, Texture and Styling

Avoid the Mullet Mistakes That Make the Shape Feel Unbalanced

A mullet doesn’t have to be extreme to look deliberate. A softer transition, a shorter back or sides that keep more length can still give the cut its distinct character. The common mistake is assuming bigger contrast automatically means a better mullet. Strong proportions matter more than pushing every feature to its limit.

An intentional mullet makes its contrast feel designed; an unfinished shape looks as if its different lengths weren’t considered together. If yours feels off, notice where the balance breaks down. The fringe may feel too heavy beside close-cut sides, or the back may seem disconnected from the crown. Naming the issue gives you a clearer starting point than deciding the whole cut is wrong.

Why can a mullet look different from the reference photo?

A photograph captures one person’s texture, density, length, growth patterns and styling. Your hair brings a different mix, so even a similar cut can fall another way. Use references to communicate what attracts you, rather than expecting an identical result. Is it the fringe, the length around the sides, the crown layers or the shape at the back? Pointing to those details helps turn inspiration into a cut that works with your hair.

Styling affects the comparison, too. A reference might show carefully defined texture, while your hair is air-dried or brushed smooth. Before changing the cut, try styling it to bring out the intended movement. If the outline still feels wrong, discuss which proportion you’d like adjusted.

Can you make a mullet softer or easier to grow out?

Yes, you can dial back the contrast through proportion and blending. Keeping more length at the sides or choosing a less pronounced back can create a gentler silhouette. If you have future length goals, mention them before settling on the strongest contrast. That gives the shape a direction beyond its first day.

Growing out depends on the starting cut and how your hair grows, so there’s no universal timeline or guaranteed smooth transition. Between cuts, keep the look readable with a styling approach that suits your texture. If the outline starts to lose its shape, a refresh can focus on the areas that feel bulky or disconnected rather than making everything shorter. Let how the cut sits for you, rather than a fixed schedule, guide the timing.

If you want a mullet shaped around your references, texture and plans for growing it out, explore a personalised mullet cut with Heavy Metal Hairdresser.

Get a Mullet Cut That Feels Like You

A reference photo is a starting point, not a blueprint. The best way to explain how to make a mullet look good for you is to show what you’re drawn to, then add the details that make the cut wearable in your everyday life. A stylist can translate those preferences into a shape that works with your hair, rather than reproducing someone else’s silhouette.

What should you tell your stylist before getting a mullet?

Bring a few reference images and point out the exact details you like. Maybe it’s the fringe in one photo, the softer sides in another or the length at the back. Be just as clear about what feels too extreme. Then share your current length, natural texture and usual routine, including how much styling you realistically want to do.

How does a personalised alternative cut come together?

A considered cut brings your preferences, texture and upkeep into the same conversation. Your stylist can use your references to understand the mood you’re after, then adapt the layers and proportions to how your hair naturally sits. That might mean keeping more length in one area, changing the fringe or adjusting the contrast so the shape feels cohesive on you.

At Heavy Metal Hairdresser, alternative haircutting and textured styling centre individuality rather than a one-template result. It’s an inclusive space where self-expression is welcome, but that doesn’t mean every mullet should look the same. The aim is to find a version that feels expressive and comfortable for the person wearing it.

Before you settle on the details, make sure the conversation covers both the look you want and the effort you’re happy to put into it. A cut that suits your texture and routine is easier to make your own.

If you’re ready to explore a mullet shaped around your preferences, take a look at the expressive cuts and textured styling at Heavy Metal Hairdresser.

Make the Mullet Your Own

Knowing how to make a mullet look good comes down to more than chasing dramatic contrast. Choose proportions that work with your features and hair, style to bring out its natural texture, and use references to explain the details you want rather than demand an exact copy. A strong cut should feel like you, not a template.

Heavy Metal Hairdresser was founded by barber and creative stylist Simon Tuckwell, bringing alternative haircutting and textured styling to an inclusive space where individual expression is celebrated. The salon’s backstage festival work includes Download and Bloodstock, but the starting point for your cut is your own style, texture and daily routine.

Ready to explore a mullet shaped around your expression? Explore a mullet cut shaped around you. Bring your references, share what feels right and make the look your own.

Frequently Asked Questions

Can anyone make a mullet look good?

A mullet can be adapted to many hair types and personal styles, but no single version suits everyone. The key is finding proportions that work with your natural texture, preferred level of contrast and everyday routine. Bring reference images and point out what you’d keep or soften, such as the fringe or length at the back. The aim is a shape that feels like you, not a copied template.

How do I make a mullet look less extreme?

Ask for a softer balance between the sides and back, and discuss fringe length, layering and blending before the cut. A mullet can still read clearly without dramatic contrast. Reference images can help show the level of boldness you prefer. Your current length and natural texture also affect how subtle the finished shape can be, so talk through how the cut is likely to sit and move with your hair.

Does a mullet suit fine or thin hair?

A mullet can work with fine or thin hair, but the cut should account for its density, movement and natural volume. Talk through how much layering will create shape without making the ends feel too sparse. Styling can help define texture, but it can’t change your hair’s underlying density. Bring examples you like and explain how much daily styling feels realistic, so the proportions can be tailored accordingly.

How do I style a mullet at home?

Start with clean, damp hair and work with its natural movement. Apply a small amount of suitable styling product, then add more only if needed. Use your fingers to separate layers or guide the fringe, and choose a finish that suits you, from tousled to defined or smooth. Your cut and hair type will affect the routine, so ask your stylist to show you a technique you can manage at home.

Can curly or wavy hair work with a mullet?

Yes, waves and curls can give a mullet natural movement and a distinct silhouette. The cut should account for how your hair sits when dry, along with its density and growth pattern. Think about whether you want to define your texture or keep it softer, and share your usual styling routine. Reference images with a curl or wave pattern similar to yours can help communicate the finish you have in mind.

How often should you get a mullet trimmed?

There’s no single trim schedule that works for every mullet. It depends on how quickly your hair grows, how sharply defined the cut is and how much change you’re comfortable with between appointments. A softer, lived-in shape may feel different from a highly structured one as it grows. Notice which areas lose their outline first, then use that as a guide when deciding when a refresh would help.

Can a mullet be grown out if I change my mind?

Yes, but growing out a mullet takes patience and depends on its starting length, layers and contrast. Mention your future length goals before choosing the cut, so the strongest proportions can take them into account. As it grows, occasional reshaping may help the changing lengths feel more intentional. There’s no single quick trim that makes every section grow evenly, so expect the transition to vary with your hair.

Posted on

Alternative Hairstyles for Over 40s: Bold Cuts Without the Rules

Alternative Hairstyles for Over 40s: Bold Cuts Without the Rules

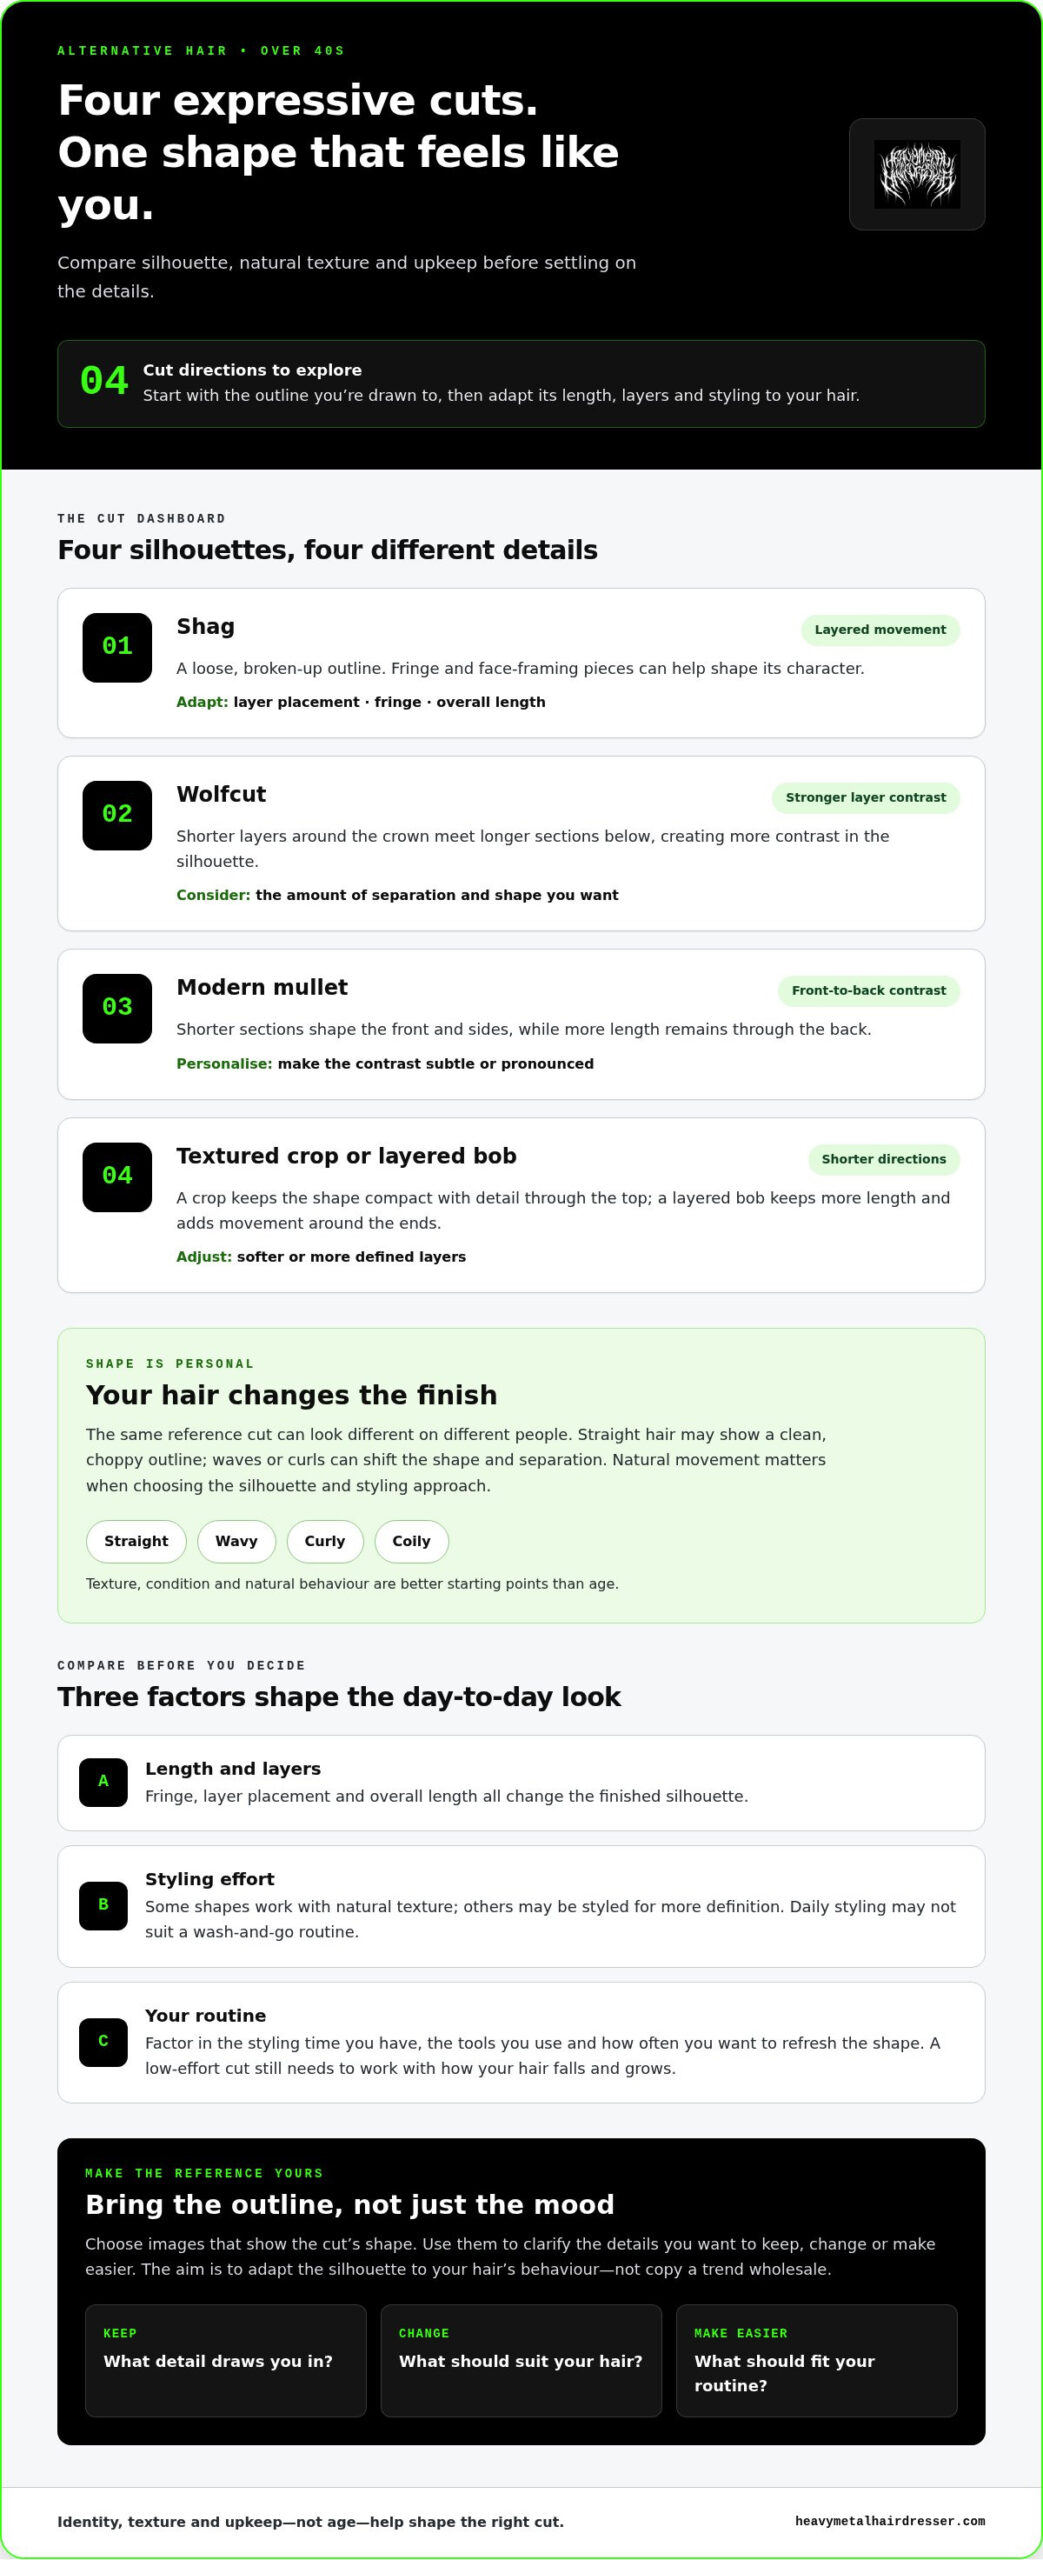
Age doesn’t come with a haircut rulebook. If the styles you’re finding feel too safe, too trend-led or aimed at someone else, alternative hairstyles for over 40s offer another route: cuts with character, shaped around who you are, not the number of candles on your cake.

It’s fair to wonder whether a bold shag, wolfcut or mullet will work with your hair texture and morning routine. The right cut should feel like you, not like a costume you have to maintain. Length, layers and styling all affect the finished shape, so personalising the silhouette matters more than copying a trend exactly.

Here, you’ll find expressive, age-inclusive cut ideas and practical ways to compare texture, upkeep and day-to-day styling. Heavy Metal Hairdresser specialises in shags, wolfcuts, mullets and textured cuts, with each look centred on individuality. Bring your instincts, your hair’s natural behaviour and a few reference images into the conversation. There are no age-based rules to follow, only a cut that feels right for you.

Key Takeaways

  • Explore shags, wolfcuts, modern mullets and textured crops to find a silhouette that matches the kind of edge you want.
  • See how straight, wavy, curly and coily hair can change the shape and styling needs of alternative hairstyles for over 40s.
  • Compare cut length and styling effort to narrow down options that fit your everyday routine.
  • Choose reference images that show the cut’s shape, then note what you want to keep, change or make easier.
  • Specialist alternative cutting can adapt an idea to your hair and personal style.

Alternative hairstyles for over 40s: style has no age limit

Want a change that feels more like you, without a list of age-based rules attached? You’re not alone in wanting hair with personality rather than a prescribed “suitable” look. Alternative hairstyles for over 40s aren’t a special category with their own restrictions. They’re expressive cuts and styling choices, from a subtle shift in shape to a full-on statement, chosen because they speak to the person wearing them.

Hair has long been part of personal grooming, fashion, and cosmetics, as well as a way to express taste and identity. That expression doesn’t expire at a certain age. Your years alone don’t decide whether you can wear a cropped cut, keep your length, add vivid colour or choose something more pared back. Hair texture, its current condition and how you like to style it are more useful starting points than an age bracket.

Why alternative hair is not reserved for one generation

Rules that prescribe short, subdued or conventional hair after a certain age reduce people to a stereotype. Bin them. Some people want a dramatic silhouette; others prefer an offbeat detail that only shows when their hair moves. Both count. Your gender, hair history and style goals are yours to define, so there’s no single look that represents everyone over 40.

Alternative can mean contrast, texture or shape, not just bright colour or a dramatic chop. Layers can add movement without sacrificing length; a sharper outline can make a cut feel more deliberate. The point is choice, not proving you’re bold enough.

What makes a cut feel right for you

Start with the details you’re drawn to. Do you like a cut that falls into place with natural movement, or one you can sculpt into a more defined shape? Do you want to keep length around your face, expose the neckline or bring out your natural texture? These preferences turn a general mood into a shape your stylist can work with.

Then weigh up the upkeep you’ll genuinely enjoy. A cut that relies on daily styling may not suit a wash-and-go routine, while a low-effort shape still needs to work with how your hair falls and grows. Think about the styling time you have, the tools you use and how often you want to refresh the shape. Heavy Metal Hairdresser’s specialist textured cutting adapts the silhouette to your hair’s behaviour rather than forcing it into a generic template.

The takeaway: age doesn’t dictate a cut. Identity, texture and upkeep help shape a look that feels like yours.

Alternative hairstyles for over 40s: four cuts with expressive edge

Think of these cuts as starting points, not prescriptions. The same silhouette can shift with your hair’s texture, length, fringe and layer placement. None belongs to a particular age or face shape. For wider inspiration, explore Alternative Hair Styles: A Professional Guide to UK Trends, then focus on the details that catch your eye.

Shag and wolfcut: movement, layers and lived-in texture

A shag uses layers to build a broken-up, lived-in outline, often with a fringe or face-framing pieces. A wolfcut pushes the contrast further, combining shorter layers around the crown with longer lengths below. Both can create movement, but the result depends on how your hair naturally sits. Fringe shape, layer placement and overall length all change the silhouette, so the cut can be adapted rather than copied wholesale. For a closer look at the shag, see The Shag Haircut Resurrection.

Modern mullet and shorter textured cuts: sharper silhouettes

A modern mullet plays with contrast: shorter sections shape the front and sides, while more length remains through the back. That difference can be subtle or pronounced, depending on how the sections blend. It’s a distinctive outline with plenty of room for personal interpretation.

If you’d rather go shorter, a textured crop gives you a compact shape with detail through the top; a layered bob keeps more length while adding movement around the ends. Either can be tailored with softer or more defined layers. Texture affects the finish: straight hair may show a clean, choppy outline, while waves or curls can shift the shape and separation. For more wolfcut detail, look up The Ultimate Wolf Hair Cut Guide.

  • Shag: layered and loose, with fringe and length shaping its character.
  • Wolfcut: more contrast between shorter crown layers and longer sections.
  • Modern mullet: shorter front and sides balanced by length at the back.
  • Textured crop or layered bob: shorter options, with different lengths and layers to play with.

Save reference images that show the outline you like, not just the colour or overall mood. Heavy Metal Hairdresser specialises in alternative, textured cutting and can translate that inspiration into a shape that works with your hair. Explore Heavy Metal Hairdresser’s alternative hair expertise for ideas grounded in expressive cuts.

How to compare alternative cuts by texture, length and upkeep

A cut can look completely different on two people, even when they bring the same reference image. Compare the shape you want with your hair’s natural movement and the time you’re happy to spend styling it. This gives you a more useful shortlist than choosing by age or face-shape rules. Use the table as a starting point, not a formula.

Cut direction Silhouette Styling effort Possible adaptation
Shag Layered, broken-up movement Can be worn with natural texture or styled for more definition Adjust layer placement, fringe and length
Wolfcut Shorter crown layers with longer sections Depends on how much separation and shape you want to create Adapt the contrast and layering to your hair’s density and movement
Modern mullet Shorter front and sides, with length through the back Can be worn more softly or styled to emphasise the contrast Change the length difference and how the sections blend
Textured crop or layered bob Shorter overall, with detail from texture or layers Varies with the finish you prefer Keep the outline softer or more defined, and tailor the layers

Match the cut to how your hair naturally behaves

Straight, wavy, curly and coily hair each respond differently to layering. Straight hair may show the outline and separation clearly; waves can create their own movement; curls and coils can change how length and layers sit. Density, growth patterns and natural direction matter too. They’re useful design information, not problems to correct. Heavy Metal Hairdresser’s textured cutting shapes layers around those behaviours instead of expecting every head of hair to follow the same template.

Balance the look you want with its upkeep

Be honest about your routine. Do you like shaping your hair each morning, or would you rather let its natural texture do the work? A deliberate, piecey finish may call for more hands-on styling than a softer, less structured shape. Neither is better. Choose the level of effort you’ll enjoy repeating.

Consider three separate upkeep factors: length, which affects how the shape sits as it grows; fringe, which may need attention to keep its intended position; and colour, if you choose to add it. Vivid colour is optional. A strong cut can make its mark through silhouette and texture alone. Your hair and preferences are individual, so discuss how the shape may change over time instead of relying on a universal maintenance schedule.

The best alternative hairstyles for over 40s aren’t dictated by a face-shape chart. Start with the outline you love, then weigh it against your texture and everyday styling habits.

Alternative Hairstyles for Over 40s: Bold Cuts Without the Rules

Plan your alternative hairstyle before changing your look

A clear brief turns “I want something different” into a useful conversation about shape, texture and routine. You don’t need the perfect haircut vocabulary. A few visual references and honest notes about what works for you can help your stylist understand the direction you have in mind.

Build a clear visual brief for your haircut

Collect a handful of images that show a similar length, texture or styling goal to your own. Look beyond colour and overall mood: focus on the cut’s outline, fringe, layers and where the shape sits around the head. Save examples you like, but also note what feels impractical or unlike you. A photo is inspiration, not a demand for an exact copy.

Talk through styling habits and personal boundaries

Your usual routine matters as much as the reference. Explain how you wear your hair on an ordinary day, how much styling you enjoy and what you’d rather avoid. Share how your texture behaves, what you want to keep from your current cut and what you’re ready to change. You can be excited about a new silhouette and still have boundaries around length, fringe or daily effort.

Use this quick prep list before your appointment:

  • Gather references: Choose images that show the shape you’re drawn to, ideally with hair texture or length close to yours.
  • Name your priorities: Pick the details you care about most, such as movement, a fringe, a sharper outline or keeping length.
  • Set your boundaries: Describe what you want to keep, change or avoid in your current cut. Be clear about any big changes you’re unsure about.
  • Talk upkeep: Explain your everyday styling habits and discuss how the proposed shape may behave as it grows.

For alternative hairstyles for over 40s, this preparation keeps the choice personal rather than trend-led. You don’t need to arrive with every detail decided. Give your stylist enough information to shape the idea around your hair and the way you want to wear it.

Ready to explore a cut with more character? Explore alternative cutting work from Heavy Metal Hairdresser, including shags, wolfcuts, mullets and textured styles.

Make the look yours with inclusive alternative hair expertise

A reference photo can spark an idea, but your cut shouldn’t be a carbon copy. A shape that works in a picture also needs to make sense with your hair’s texture, natural movement and the way you like to style it. A skilled alternative haircut takes that conversation into account: keep the parts that feel like you, reshape what doesn’t, and find the details that give the look its edge.

A cut should reflect the person wearing it

Bring images as a visual starting point. One might show the fringe you love; another could capture a layered outline or the balance between shorter and longer sections. Explain what you want from each, as well as what you’d change. Heavy Metal Hairdresser can use those cues to discuss shape, texture and styling effort, then adapt the idea to your hair and personal taste.

There’s no need to treat your age, identity or hair texture as something to work around. They’re part of the full picture, alongside your preferences and routine. Maybe you want a shag that moves without losing length, a wolfcut with a softer contrast, or a mullet shaped to feel distinctly yours. The useful question isn’t whether a style is “right for your age”. It’s whether the cut expresses what you want and feels wearable in your everyday life.

From inspiration to your next cut

Keep the decision simple: choose a direction, think through the upkeep you’re comfortable with, then communicate your priorities clearly. That gives your stylist a strong starting point without locking you into every detail before the conversation begins.

Heavy Metal Hairdresser is an inclusive alternative salon founded by stylist Simon Tuckwell, with specialist work in shags, wolfcuts, mullets and textured styling. The focus is individuality: adapting the chosen silhouette to the person wearing it, rather than forcing hair into an age-based template. This specialist experience helps turn a broad reference or half-formed idea into a more personal cut plan.

Exploring alternative hairstyles for over 40s should feel like opening up possibilities, not narrowing them down. Keep the details you love, be honest about what fits your routine, and let your inspiration lead the conversation.

Explore Heavy Metal Hairdresser’s alternative hair services when you’re ready to take the next step.

Choose a cut that feels like your next chapter

Age doesn’t set the limits. The best alternative hairstyles for over 40s start with what you want to express, then take your natural texture, preferred length and styling routine into account. Shags, wolfcuts, mullets and shorter textured shapes can all be adapted; vivid colour is a choice, not a requirement.

Bring images that show the shape you love, and be clear about what you want to keep, change or avoid. That gives your stylist room to turn inspiration into a cut that feels personal, rather than simply copying a reference.

Heavy Metal Hairdresser, founded by barber and creative stylist Simon Tuckwell, specialises in shags, wolfcuts, mullets and textured styling. Its backstage festival work includes Download and Bloodstock, but the focus stays on the individual in the chair and the look they want to make their own.

Explore alternative cuts and find a look that feels like you. Your next style doesn’t need permission from a rulebook. Make it yours.

Frequently Asked Questions

Can you wear alternative hairstyles over 40?

Yes, you can wear an alternative hairstyle at any age. A shag, wolfcut, mullet or vivid colour isn’t reserved for a particular generation or identity. Choose a shape that suits your personal taste, hair texture and everyday routine, rather than following rules about what you should wear after 40. Heavy Metal Hairdresser can adapt reference ideas around your hair’s natural behaviour and the look you want to express.

What is a low-maintenance alternative hairstyle for over 40s?

A low-maintenance option is one that works with your natural texture and doesn’t demand more daily styling than you enjoy. A softer layered bob or shag may suit someone who prefers a relaxed finish, while a sharply defined crop may need more deliberate shaping. No cut is automatically easy for everyone. Talk through how you usually wear your hair and what effort feels realistic before choosing a shape.

Can a wolfcut work on mature hair?

Yes, a wolfcut can be adapted for different hair textures and life stages. Its shorter layers around the crown and longer sections below can be adjusted to suit your hair’s density, movement and preferred length. The name alone doesn’t determine whether it’ll work for you. Discuss how your hair sits naturally, how much styling you want to do and how pronounced you’d like the layered contrast to look.

Is a modern mullet suitable for over-40s?

A modern mullet can suit anyone drawn to its contrast between shorter front and side sections and more length at the back. That contrast can be subtle or bold, with the shape tailored to your hair and taste. If you’re unsure about a dramatic change, discuss a softer outline or a less pronounced difference in length. Your age doesn’t rule it in or out; your preferences should lead.

How do I choose an alternative haircut for my hair texture?

Start by noticing how your hair behaves without forcing it into a particular shape. Straight, wavy, curly and coily hair can respond differently to the same layers, fringe or length. Consider density, natural movement and growth patterns, then gather reference images that show a similar texture or cut outline. Heavy Metal Hairdresser’s experience with textured alternative cuts helps adapt the shape to your hair and the way you like to style it.

Do alternative hairstyles for over 40s have to be brightly coloured?

No, alternative hairstyles for over 40s don’t have to include vivid colour. A cut can make a statement through its silhouette, layers, fringe or texture alone. Colour is an optional way to shift the overall feel, whether you prefer a subtle change or a brighter expression. If you’re choosing a new cut, decide whether colour is part of the idea or a separate choice; neither is required to make the look personal.

How should I prepare for a bold haircut?

Collect a few images that show the shape you like, not only a colour or general mood. Note details such as length, fringe and layers, plus what feels impractical or unlike you. Before your appointment, think about what you want to keep, change or avoid in your current cut, and how much daily styling you enjoy. Sharing your hair’s natural behaviour and your priorities gives your stylist a clear starting point.

Posted on

Styling a Wolfcut as It Grows Out: Keep the Shape in 2026

Styling a Wolfcut as It Grows Out: Keep the Shape in 2026

A growing wolfcut doesn’t need to be wrestled back into its original shape. Styling a wolfcut as it grows out means working with its new proportions, not fighting every flipped-out end or shifting layer. If shorter pieces sit differently and the overall shape feels less defined, you’re not imagining it. As your hair grows, your routine can change too.

The aim is to keep the texture and movement that make the cut yours, without turning every morning into a styling battle. This guide covers adaptable ways to wear your wolfcut through changing lengths, from encouraging natural texture to giving stubborn layers direction. You’ll also learn what to try when the shape feels off and when a conversation with a stylist about a reshape could help. A small styling adjustment may be enough. If you want expert support, Heavy Metal Hairdresser specialises in wolfcuts and alternative cuts, with options to discuss what suits your look and comfort.

Key Takeaways

  • Learn why the balance between shorter layers, longer lengths and fringe shifts as your wolfcut grows.
  • Use a simple damp-hair routine to encourage movement without forcing every layer into place.
  • Match your styling approach to whether your cut is in a shorter, in-between or longer grow-out stage.
  • Track changes in your silhouette with occasional photos taken in similar light.
  • Find out when styling a wolfcut as it grows out may be enough, and when a reshape conversation could help.

Styling a wolfcut as it grows out: why the shape changes

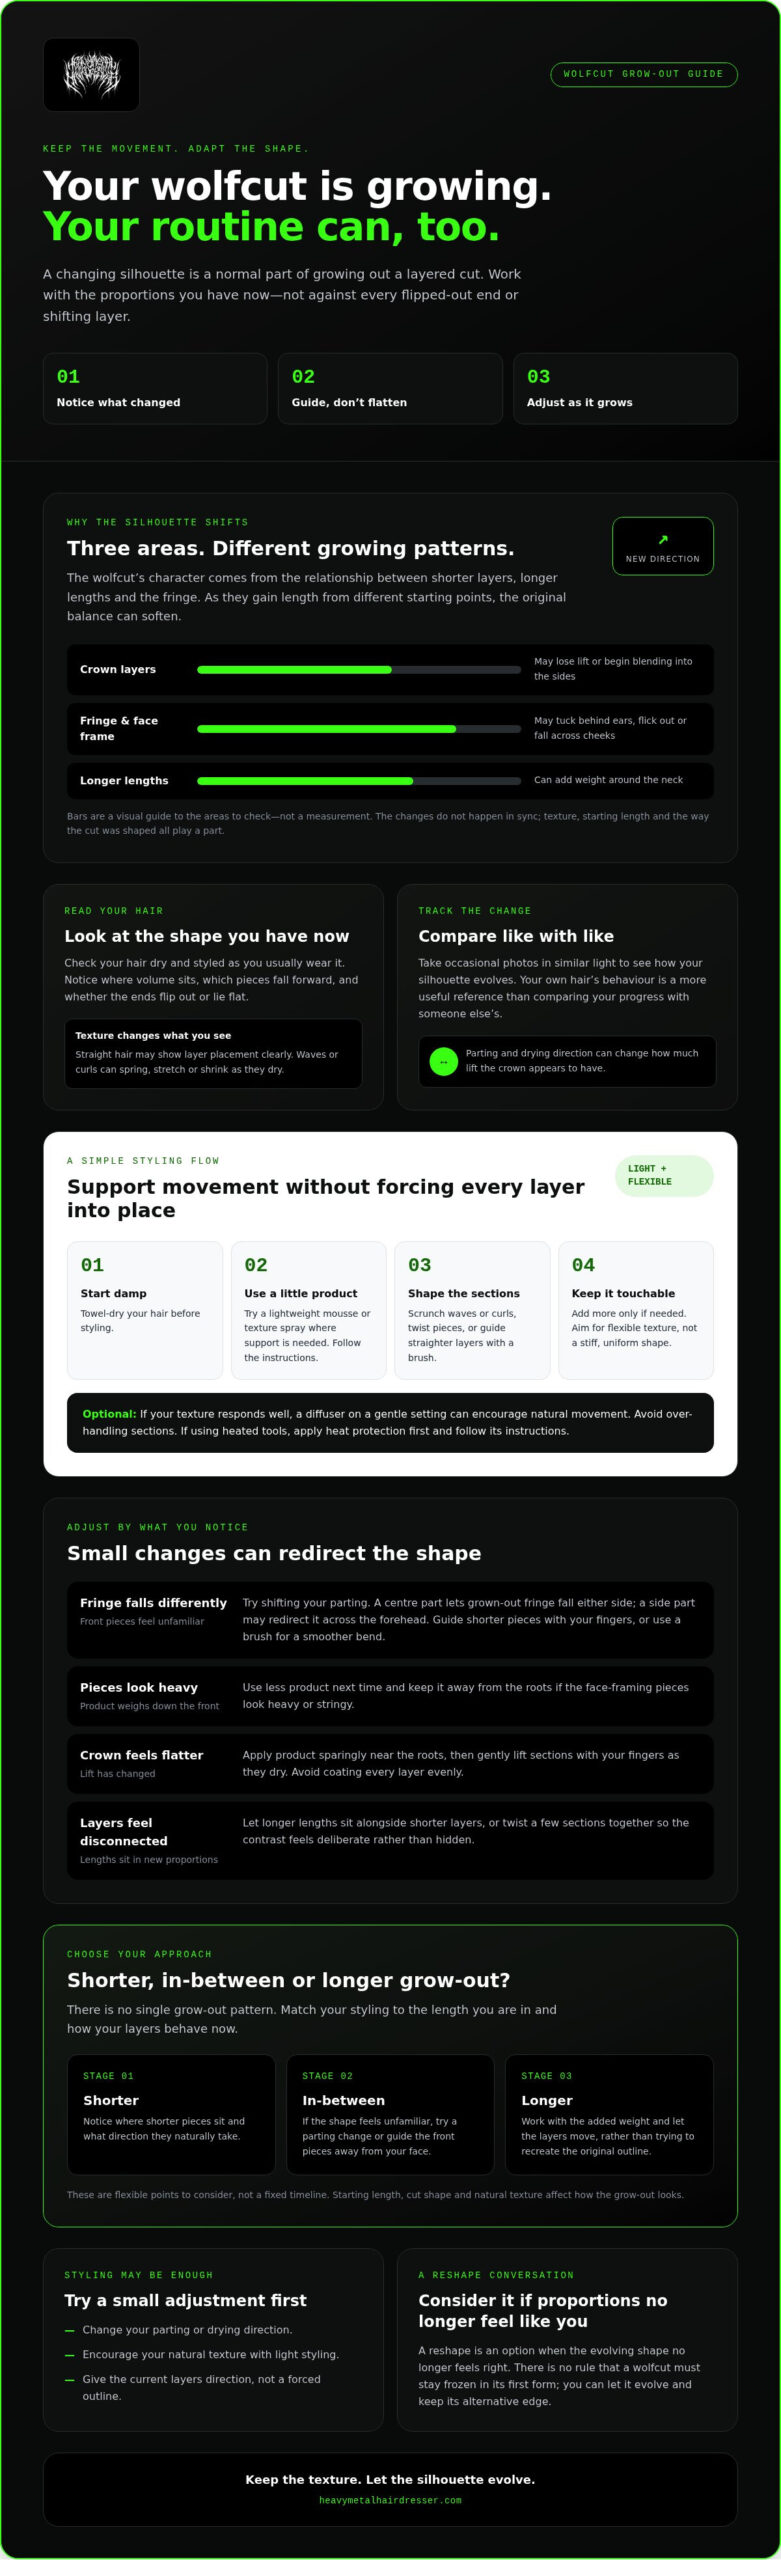
A changing silhouette is a normal part of growing out a layered cut, not a sign that you’ve done anything wrong. A wolfcut’s shape comes from the relationship between shorter crown layers, longer lengths around the sides and back, and the fringe or face-framing pieces. As these sections gain length from different starting points, the balance that made the original cut distinctive can soften.

That structure is part of the cut’s character. A wolfcut is a modern variation of the shag, with layers that create movement and a deliberately undone shape. As the layers lengthen, they may sit closer to the head, blend into surrounding sections or fall in a new direction. The original silhouette can become less obvious, even when the hair still has texture and personality.

There’s no single grow-out pattern. Your starting length, the way the cut was shaped and your natural texture all affect what you see. Straight hair may show changes in layer placement clearly; waves or curls can spring, stretch or shrink as they dry. Styling habits matter too. A parting or drying direction that once lifted the crown might now make it sit flatter. Start by noticing what your hair is doing now, rather than expecting it to follow a fixed timeline.

What changes first as wolfcut layers grow?

The crown layers may lose some lift or begin blending into the sides. Face-framing pieces might reach a length where they tuck behind your ears, flick out or fall across your cheeks, while the longer sections add weight around the neck. These changes don’t happen in sync because each area started at a different length and may behave differently with your texture.

Look at your hair when it’s dry and styled as you usually wear it. Notice where the volume sits, which pieces keep falling forward, and whether the ends flip out or lie flat. This gives you a more useful picture of your shape than comparing your progress with someone else’s hair.

Is the awkward wolfcut stage unavoidable?

Some lengths may feel unfamiliar, especially when the fringe and face-framing sections no longer sit as they did. That doesn’t mean the stage is a failure. Try changing your parting, directing the front pieces away from your face or bringing out your natural texture. A small change in direction can give the layers a different kind of energy.

Growing it out doesn’t mean giving up its alternative edge. You can keep the movement loose and lived-in, let the shape evolve or explore a reshape if the proportions no longer feel like you. There’s no rule that says a wolfcut must stay frozen in its first form.

How to style a growing wolfcut without flattening its texture

Keep your routine light and let the lengths move. Start with damp, towel-dried hair, then work a small amount of suitable styling product through the areas that need support. A lightweight mousse or texture spray can help encourage lift and definition. Follow the product instructions, and add more only if your hair needs it.

Shape sections according to how they sit now. Scrunch waves or curls, twist a few pieces around your fingers, or guide straighter layers into place with a brush. You’re not trying to recreate the exact outline of the original cut. Give the current layers enough direction to look intentional.

Lightweight, adaptable styling helps preserve movement by supporting the layers without weighing them into a stiff, uniform shape. For more upkeep ideas, see this wolf cut maintenance routine, then adjust the approach to suit your hair and preferred finish.

How to shape the fringe and face-framing layers

Try shifting your parting before adding more product. A centre part can let grown-out fringe fall on either side, while a side part may redirect it across the forehead. Use your fingers to separate and guide shorter pieces, or a brush for a smoother bend. If those pieces look heavy or stringy, use less product next time and keep it away from the roots.

How to work with crown layers and longer lengths

For soft lift at the crown, apply product sparingly near the roots and gently lift sections with your fingers as they dry. Avoid coating every layer evenly; varied, touchable texture often looks more natural. Let longer lengths sit alongside the shorter layers, or twist a few sections together so the contrast feels deliberate rather than hidden.

If your texture responds well, a diffuser can help dry your hair while encouraging its natural movement. Try a gentle setting and avoid over-handling the sections; results vary with hair texture and drying technique. If you use heated tools, apply heat protection first and follow its instructions. Aim for a flexible finish, not a locked-in shape.

Styling a wolfcut as it grows out doesn’t require a complicated kit or a perfect blow-dry. To explore how an alternative-cut specialist might approach your current shape, learn more about Heavy Metal Hairdresser’s wolfcut expertise.

Which styling approach suits each wolfcut grow-out stage?

Use the shape in front of you as your guide, not a calendar. “Shorter”, “in-between” and “longer” describe how your layers sit in relation to each other, not how long you’ve been growing your hair. The table offers starting points, not strict rules. Your texture, density and preferred finish all affect what works.

What you notice Low-effort option More defined option
Shorter layers still dominate; the crown has more shape than the lengths. Let the crown dry naturally and guide the longer pieces around your face with your fingers. Separate a few crown sections for texture, then shape the fringe in the direction you want it to fall.
In-between lengths are beginning to blend, but some layers still stand apart. Change your parting and scrunch or smooth the hair according to its natural texture. Use fingers or a brush to define selected sections, keeping the finish varied rather than uniform.
Longer lengths now carry more of the silhouette, with softer or less obvious layering. Wear the lengths loose and let the remaining layers move around them. Give a few face-framing or crown pieces extra direction to bring definition back into the outline.

When the shorter layers still dominate

Let the crown texture do its thing while the longer sections frame your face. Don’t try to make every layer match. For a softer finish, leave the sections less separated; for a pieceier effect, define a few strands with your fingers and a small amount of suitable product. Directing the fringe to the side, forward or away from your face can change the balance without changing the cut.

When the lengths begin to blend together

As layers merge, define a few pieces and leave others relaxed. This keeps movement visible without making the style look overly arranged. Try a different parting or finish before deciding you need to trim back towards the old shape. If an experiment doesn’t work, wash it out or reset your hair with your usual routine. Not every look has to stick.

As the cut gets longer, resist hiding the shorter layers beneath the lengths. Let them sit together, or bring out a few selectively to keep some contrast. These are options, not universal fixes. Choose an approach that suits your hair today, whether that’s barely-there texture or a more deliberate shape.

Styling a Wolfcut as It Grows Out: Keep the Shape in 2026

A practical routine for managing wolfcut growth between trims

A repeatable routine makes it easier to tell whether your wolfcut needs a styling tweak or simply more time. Keep the steps flexible: your texture, preferred finish and available time matter more than following a strict schedule. For more context on the cut and its terminology, explore the ultimate wolfcut guide.

A repeatable wash-day and refresh routine

On wash day, start with clean, damp hair. Choose styling support for the result you want: texture for separation, hold for more definition or smoothing support for a softer finish. Use products according to their instructions, and don’t assume you need the same amount or approach every time.

Change one thing at a time as you style. Try a new parting, a different drying direction or a lighter hand with product, then notice how your hair responds. When you’re short on time, focus on the sections that most affect the outline, such as the fringe or crown, and let the rest settle naturally.

For a useful visual check, take an occasional photo in similar light and from a similar angle. Compare the overall silhouette, not every strand. Are the front pieces sitting differently? Has the crown lost the lift you like? Photos can help distinguish a temporary styling frustration from a change in shape that keeps bothering you.

When should you ask for a reshape?

Consider speaking with a stylist if the outline persistently feels difficult to style or no longer feels like you. A reshape conversation doesn’t automatically mean losing length. It’s a chance to explain the direction you want and discuss what might work with the hair you have now.

Make the conversation specific. Bring your photos and describe your desired length, the sections that frustrate you and the features you want to keep, such as crown texture or face-framing layers. If you’re unsure whether to keep growing it or bring back a more layered shape, comparing related cuts may help. The shag haircut guide offers context on another textured shape.

Styling a wolfcut as it grows out doesn’t mean managing every stage alone. Heavy Metal Hairdresser specialises in wolfcuts and alternative textured cuts. You can explore its wolfcut expertise if you’d like a stylist’s perspective on your current shape.

Keep your growing wolfcut yours: styling support and next steps

Choose what feels right for your hair: keep growing, change how you style the layers or explore a reshape that suits the length you have now. There’s no single correct finish, and you don’t have to preserve the cut exactly as it was on day one.

Styling a wolfcut as it grows out can mean trying small changes and seeing what works. If you’d like another perspective, a stylist experienced with wolfcuts and textured cuts can talk through options for your current shape. Heavy Metal Hairdresser specialises in alternative cuts, including wolfcuts. Any discussion should start with your preferences, not a promised result.

What to bring to a wolfcut reshape conversation

Reference images can help make your ideas clear. Bring examples of shapes you like, as well as details you’d rather avoid. Be open about how much time you want to spend styling, how your hair behaves and how much length you’d like to retain. You know what feels like you; a stylist can discuss how those preferences might work with your hair as it is now.

How to choose your next move

If a change of parting, direction or styling finish makes the shape feel more like yours, an adjustment at home may be enough for now. If the outline repeatedly frustrates you, certain sections remain difficult to wear or the cut no longer reflects how you want to look, a conversation with a stylist could help clarify your options. It’s a discussion, not a commitment to cut.

There’s no rush to decide. Explore wolfcut and alternative styling to learn more about Heavy Metal Hairdresser’s approach and consider what feels right for your hair. Whether you keep growing, restyle or reshape, the best wolfcut is the one you want to wear.

Let your wolfcut evolve on your terms

As your layers change, the shape shifts too. The key to styling a wolfcut as it grows out is adapting your routine to the proportions you have now. Light, flexible styling can keep movement without forcing every piece into its old place. If a parting or texture tweak brings the cut back into balance, keep growing. If the shape persistently feels wrong, a reshape conversation can help you consider your options without committing to a particular result.

Heavy Metal Hairdresser specialises in wolfcuts, shags, mullets and textured styling. Founder Simon Tuckwell is a barber and creative stylist, with backstage experience at Download and Bloodstock. That alternative-cutting background can inform a conversation about what may suit your current length and the look you want to wear.

Explore alternative wolfcut styling and discuss your next cut with Heavy Metal Hairdresser. Keep growing, restyle or reshape. Your hair, your call, and the best wolfcut is the one that feels like you.

Frequently Asked Questions

How do you style a wolfcut while growing it out?

Style the lengths you have now rather than trying to recreate the original outline. Start with damp hair, use a little suitable product for your preferred finish, then shape selected sections with your fingers or a brush. You might redirect the fringe, encourage texture at the crown or let the longer pieces fall naturally. Adjust one thing at a time and see how your hair responds.

How long does it take to grow out a wolfcut?

There’s no fixed timeframe. It depends on your starting length, how much length you want and how your hair grows. A wolfcut also has several layers, so the shape can change before the overall length feels substantially different. Rather than relying on a calendar, notice how the fringe, crown and longer sections sit in relation to each other. Occasional photos in similar light can help you track those changes.

Can you grow out a wolfcut without cutting it?

Yes, you can let a wolfcut grow without cutting it. The layers and fringe will continue to change as they gain length, and you can adapt your parting or styling to suit the evolving shape. Some people prefer to leave every section untouched; others choose to discuss a reshape if the outline becomes difficult to wear. A cut isn’t required to grow it out, and the choice is yours.

What should you do with wolfcut layers as they grow?

Let the layers work with their new proportions instead of forcing them into their original positions. If the crown still has visible texture, bring out a few pieces; if the layers are blending, try a different parting or define selected sections. Keep the finish flexible, and avoid adding more product if shorter pieces start to look heavy or separated. Let your hair’s texture and the look you enjoy guide your approach.

How do you style wolfcut bangs when they get longer?

Experiment with the direction and parting. Longer fringe can be guided to either side, worn across the forehead or blended into face-framing pieces, depending on its length and how it naturally falls. Use your fingers for a relaxed finish or a brush for a smoother bend. Apply product sparingly, especially if the fringe is fine or easily weighed down. If it keeps falling in a way you dislike, ask a stylist about options.

Does a wolfcut look good at every length?

A wolfcut can evolve through different lengths, but whether you like the look is personal. As it grows, the balance between crown layers, fringe and longer sections changes, so the original silhouette may soften or take on a different character. Styling can help you explore the in-between shape, but there’s no obligation to love every stage. Choose the length and finish that feel comfortable and expressive for you.

When should you get a wolfcut reshaped?

Consider discussing a reshape if the outline persistently feels difficult to style or no longer reflects the look you want. Bring reference images, explain which sections bother you and say how much length you’d like to keep. A conversation with a stylist experienced in wolfcuts and textured cuts can help clarify possible directions, but it doesn’t commit you to a cut. If a styling change is working, there’s no need to rush.

Posted on

Professional Wolfcut for Work: Style It Your Way

Professional Wolfcut for Work: Style It Your Way

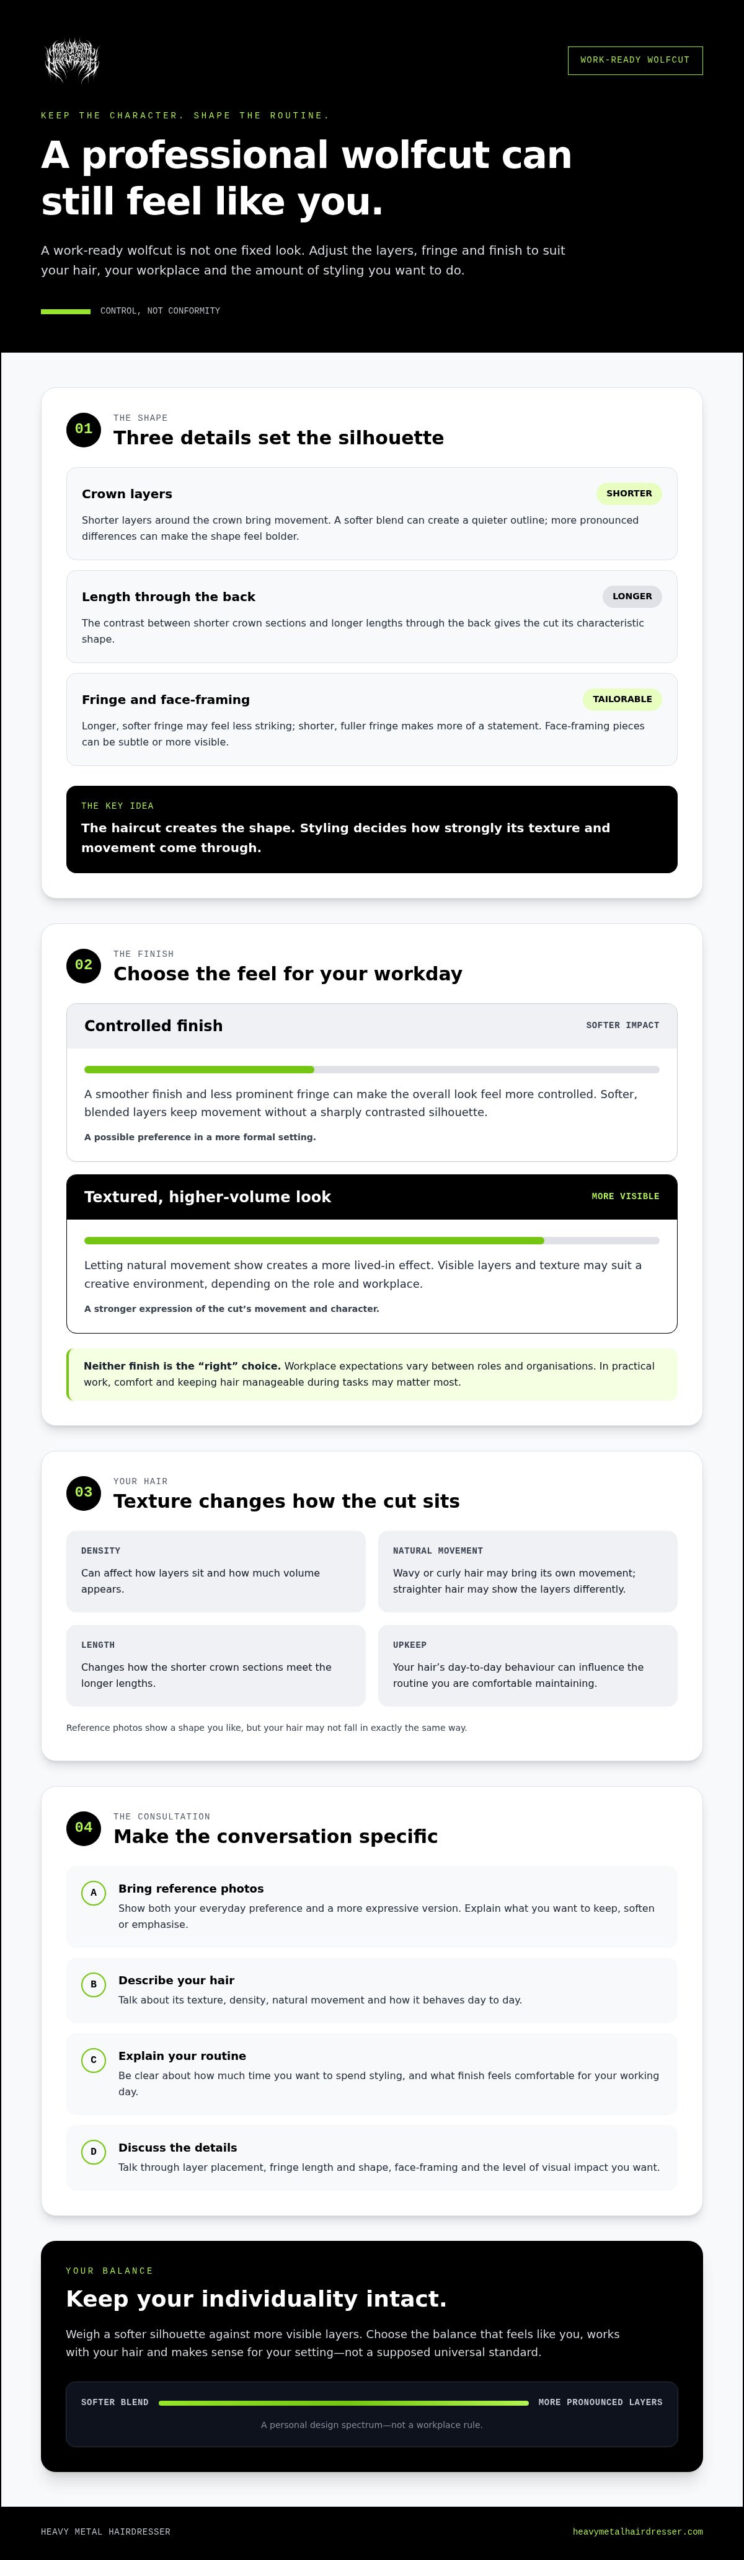
A professional wolfcut for work is shaped by control, not conformity. Softer, more blended layers can keep the cut’s movement without making the silhouette feel too dramatic. Fringe length and shape can also be tailored to your comfort and workplace. The result can still look unmistakably like you.

It’s fair to wonder whether choppy layers will feel too bold on a Monday morning, or whether your fringe will take more time to style than you have. Workplace expectations can make personal style feel like something to tone down. But adapting your wolfcut doesn’t mean sanding off its edges.

This guide explains how layer placement, fringe and texture change the overall look, and how to style your cut around your hair and working day. You’ll also find practical points to discuss with a stylist, from the finish you want to the upkeep you’re comfortable with. Keep the character. Make the routine work for you.

Key Takeaways

  • A professional wolfcut for work isn’t one fixed look. Consider your workplace expectations and the level of visual impact that feels right to you.
  • Shorter crown layers, longer lengths and fringe all affect the shape. Discuss these details with your stylist to customise the result.
  • Compare a controlled finish with a higher-volume, textured look to find an approach that suits your workday and styling routine.
  • Take reference photos to your stylist and explain your hair texture, daily routine and how much time you want to spend styling.
  • Weigh a softer silhouette against more visible layers, then choose a balance that keeps your individuality intact.

Can a professional wolfcut work in your workplace?

It’s understandable to wonder whether a distinctive cut will feel out of place at work. A wolfcut can be adapted to different working environments, but “work-ready” doesn’t mean there’s one correct version. Think of it as a customised layered shape, not a fixed office template. The balance of shorter layers, longer lengths and fringe can be adjusted to suit your hair, preferences and day-to-day life.

The cut sits within a broader shag tradition. The variation of the shag known as the wolfcut takes on mullet-like characteristics, but that doesn’t dictate how bold the finished look must be. The haircut creates the shape; styling decides how strongly its texture and movement come through. Your working environment may influence that choice, but it doesn’t have to erase your individuality.

What makes a wolfcut feel more understated?

Small design choices can change the overall impression. A longer, softer fringe may feel less striking than a short, heavy one. Less pronounced layers can add movement without creating a sharply contrasted silhouette. Face-framing length also affects how strongly the cut frames your features.

Styling can soften or emphasise texture without changing the haircut itself. A smoother finish may feel more controlled, while letting your natural movement show creates a more lived-in effect. Neither is the “right” choice. Consider what feels comfortable for you, rather than treating workplace appearance as a set of rigid rules.

Does a wolfcut suit different professional settings?

Workplaces aren’t all cut from the same cloth. In a formal setting, you might prefer a more controlled finish or less prominent fringe. A creative environment may leave room for visible layers and texture. In practical work, comfort and keeping hair manageable during tasks may matter most. These are possibilities, not rules: expectations vary between roles and organisations.

If you’re unsure, check any relevant workplace guidance or ask an appropriate contact how appearance expectations apply to your role. That gives you a clearer starting point before deciding on the cut’s shape or styling. A considered work look and personal expression can coexist. The aim is to choose a version that feels like you and makes sense for your setting, not to meet a supposed universal standard.

How wolfcut layers, fringe and texture shape the finished look

A wolfcut gets its movement from contrast: shorter layers around the crown meet longer lengths through the back. That mix draws on shag and mullet shapes, as described in the history of the wolf cut. The balance matters. More pronounced differences between the layers can make the shape feel bolder, while a softer blend may give it a quieter outline.

The same wolfcut can look controlled or untamed depending on how you style its layers, fringe and natural texture. The haircut sets the structure; your styling choices bring out different parts of it. That flexibility is useful if you want a professional wolfcut for work that can shift in feel without losing its character.

How can fringe and layers be tailored for work?

Fringe isn’t one-size-fits-all. A longer or more softly shaped fringe may feel less prominent, while a shorter, fuller fringe can make more of a statement. Face-framing pieces can also range from subtle shaping to a stronger, more visible edge. These are options to explore with your stylist, not rules for what’s acceptable at work.

Bring reference photos that show both your everyday preference and a more expressive version of the cut. Pointing out what you like in each can help clarify which details you want to keep, soften or emphasise. Use the consultation to discuss how the fringe and layers frame your face, and how much visual impact feels like you.

What should you consider about your hair texture?

Your hair’s density and natural movement affect how layers sit, how much volume appears and what upkeep may involve. Wavy or curly hair may bring its own movement to the shape; straighter hair may show the layers differently. Length matters too, because it changes how the shorter crown sections meet the longer lengths. A reference photo can show the shape you like, but your hair may not fall in exactly the same way.

Be upfront about how your hair behaves day to day and how much time you want to spend styling it. The ultimate wolfcut guide offers broader cut fundamentals to help you prepare. Heavy Metal Hairdresser specialises in wolfcuts and textured styles, so exploring its wolfcut expertise may also help you think through the shape you want.

Professional wolfcut styling: subtle finish or full-volume attitude?

A wolfcut doesn’t have to show up at maximum volume every day. You can keep the same cut and change how much texture, lift and definition you bring forward. A controlled finish might suit a day when you want a neater outline; a more tousled shape can bring out the cut’s movement when you feel like it. Your hair texture, the cut itself and your styling technique all affect the result, so use these approaches as starting points rather than guaranteed outcomes.

Finish Visual effect General effort May suit
Controlled Smoother, more contained layers Low to moderate, depending on your routine Days when you want a tidier outline
Textured, higher volume More lift, separation and movement May take more hands-on shaping When you want the cut’s edge to stand out

How can you create a tidier workday finish?

Keep it simple. Direct your fringe into the shape you prefer, smooth only the sections that feel unruly, or use your fingers to define a few layers. You don’t need to flatten the whole cut or reach for heated tools every morning. If you use a hairdryer or another heated tool, use heat protection and follow the product instructions.

Try the routine on a day when you have time to see how your hair responds. Guiding the fringe away from your face or calming the sides may be enough to create a more controlled outline. What works will depend on how your layers fall and how much natural movement your hair has.

How do you bring the wolfcut’s texture back after work?

If you want a more expressive finish later, loosen any sections you’ve smoothed and reshape the layers with your fingers. You could bring out more separation or volume, depending on your texture and the look you’re after. There’s no need to maintain two separate looks: keep your everyday finish as it is if that feels right.

For more ideas on working with the cut’s movement, explore this wolfcut styling guide. If you’re considering a professional wolfcut for work, a stylist can help you discuss a cut and finish around your texture and routine. Heavy Metal Hairdresser specialises in wolfcut haircuts, with individuality at the centre of its approach.

Professional Wolfcut for Work: Style It Your Way

How to ask your stylist for a work-ready wolfcut

“The best brief tells your stylist how you want the cut to look, how you wear it day to day and how much effort you want to put into styling it.” That gives them something more useful to work with than the word “professional” alone. Use this consultation checklist to make the details clear before the cut begins.

  • 1. Gather references. Choose photos that show the shape from more than one angle where possible. Include a workday finish you like and a more expressive version if you want the option to change things up.
  • 2. Explain what you like. Point out the details in each image: perhaps the fringe length, shorter crown layers, face-framing pieces or overall silhouette. Say what you’d rather avoid, too.
  • 3. Describe your routine. Tell your stylist what your working day involves, how much time you realistically want to spend styling your hair and whether you prefer a subtle or more noticeable finish.
  • 4. Agree the cut and upkeep. Talk through layer placement, fringe, natural texture and how the shape may behave as it grows out. Ask what maintenance and styling the proposed cut may involve before you decide.

What reference photos should you bring?

Bring images that show the cut itself, not just a finished look from one angle. A side view can reveal how the shorter layers meet the longer lengths; a front view can show the fringe and face-framing shape. Choose examples of both everyday styling and the bolder finish you might want sometimes. Explain what appeals to you in each, so your stylist can distinguish the details you want from the parts you don’t.

What should you agree before the cut?

Be specific about your styling time. If you want a quick routine, say so; if you’re happy to spend longer shaping the layers, make that clear. Ask how the chosen fringe and layer placement may change as they grow out, and what adjustments might help maintain the shape. These conversations help tailor a professional wolfcut for work to your hair and real routine, rather than an idealised reference photo.

Heavy Metal Hairdresser specialises in wolfcuts and textured styles. If you’re considering a cut shaped around your preferences, explore its wolfcut expertise and use these questions to guide your consultation.

Choose a wolfcut that feels like you at work and beyond

A softer silhouette can keep the layers less prominent, while more visible shaping brings extra movement and edge. Either way, the cut needs to fit your real routine. A more textured finish may take more hands-on styling, depending on your hair and the shape you choose. A controlled finish might suit you better if mornings are already full. There’s no single version that earns the label “work-ready”. Your setting, preferences and any relevant workplace expectations all matter.

Is a professional wolfcut right for your routine?

Ask yourself two things: how much of the wolfcut’s character do you want to show, and how much time do you genuinely want to spend styling it? You might prefer a quieter outline for everyday wear, or choose more pronounced layers because that’s the look that feels most like you. Neither choice needs to be permanent. Your styling can shift with your mood and plans.

A consultation can help refine details such as fringe, layer placement and shape around your texture and routine. It’s a chance to talk through what you want and what upkeep may involve, not a promise of a particular result. Choose a look you feel good wearing on an ordinary workday, not just one that looks right in a reference photo.

Where can you explore specialist wolfcut styling?

Heavy Metal Hairdresser is an inclusive alternative salon specialising in wolfcuts and textured styling. Its individuality-led approach means the conversation can centre on your preferences and how you want the cut to work for you. The salon is a gender-inclusive space; everyone’s needs are different, so consider what matters to you when deciding where to discuss your haircut.

A professional wolfcut for work doesn’t have to mean choosing between fitting your routine and keeping your edge. It’s about finding a balance that feels wearable to you, whether that means softer layers, a bolder shape or something in between. To see more, explore Heavy Metal Hairdresser and its wolfcut and textured styling work.

Make your next cut work on your terms

A professional wolfcut for work isn’t one preset shape. Fringe, layer placement and texture influence its overall feel, while styling lets you choose a more controlled finish or bring out extra movement. The right balance depends on your workplace expectations, your comfort and the time you want to spend getting ready.

Before committing, talk with your stylist about your everyday routine, the level of edge you want and how the cut may grow out. Bring reference images that show both the shape you like and how you’d wear it. A clear conversation can help turn your ideas into a cut tailored to your hair and preferences, without asking you to leave your individuality at the door.

Heavy Metal Hairdresser specialises in wolfcuts and textured alternative styles. Founded by barber and creative stylist Simon Tuckwell, the salon is an inclusive, gender-inclusive environment. Explore Heavy Metal Hairdresser to see its work and services, and start planning a wolfcut that works on your terms.

Frequently Asked Questions

Can a wolfcut look professional for work?

Yes, a wolfcut can suit a professional setting when its shape and styling feel right for you and your workplace. A softer silhouette or more defined layers are both options, not universal standards. Consider any relevant appearance guidance, then discuss how fringe, layer placement and natural texture could shape the result. A professional wolfcut for work can keep the cut’s distinctive movement without requiring the same bold finish every day.

How do I make a wolfcut look more subtle at work?

Try directing your fringe neatly, smoothing selected sections or defining the layers without adding extra volume. You don’t need to flatten the whole cut: a small adjustment around the face or crown may create a more controlled outline. What works depends on your hair and haircut, so try a simple routine and see how it wears through your working day. Your own comfort matters more than following a rigid rule.

Is a wolfcut high maintenance?

Maintenance varies with your hair texture, the cut’s shape and the finish you want. A look that relies on defined volume may take more daily styling than one worn closer to your natural movement. Before committing, tell your stylist how much time you want to spend getting ready and ask how the layers may behave as they grow. That conversation can help you choose a shape that fits your routine, rather than an idealised photo.

Can you wear a wolfcut with a fringe in a formal workplace?

Often, yes, but the right choice depends on your workplace’s expectations and your preferences. A longer or softer fringe may feel less prominent, while a shorter, fuller fringe makes more of a statement. You can also style fringe away from your face on days you want a more controlled look. If expectations aren’t clear, check relevant workplace guidance before deciding what shape feels comfortable.

How should I explain a professional wolfcut to my hairdresser?

Describe the shape you want rather than relying on “professional” alone. Explain your preferred layer length, fringe, face-framing detail and how much movement or contrast you’d like. Bring reference photos from different angles, ideally showing both an everyday finish and a bolder version. Point out what appeals in each image, and describe your hair texture and routine. That gives your hairdresser a clearer brief to discuss and tailor with you.

Can a wolfcut be styled differently for work and weekends?

Yes. The same haircut can look more controlled for work and more textured or voluminous at other times. You might smooth selected sections or guide your fringe into place for one finish, then loosen the layers with your fingers for extra movement. How much the look changes depends on your hair and styling technique. Switching it up is optional, though; you don’t need to maintain two separate looks.

What should I ask before getting a wolfcut for work?

Ask how the proposed layers and fringe will work with your natural texture, how much styling the shape may need and how it could change as it grows out. Explain your work routine and any relevant appearance expectations, then agree the level of visual impact you feel comfortable with. It’s also useful to ask which details can be adjusted if you want a softer or more expressive finish. A clear conversation helps you make an informed choice.

Posted on

Best Products for Styling a Wolf Cut: A UK Guide for 2026

Best Products for Styling a Wolf Cut: A UK Guide for 2026

More product won’t make your wolf cut look wilder. The wrong formula can flatten its layers, limit movement and leave fine hair coated in residue. If you’re searching for the best products for styling a wolf cut, build a small routine that gives your roots lift while keeping the ends light and textured. Less fuss, better shape.

It’s frustrating when a cut looks full of life in the salon but refuses to behave at home. Your hair texture, the finish you want and the time you have each morning all affect which products may work for you. This UK guide compares product types for volume, definition and separation, with practical pointers for fine, wavy, curly and thicker hair. You’ll learn how to keep the look undone rather than overworked, and when advice from a stylist who knows wolf cuts could help you make more of your layers.

Key Takeaways

  • The best products for styling a wolf cut depend on your hair texture, the finish you want and how much time you want to spend styling.
  • Compare product types by their role, hold and finish before choosing. One formula won’t suit every cut.
  • Limp roots or coated-looking ends can be signs to use less product or rethink where you apply it.
  • Keep your routine simple, then adjust how you shape your hair for air-drying or heat styling.
  • Check product formats and directions before use. If your layers aren’t behaving as you’d like, consider asking a stylist about the cut.

Best products for styling a wolf cut: what each product type actually does

A styling product system is a small set of products with different jobs. One might add lift, another define texture, and an optional finisher may help hold the shape. You don’t need every category. The wolf cut’s layered lengths and shorter crown sections can need different treatment: the crown may need support, while the longer ends benefit from movement rather than a heavy coating.

The cut sits within the shag family. Wikipedia describes the wolf cut as a popular 2020s variation of the shag, with a deliberately layered shape. Products can help bring out that shape, but they can’t replace a cut suited to your texture or a styling technique that works with how your hair naturally falls.

Which product types create lift, texture and separation?

Choose a product for the effect you want, then start with a small amount. Hair texture and application both affect the result, so use these as starting points rather than guarantees.

  • Mousse: Applied through damp hair, mousse may support root lift and give finer hair some body. Too much can leave hair feeling coated, so follow the directions and use a light hand.
  • Texture spray: This can create visible separation and a tousled finish, particularly through the mid-lengths and ends. Some formulas may feel drying, so check the product guidance and see how your hair responds.
  • Paste or clay: These can define individual ends or create a more piecey finish. Work a small amount between your fingers first, then apply it sparingly. Adding more is easier than removing excess.
  • Cream or leave-in conditioner: These may help wavy or curly lengths feel more defined and manageable. Rich formulas can weigh down finer hair, so consider your texture and the finish you want.

Do you need heat protection, dry shampoo or hairspray?

These are supporting options, not compulsory steps. Choose one for a specific need, and check its directions rather than layering on extras by default.

  • Heat protection: Use a product labelled for heat protection before heated styling tools, following its instructions. It’s relevant when you’re blow-drying with heat or using a heated tool, but it doesn’t replace careful styling.
  • Dry shampoo: This can refresh the roots between washes. It doesn’t replace cleansing, and overuse may leave visible or tactile residue, so use it as directed.
  • Hairspray: This is an optional final step if you want extra hold. Choose a finish that suits your look, and apply lightly if you want the layers to keep moving.

Think of the cut, your hands and your products as a team. A well-shaped wolf cut and a light touch often do more for movement than piling on formulas.

How to compare wolf-cut styling products by hold, finish and hair texture

Choose a product for the job you want it to do, not because it promises to be a universal solution. Light, flexible hold can keep movement loose and touchable. Stronger hold may help a shape stay more defined, but can feel stiff or heavy if you use too much. Finish matters too: a matte product looks less glossy, while a lighter cream may leave hair looking more natural.

Use the table as a starting point. Labels and results vary by formula, and the amount you apply can change the outcome as much as the product category. Davines outlines several hair products for styling a wolf cut.

Product category Styling role Typical finish May suit Watch for
Mousse Supports body and root lift Often light, with flexible hold Fine hair or anyone seeking lift Too much can leave strands feeling coated
Texture spray Encourages visible separation Textured, sometimes matte People after a piecey, tousled look Some formulas may feel drying; check the directions
Curl cream or leave-in Helps shape natural waves or curls More defined, often natural-looking Naturally textured hair Rich formulas may weigh down finer lengths
Paste or clay Defines selected ends Often more matte and controlled Anyone wanting targeted separation Heavy application can make ends look coated
Hairspray Adds a final layer of hold Varies by formula People wanting their shape to last longer Too much may reduce movement

What should fine, thick or naturally textured hair look for?

Fine hair can lose lift under a rich formula, so begin with a lighter option and apply it sparingly. With thicker hair, working in sections can help distribute product through the layers instead of loading the surface. Naturally wavy or curly hair has its own pattern, which affects how the shorter crown and longer lengths sit. Work with that movement rather than expecting the same finish as straight hair.

Matte, natural or defined: choose the finish you actually want

Matte texture tends to look less shiny and more separated. A natural-looking finish keeps the hair closer to its own appearance, with less obvious product definition. These finishes are different from volume: you can lift the roots while keeping the ends soft, or define a few ends without adding height at the crown. Think about your usual styling time and how much separation you want before choosing a formula.

Takeaway: Match product weight and hold to your hair texture and the movement you want. Adjust the amount before switching categories. If you’re weighing up the cut as well as the routine, explore wolf-cut work from a specialist salon.

The biggest wolf-cut product mistake: using too much or chasing one “best” formula

A highly rated product can still be wrong for your hair. Fine strands, dense hair and naturally wavy or curly textures respond differently. The same formula can also behave differently depending on how much you use. The best products for styling a wolf cut aren’t a single universal pick. They’re the products that suit your hair, the cut’s shape and the finish you want.

Look for clues before adding more. Roots that fall flat, ends that look coated or strands that clump together may mean you’ve applied too much, chosen a formula that’s too rich or combined products that don’t work well together. Hair condition and styling technique can affect the result too, so don’t assume every disappointing day means you need a new product.

How can you avoid flat roots and heavy-looking layers?

Keep your test simple. Follow the product directions, apply it where intended and use a little at a time. If a formula is designed for root lift, work near the roots rather than coating the ends. With thicker hair, separate it into small sections to help distribute product more evenly. Avoid trying several new products at once. If the finish changes, you won’t know which product made the difference.

  • Try one new product in your usual routine.
  • Use less than you think you need, then add a small amount only if the result calls for it.
  • Notice what changes at the roots, through the layers and at the ends.
  • Adjust one thing at a time, such as the amount or where you apply it.

This gives you a clearer read than changing your products and technique all at once. Follow the label, especially if it says whether the product should be used on damp or dry hair.

When is the product not the problem?

A wolf cut changes as it grows. Layers that once framed the crown and moved freely may sit differently as their lengths shift, so a grown-out cut won’t necessarily style like it did when freshly shaped. Your hair’s texture and length also affect the silhouette. A technique that lifts one head of hair might not create the same shape in another.

If you’ve pared back your routine and tried a consistent technique but the shape still won’t behave as you expect, consider asking a stylist to assess the cut itself. Heavy Metal Hairdresser specialises in wolfcuts and textured alternative styling, so a specialist perspective may help you work out whether the issue is the product, the technique or the layers.

Best Products for Styling a Wolf Cut: A UK Guide for 2026

Build a simple wolf-cut styling routine for your texture and daily habits

Your routine doesn’t need a crowded shelf. Start with clean or refreshed hair, choose one main product for the result you want, shape the layers, then pause and assess. You’ll get a clearer idea of what’s working before adding anything else. For more context on how the cut’s layers shape the finish, see the ultimate wolf cut guide.

A low-fuss routine for everyday texture

Work with your texture and schedule. On damp hair, apply your chosen product as directed, then scrunch, tousle or shape a few sections with your hands. The same approach won’t suit every head of hair: curls may respond to scrunching, while straighter hair may need shaping around the crown. If you air-dry, let your hair settle before deciding whether it needs more. If you use heated tools, apply a suitable heat-protection product first and follow its label.

  1. Prepare: Begin with clean or refreshed hair, then detangle if needed.
  2. Apply: Use one main styling product, following its directions and starting with a modest amount.
  3. Shape: Encourage the movement you want by scrunching or working through selected sections.
  4. Assess: Let your hair dry or finish styling, then check the roots and ends before adding anything.

Product labels matter. Follow the stated directions, and stop using a product if you notice irritation or another unwanted effect.

Adjust the routine when your wolf cut needs more definition

Separate the goal. Root lift is about giving the crown more height; defining the mid-lengths and ends is about bringing out selected layers. Focus your main product where it’s needed rather than coating every section. A finishing product is optional, not a compulsory final step. If you want to explore other product categories, browse this guide to textured styling products, then check each item’s format and directions to see whether it suits your routine.

The best products for styling a wolf cut are the ones you can use consistently without fighting your texture or daily habits. If you’re unsure whether the issue is your routine or the shape itself, explore wolf-cut work from a specialist stylist and consider what cut advice could help.

Choose wolf-cut products with specialist advice and verified product details

There’s no magic formula for every wolf cut. Choose products by your hair texture, the finish and hold you want, and the time you’ll realistically spend styling. A product that supports a quick, loose routine may not suit someone aiming for more defined sections. Keep your goal clear, check the label and try one product at a time.

Heavy Metal Hairdresser offers Death Grip and Hair To the Throne. Before choosing either, check the product information for its format, ingredients, directions and suitability. Don’t assume a product is right for a particular texture or promises a specific hold or finish based on its name alone. Compare its stated details with your styling needs.

What to check before choosing an in-house styling product

Before choosing Death Grip or Hair To the Throne, check what form each product takes, how it’s meant to be used and what the product information says about its intended use. Look for directions, ingredients and any stated suitability guidance. Match the details to your hair, preferred finish and everyday routine, and follow the label.

  • Format: Is it a spray, cream, paste or another type of product?
  • Directions: Is it intended for damp or dry hair, and where should it be applied?
  • Suitability: Does the product information identify hair types or styling goals?
  • Finish and hold: Are these described in the product information, rather than assumed?

If you can’t find these details, avoid choosing based on assumptions. The best products for styling a wolf cut are useful only when you know what they’re designed to do and how they fit your routine.

When professional wolf-cut advice can make the difference

Products are only part of the picture. A stylist can consider how your layers sit, your hair’s texture and length, and how you prefer to style it day to day. That can help clarify whether you’re trying to change the finish with product or working with a cut shape that needs a fresh assessment. No one can promise one result for every head of hair.

Heavy Metal Hairdresser specialises in wolfcuts and textured alternative styling. For wider inspiration, explore this wolf-cut and altcut style guide. If you want to learn more about the salon’s work and approach, explore Heavy Metal Hairdresser.

Find your wolf cut’s next styling move

The best products for styling a wolf cut aren’t about piling on more. Choose a formula that suits your texture, the finish you want and the time you have, then use it sparingly. If your layers fall flat or feel coated, reassess the amount and application before writing off the whole routine. The cut’s shape and your styling technique matter just as much as the products on your shelf.

Heavy Metal Hairdresser specialises in wolfcuts and textured styling, with creative stylist Simon Tuckwell leading the salon. The salon has also worked backstage at Download and Bloodstock. For advice grounded in alternative hair and textured cuts, explore Heavy Metal Hairdresser and find your next styling move.

Your wolf cut doesn’t need to look polished or follow anyone else’s rules. Start with one small change, work with your natural texture and make the style your own.

Frequently Asked Questions

What are the best products for styling a wolf cut?

The best products for styling a wolf cut depend on your hair texture, the finish you want and how much time you’ll spend styling. Mousse may help support lift, texture spray can encourage separation, and curl cream may suit someone looking to define natural curls or waves. Paste or clay can add definition to selected ends. Start with one product, follow its directions and judge the result before adding another.

How do I make my wolf cut look more textured?

Use a product designed to create texture or separation, applying it as directed and focusing on the sections you want to define. For example, tousle the mid-lengths or shape a few ends with your fingers rather than coating every strand. Use a small amount first, then check how your layers sit once your hair is dry. Your cut shape and natural texture also influence the final effect.

Can I style a wolf cut without heat?

Yes, you can style a wolf cut without heated tools. Apply a suitable product to clean or refreshed hair according to its label, then scrunch, tousle or shape sections with your hands if that works for your texture. Let your hair air-dry and assess the finish before adding anything else. The result depends on your hair’s natural pattern, the cut and the products you choose.

Is mousse or texture spray better for a wolf cut?

Neither is automatically better. Mousse may be useful if your goal is lift or body, while texture spray may suit a more separated, tousled finish. Formula and application matter, so check the directions and begin with a small amount. If your hair feels coated or loses movement, try less product or reconsider whether that category matches the result you want.

How can I stop styling products weighing down my wolf cut?

Start with one product and use it sparingly. Apply it only where its directions recommend, rather than coating every layer, then let your hair dry or finish styling before deciding whether you need more. Limp roots or coated-looking ends can be signs to reduce the amount or reconsider the formula. If you use several products at once, change one at a time so you can identify what affects the finish.

Do I need a different product for fine hair and thick hair?

Possibly. Fine hair may be easier to weigh down, so a lighter formula and careful application can be a sensible starting point. With thick hair, applying product through smaller sections may help distribute it more evenly. These are starting points, not rules: length, natural texture, cut shape and styling habits all matter. Choose for the result you want, follow the label and adjust based on how your hair responds.

Posted on

Wolfcuts and Altcuts: Your Guide to Edgy British Styles

Wolfcuts and Altcuts: Your Guide to Edgy British Styles

A cut that gets softened until its sharp edges disappear isn’t the cut you asked for. Wolfcuts & altcuts are about individuality, not making every silhouette behave. If you’ve left a mainstream salon with layers that feel too polite, or wondered how a wolfcut differs from a shag, mullet or another altcut, you’re in the right place.

You don’t have to choose between a bold look and hair that works for you. The right shape should suit your texture, length and identity while keeping the attitude that drew you to it. Heavy layers can also be easier to style at home once you know which tools and techniques bring them to life.

This guide compares wolfcuts and other altcut silhouettes, helps you think through what might work for your hair, and shares practical styling advice for a lived-in, textured finish. You’ll also learn what to look for in a stylist who understands alternative hair and respects your vision. Heavy Metal Hairdresser is a gender-inclusive space, with experience styling bands and artists and working backstage at Download and Bloodstock. No sanding off the edges.

Key Takeaways

  • Wolfcuts & altcuts cover a range of shapes, from shag-inspired layers to disconnected mullets. Learn what distinguishes each silhouette.
  • Compare the textured movement of a modern shag with the more pronounced contrast of a mullet.
  • Fine hair isn’t automatically off-limits for bold layers. A considered shape can add movement while retaining fullness through the ends.
  • Build a practical styling routine with damp-hair prep and rough-drying or diffusing.
  • Look for an alt-hair stylist who understands the look you want and creates a gender-inclusive space where your vision is respected.

What are Wolfcuts & Altcuts? Defining the New Alternative Standard

A wolfcut isn’t simply a shag with a mullet bolted on. It’s a deliberately shaped silhouette, with shorter, choppier layers creating lift through the crown and longer lengths retaining movement around the face and back. The result has contrast and direction rather than a uniform cascade of layers. Wikipedia describes a variation of the shag called a wolf cut, placing it within the shag’s wider haircut history.

Altcuts is the bigger picture. The term can include shullets, jellyfish cuts and disconnected mullets, each playing with shape, separation and proportion in a different way. The shared principle is movement over sleekness. Think controlled chaos: the cut should have intention, but it doesn’t need to sit perfectly in place to look finished.

Wolfcuts & altcuts bring music, identity and personal style into the shape of a cut. They aren’t one fixed trend, but a way to create personality through proportion and texture.

The Anatomy of a Professional Wolfcut

The shape depends on more than piling layers on top. A stylist can remove internal weight strategically to help the hair separate and flick instead of collapsing into a heavy outline. Face-framing layers can sharpen the silhouette around the cheekbones and jaw. A curtain fringe can anchor the look, linking the shorter crown to the longer sides. Its length and density matter: it should feel like part of the cut, not an afterthought.

The Subcultural Roots: From Punk to the Mosh Pit

The wolfcut’s shag-and-mullet DNA echoes the long relationship between alternative hair and rock, from the free-moving shapes associated with 1970s rock to the louder styles seen around modern festival culture. The point isn’t to copy a specific era, but to carry its defiant spirit forward.

For heavy metal and underground communities, hair can be part of the signal: a visible refusal to blend in. The shift is from perfection to personality. Texture, unevenness and an unapologetic outline aren’t flaws to correct; they’re part of the design. Heavy Metal Hairdresser brings that subcultural context into its work, with experience styling prominent bands and artists and working backstage at Download and Bloodstock. A strong altcut should look intentional, but it should still feel like you.

The Altcut Spectrum: Choosing Your Silhouette

There’s no single altcut uniform. A modern shag brings heavy texture with a softer, more wearable edge, while an aggressive mullet makes the contrast more pronounced, with shorter lengths on top and longer hair at the back. A shullet sits between the two, blending shag-like layers into a mullet shape. The Guardian captured that easy-going appeal in its piece on the easy, breezy shullet.

Want a sharper reveal? Disconnects create a visible jump between lengths, while an undercut can hide that contrast beneath the top layers. These details let you dial up the edge without changing the whole outline. Bring reference images that show the shape you want, and point out what you’d rather avoid. That gives your stylist a clearer brief than a style name alone.

Long Wolfcut vs Short Wolfcut: Choose Your Weapon

A long wolfcut keeps the length while adding crown volume, face-framing movement and rougher ends. It can suit anyone who wants drama without losing the weight of longer hair. A short wolfcut puts texture front and centre; less length can make the silhouette feel punchier, though it still needs shaping and styling. Think about your daily routine: how much time do you want to spend lifting the roots, separating layers or encouraging a flick? Be honest about that before choosing.

Altcuts for Different Face Shapes

Face shape can guide the conversation, but it shouldn’t dictate the cut. Soft, face-framing layers can break up strong lines around a square face; extra height at the crown can lengthen a rounder silhouette. Proportion, texture and personal taste matter just as much. Wolfcuts & altcuts are about making the shape yours, not following a chart. If you want to explore how a specialist approaches individual silhouettes, see Heavy Metal Hairdresser’s alternative hair work.

For a wearable shag, ask for texture that moves without losing the outline. For a full-throttle mullet, be specific about the contrast between the crown, sides and back. If you’re drawn to both, a shullet can bridge the gap. There’s no face-shape rule that outranks your own taste.

Injecting Chaos into Thin Strands: The Wolfcut on Fine Hair

Fine hair can wear a wolfcut. The idea that it must stay blunt and untouched confuses fine strands with low density and assumes layers always reduce impact. A considered cut can use texture to build lift and movement. The key is control: remove weight where it helps the shape, but keep enough fullness through the ends to avoid a wispy outline.

Ask whether a dry-cutting approach would suit your hair. Seeing the strands in their natural fall can help a stylist judge where the layers sit and how much weight to remove. Shattered ends add separation and a broken-up edge, creating the impression of movement without cutting broad, thin sections. Explore the technique in this guide to the wolfcut on fine hair.

Technical Secrets for Fine Hair Volume

For lift, a stylist may shorten selected crown layers so they don’t lie flat against the head. The back needs a considered shape too: remove too much from the bottom and the mullet outline can turn see-through. Keeping a stronger perimeter, then adding texture selectively above it, can help preserve the look of fullness while creating a more jagged finish. Strand thickness, density and natural movement all affect how a wolfcut or altcut should be shaped.

At home, start with a light touch. A small amount of salt spray or texturiser can encourage separation and grip, but too much product may weigh fine strands down or make them feel stiff. Work it through sparingly, then add more only where the shape needs definition.

Styling for Maximum Oomph

Use a diffuser to encourage natural bends and lift without blasting the layers into a flat sheet. Cup sections gently and move the diffuser around your head; avoid scrubbing the hair, which can disturb the shape. If your hair responds better to your hands, try scrunch-drying: press the ends upwards towards the roots as you rough-dry, then let the layers settle before adding more product.

Keep the finish lived-in, not shellacked. Heavy creams and waxes can collapse fine hair, especially near the roots. Start with clean, damp hair and a light texturising product, then dry until it’s almost set before deciding whether you need extra grit. A little separation often gives a wolfcut more bite than coating every strand.

Wolfcuts and Altcuts: Your Guide to Edgy British Styles

How to Style a Wolfcut: Mastering Aggressive Texture

A wolfcut comes alive through separation, lift and a bit of deliberate disorder. You don’t need a polished blow-out. Build the shape, then let the layers do their thing. Adjust the amount of product and heat to your hair’s texture and the finish you want.

  • Prep: Work a texturising primer through damp hair, concentrating on the lengths rather than saturating the roots with product.
  • Build the shape: Rough-dry for a relaxed finish, or use a diffuser to encourage natural bends and lift. Direct air towards the roots for volume, then dry the fringe and face-framing pieces into place.
  • Define: Warm a small amount of matte clay or texture paste between your hands. Pinch it into selected layers and ends for separation instead of coating every strand.
  • Disorganise: Use your fingers or a wide-tooth comb to break up neat sections and shift the layers into a less uniform shape.
  • Set: If you need extra staying power, mist with a high-hold hairspray from a distance. Use a light veil, then scrunch or lift the hair rather than pressing it flat.

Essential Tools for the Alt-Hair Kit

A diffuser is useful for building texture without flattening natural movement, particularly if your hair waves or curls. It isn’t the only option: rough-drying can work well when you want a looser, less defined finish. Matte clays and texture pastes tend to create a drier, more separated look than shine-heavy pomades, which can make layers appear smoother and more grouped. Use a flat iron to make soft S-waves by gently bending the hair in alternating directions rather than winding it into uniform curls. Keep the iron moving and follow its safety instructions.

Maintaining the Grit Between Salon Visits

On second-day hair, dry shampoo can do more than refresh the roots. Used sparingly, it can add grip and help revive flattened layers. For a tired fringe, dampen just the fringe, reshape it with your fingers or a brush, then dry it into place. No full wash needed. For more on how to style a wolfcut between washes, use the guide as a starting point and adapt the method to your own texture.

Wolfcuts & altcuts look strongest when the finish still moves. Start with less product than you think you need, then build definition only where the layers lose their shape. For a cut shaped around texture and attitude, explore alternative haircuts at Heavy Metal Hairdresser.

Finding Your Style Master: The Alt-Hair Specialist

A dramatic cut needs more than someone who can use scissors. The right stylist should understand the references, attitude and shape you’re asking for, then adapt the cut to your hair and everyday routine. When searching for a wolfcut hairdresser, look for someone who respects the subculture behind the silhouette rather than automatically softening it into a more conventional shape.

That respect matters in the chair too. For non-binary and gender-diverse people, a gender-inclusive safe space means being able to talk about the look you want without fitting it into a gendered haircut category. Describe the length, shape and feeling you’re after. You can also share any language or boundaries that will help you feel comfortable.

Make your vision easy to read. Bring a mood board with different angles, point out the details you love, and name what you don’t want copied. Music references can help too: describe the energy, whether it’s raw and jagged or more flowing and dramatic. Wolfcuts & altcuts are personal; a clear brief helps your stylist shape the idea around you.

The Heavy Metal Hairdresser Philosophy

Heavy Metal Hairdresser was founded by Simon Tuckwell, a barber and creative stylist. Its work includes styling for prominent bands and artists, plus backstage festival work at Download and Bloodstock. That experience brings a connection to the scene, but your cut shouldn’t be a copy of someone else’s look. It should reflect your identity, texture and appetite for change.

Creative colour can push an altcut into a different register, highlighting its layers or making its shape more graphic. If vivid shades are part of your vision, explore this guide to vivid hair colour as a way to think through how colour and silhouette might work together.

Booking Your Transformation

Before committing to a new shape, discuss your reference images, current hair, styling routine and the amount of change you’re ready for. Ask how the proposed layers will sit, what upkeep they’ll need and how the cut could grow out. You don’t need specialist vocabulary; clear examples and honest answers are enough. Heavy Metal Hairdresser offers Wolfcuts for people seeking an alternative silhouette. Explore Wolfcuts at Heavy Metal Hairdresser and take your next step towards a cut that feels like yours.

Make Your Next Cut Unmistakably Yours

The right alternative cut is more than a silhouette. It’s a shape built around your texture, your identity and the level of edge you want to wear. Wolfcuts & altcuts can bring lift and movement to fine hair, retain their grit with a considered styling routine, and range from shag-inspired layers to full-throttle mullet contrast.

Your stylist should understand the vision, not dilute it. Heavy Metal Hairdresser offers alternative haircuts, vivid colour and a gender-inclusive space where you can talk through the look you want on your own terms. Its work celebrates individuality rather than copying a trend.

Ready to turn your references into a cut with real attitude? Explore Wolfcuts at Heavy Metal Hairdresser. Bring your ideas, own your edges and make the next look yours.

Frequently Asked Questions

Is a wolfcut high maintenance for daily styling?

A wolfcut can be low-fuss day to day if its layers work with your natural texture. Some mornings, a quick rough-dry or a little texturiser may be enough; other hair types need more shaping to bring out the flick and volume. Tell your stylist how much time you actually want to spend styling it. The cut should fit your routine, not turn every morning into a full production.

Can I get a wolfcut if I have curly hair?

Yes, curly hair can work with a wolfcut, provided the shape is designed around your curl pattern and how much your hair shrinks as it dries. Ask the stylist to consider where curls will sit when dry, especially around the fringe and crown. Bring photos of your hair on an ordinary day, not only freshly styled. That helps set expectations for the outline and finished length.

What is the difference between a wolfcut and a shag?

A wolfcut generally combines shag-like layers with a stronger mullet influence, often creating more contrast between the crown and the longer back. A shag can have heavy texture too, but its outline may feel more evenly layered and less pronounced at the back. The names aren’t rigid rules, though. Show your stylist the exact shape you mean, since one person’s idea of a wolfcut may differ from another’s.

How often should I trim my altcut to keep the shape?

There isn’t one trimming schedule for every altcut. A sharp fringe, close undercut or very defined disconnect may need attention sooner than a longer, more blended shag. Watch how the shape changes as it grows and book a trim when the outline stops sitting as you like. At your appointment, ask your stylist what to monitor and how your specific cut is likely to grow out.

Will a wolfcut work with a very short fringe?

Yes, a very short fringe can pair with a wolfcut for a stark, graphic contrast. Decide how it connects to the crown and face-framing layers, or whether you want it to stand apart. Consider how your fringe behaves as it grows and whether you’re comfortable styling it. Bring reference photos showing the fringe from the front and side, then discuss how your hair’s texture may affect its shape.

How do I stop my wolfcut layers from looking flat?

Start by lifting the roots as you dry your hair, using your fingers to direct the airflow beneath the layers. A diffuser can encourage natural movement, while a light texturiser can add separation where the hair needs it. Use small amounts and build gradually, especially if your strands are fine. Heavy product or applying too much near the roots can weigh the shape down instead of giving it more life.

Are wolfcuts gender-neutral?

Yes. A wolfcut is a shape, not a gender category. Its length, fringe, layering and level of contrast can be adapted to suit the person wearing it. Explain what you want the cut to express, and use reference images if words don’t quite capture it. A gender-inclusive stylist should listen without forcing your ideas into a gendered menu. Wolfcuts & altcuts are for anyone who connects with their attitude and shape.

Can I transition from a bob to a wolfcut easily?

Often, yes, but the result depends on your bob’s length, layers and current outline. A stylist may be able to reshape the top and sides straight away while keeping enough length at the back for the silhouette you want. If your bob is very short or blunt, you may need a gradual transition rather than one dramatic change. Bring photos and ask which parts are achievable now and which may need time to grow.

Posted on

Alternative Hair Styles: A Professional Guide to UK Trends

Alternative Hair Styles: A Professional Guide to UK Trends

Walking into a conventional salon with an underground reference photo almost always ends in heartbreak. Traditional stylists tend to round off sharp edges, playing it safe until a rebellious vision becomes just another sensible blow-dry. True alt hair styles reject that cookie-cutter conformity entirely, prioritising your raw bone structure, natural movement, and personal identity instead.

If you’ve ever felt judged in a sterile, hyper-traditional chair, or struggled to keep a dishevelled, razor-carved cut looking deliberate once you’re back home, you aren’t alone. Translating subcultural attitude into an everyday haircut shouldn’t require compromising who you are.

This guide will help you discover the defining modern cuts shaping the UK alternative scene, from textured wolfcuts to razor-sharp mullets, and show you how to wear them with genuine confidence. You’ll learn how to match iconic silhouettes to your features, master proper texturising techniques at home, and consult a specialist stylist to get the exact cut you want.

Key Takeaways

  • Explore how modern alt hair styles use intentional asymmetry, razor carving, and disrupted silhouettes to celebrate individuality over conventional salon uniformity.
  • Compare core subcultural cuts, including the high-contrast mullet, textured wolfcut, and classic shag, to match the right weight distribution to your facial structure.
  • Discover strategic pigment placement techniques, from split dyes to vivid halo panels, that amplify the movement of shattered layers.
  • Master an effortless home styling sequence using matte clays, sea salt sprays, and texture dusts to keep gritty silhouettes defined without daily heat damage.
  • Learn the exact technical vocabulary to bring to your consultation so you can partner with an alternative specialist and secure a truly bespoke result.

What Defines Modern Alt Hair Styles in 2026?

Mainstream hairdressing relies on symmetry, blending, and safe transitions. Modern alt hair styles tear that rulebook up completely. These cuts are architectural, raw, and built specifically around the organic texture of your hair. Instead of forcing your hair into sterile, cookie-cutter shapes, alternative design embraces sharp contrasts. You see deliberate asymmetry, blunt micro-fringes, and razor-carved disconnections that celebrate natural volume instead of thinning it into oblivion.

Crucially, modern alternative hair has dismantled the outdated, binary pricing structures that still linger across conventional high-street salons. Cutting hair based on gender rather than length, density, and technical complexity makes zero sense. Today’s countercultural styling functions as an unapologetic, gender-affirming safe space where anyone can sculpt a silhouette that reflects their authentic identity without compromise.

The Core Philosophy of Alternative Hair Design

Traditional salons aim to hide flaws with blowouts and seamless layers. Alternative hairdressing does the exact opposite. It treats hair as wearable sculpture, using internal weight removal and shattered perimeters to create effortless, rebellious movement. Key pillars of this approach include:

  • Deconstructed shapes: Intentional disconnections between the crown and perimeter that reject commercial uniformity.
  • Organic movement: Working directly with natural cowlicks, wave patterns, and curls rather than battling against them.
  • Shattered edges: Razor-sculpted perimeters that deliver built-in grit straight out of the chair.

Subcultural Roots: Punk, Metal, and Underground Counterculture

Every modern disconnected cut traces its lineage directly back to underground music scenes. The jagged texture and unapologetic volume dominating today’s cuts draw heavy inspiration from 1970s punk, 1980s thrash metal, and the explosive DIY scene culture of the 2000s. The history of punk fashion and hairstyles established that chopping, bleaching, and spiking your hair was a radical act of personal autonomy, not just a passing trend.

Back then, people took straight razors and household clippers to their own heads because high-street salons refused to understand their subcultural energy. That independent defiance remains baked into modern alternative hair craft. Today’s top stylists borrow those aggressive backstage layering techniques and sharpen them with professional razor carving, turning chaotic rebellion into bespoke, wearable art that holds its shape through sweat, mosh pits, and daily life.

The Definitive Modern Alt Hair Styles: Which Cut Fits Your Identity?

Alt hair styles are not one-size-fits-all festival novelties. They are precision-engineered cuts designed around how hair behaves in the wild. Choosing the right cut comes down to understanding internal weight distribution. Fine hair requires strategic carving to create the illusion of volume, whilst thick hair demands substantial internal debulking so the silhouette collapses into sharp, deliberate texture rather than an unruly helmet.

The Wolfcut and the Modern Shag

The wolfcut merges the wild crown volume of a mullet with the face-framing softness of a 70s rock cut. Shorter, jagged layers explode around the top, tapering down into heavily feathered lengths. If you want deep layering with serious grit, check out the ultimate wolf hair cut guide for a complete breakdown of internal razor carving.

The classic shag takes a slightly more cohesive approach. It blends a heavy curtain fringe straight into choppy exterior layers, creating effortless movement that flatters natural waves and loose curls. You can dive deeper into the shag haircut resurrection to see how retro-inspired shapes adapt to modern subcultural wardrobes.

The Modern Mullet and Disconnected Alt Cuts

The modern mullet thrives on deliberate, radical contrast. Instead of a gradual blend, it relies on disconnected sections:

  • Cropped temples: Tight scissor-over-comb work or aggressive taper fades around the ears, opening up the profile to showcase curated ear piercings from studios like Stellar SG.
  • Flowing length: Raw, textured lengths draping down the nape and back.
  • Hidden undercuts: Carved underneath heavy crowns to remove bulk and give thick hair immediate, effortless lift.

To master this structural contrast across straight, wavy, or coily hair, explore the full mechanics behind the modern mullet haircut.

Micro Bangs, Hime Cuts, and Geometric Edge

If you prefer stark geometry over broken edges, blunt micro bangs anchor the browline with unapologetic attitude. Stepped jawline panels, inspired by traditional hime cuts and dark gothic aesthetics, frame facial bone structure while drawing immediate focus to cheekbones and statement piercings.

Whether you want razor-sharp lines or a chaotic silhouette, working with an experienced stylist makes all the difference. Explore bespoke options like a tailored wolfcut or shag haircut to bring your personal subcultural vision to life.

Vivid Colour and Visual Grit: Amplifying Your Alternative Cut

A razor-carved cut provides the architectural foundation, but strategic colour brings that shape alive. High-contrast placement pulls the eye directly toward intentional disconnections, making textured layers pop rather than sink into a flat silhouette. Placing intense colour throughout alt hair styles is never about random bleaching. It is about illuminating the internal movement and raw edges sculpted into the haircut itself.

Rushing this process with aggressive, box-dye bleaching at home ruins both texture and curl elasticity. Once hair fibres melt from over-processing, razor-cut layers lose their structural snap and collapse flat. Saturated tones require a healthy, intact canvas. For a complete guide to high-impact saturation and shade longevity, check out our deep dive into vivid hair colour techniques.

Strategic Placement: Split Dyes, Raccoon Tails, and Panels

Mainstream balayage aims to hide transitions. Subcultural colour blocking celebrates them loudly. Modern alt hair styles rely on intentional visual disruption across three primary formats:

  • Split dyes: Bisecting the head down the centre creates immediate drama that shifts dramatically every time your hair moves or parts naturally.
  • Halo and peekaboo panels: Slicing neon lime, acid violet, or blood red underneath a jet-black crown gives interior texture high-voltage contrast.
  • Horizontal banding: Y2K scene hair-inspired raccoon stripes across micro bangs or face-framing tendrils provide gritty, graphic appeal.

Maintaining High-Voltage Pigment on Textured Hair

Keeping fashion shades punchy on heavily layered or naturally curly hair requires an uncompromising aftercare discipline. Warm water lifts the hair cuticle, letting direct dye molecules flush down the drain instantly. Rinse your hair strictly in cold water using sulphate-free, colour-safe cleansers.

Bleached hair thirsts for hydration, but heavy oil-rich masks can actually strip direct dyes. Instead, rotate between protein-rich bond-building treatments to repair structural disulphide bonds and lightweight, moisture-focused conditioners. This keeps your razor-cut layers snappy, springy, and vibrant without bleeding out your pigment before the next gig.

Alternative Hair Styles: A Professional Guide to UK Trends

How to Style and Maintain Alt Hair at Home

There is a stubborn myth that alternative haircuts require zero styling effort. While a proper razor-sculpted cut does the heavy lifting, stepping out of bed with runway-ready grit does not just happen automatically. Alt hair styles need friction, grip, and deliberate separation to keep layers from collapsing flat against your scalp. Ditch the high-gloss serums and heavy silicones; subcultural shapes demand matte finishes that hold up to real life.

To lock in a dishevelled, intentional silhouette every single day, follow this five-step sequence:

  1. Prep damp roots: Douse the base of your hair with a sea salt spray to build foundational grit.
  2. Diffuser rough dry: Tip your head upside down and cup sections with a diffuser on medium heat to encourage natural wave chaos.
  3. Ditch flat brushes: Use only your fingers to rake and shake layers, preserving jagged, razor-carved ends.
  4. Puff texture dust: Tap a silica-based root powder directly into your crown for immediate, gravity-defying height.
  5. Pinch and twist: Warm a pea-sized amount of matte clay between your fingertips and define face-framing pieces.

Building Raw Texture and Crown Height

Getting massive crown volume starts during the drying phase. Traditional round brushes smooth the cuticle down, killing the exact raw energy alt hair styles need. Instead, direct warm air up into the roots with your hands to force hair follicles upward. Once completely dry, a light dusting of texture powder creates instant mechanical friction between strands, keeping crown layers spiked, split, or dramatically swept without needing sticky hairspray.

Daily Restyling Without Over-Washing

Washing your hair every morning strips essential oils, causes vivid pigment to fade, and leaves hair strands slippery and soft. Alternative hair actually looks best when it has a bit of lived-in wear. Wake up flattened layers with targeted revival instead of a full wash:

  • Targeted misting: Spritz crushed curls and flattened bangs with plain water to reactivate your hair’s natural wave memory.
  • Strategic dry shampoo: Spray dry shampoo directly into your root line to absorb excess sebum whilst preserving pliable movement through the mid-lengths.
  • Matte clay piecing: Work a tiny dab of matte clay across sleep-crushed ends to sculpt them back into sharp, deliberate spikes.

Mastering this daily balance keeps your silhouette sharp between salon appointments. If your current shape lacks the structural texture to hold these styles naturally, book a specialist session with Heavy Metal Hairdresser to get your layers professionally carved.

Consulting an Alternative Stylist: Securing the Perfect Cut

Walking into a high-street salon with a photo of a razor-carved mullet often leads to frustration. Traditional training focuses on blending away sharp edges and maintaining polite symmetry. To get genuine alt hair styles right, you need a specialist who understands subcultural silhouettes and isn’t afraid to take a straight razor to your perimeter. You deserve an inclusive, gender-affirming safe space where your personal expression is celebrated rather than quietly softened.

Avoid generic requests like “give me layers” or “thin it out.” Instead, use precise technical vocabulary during your consultation:

  • Internal weight removal: Ask for bulk carved out from the mid-lengths rather than just thinning scissors dragged through your ends.
  • Intentional disconnection: Specify where you want sudden jumps in length, such as between temple fades and back skirts.
  • Perimeter shattering: Request razor carving or deep point-cutting along edges to eliminate blunt, shelf-like lines.

Finding Your Specialist and Curating Visual References

Scan a stylist’s portfolio for raw, authentic movement. Look for unedited photos taken under honest lighting, showcasing real clients with varied densities and curl patterns. If a hairdresser only posts polished, heat-curled prom hair, they will likely struggle with the aggressive texture of alt hair styles.

Bring references featuring models whose natural density matches your own. Point out exact landmarks on your face where you want key features to sit. Show them precisely where you want your micro bangs to stop, where face-framing layers should hit your cheekbones, and how high up you want the temple taper to climb.

Navigating Your Safe-Space Consultation

Be completely transparent about your morning routine. A talented alternative hairdresser designs a haircut that works with your actual habits, whether you spend twenty minutes diffusing with sea salt spray or just shake your head out after waking up.

Ask how they plan to approach your hair. Alternative cutting often benefits from dry-cutting or freehand razor work, allowing the stylist to track how cowlicks, whorls, and curl patterns spring back in real time. Take control of your image by booking a bespoke alternative hair consultation with an expert who respects your subcultural identity and cuts with genuine precision.

Step Out of the Mainstream: Claim Your Cut

Mainstream salons will always try to smooth out what makes you stand out. True alt hair styles reject that sanitised, assembly-line beauty in favour of raw, wearable identity. Whether you are balancing the aggressive crown volume of a wolfcut, rocking a high-contrast mullet, or framing your jaw with sharp geometric layers, an authentic shape demands technical precision and gritty texture that holds up to real life.

You deserve an environment where your aesthetic is celebrated without awkward explanations. Heavy Metal Hairdresser channels backstage festival styling heritage from Download and Bloodstock straight into an unapologetically inclusive, gender-affirming community. Using specialist razor carving, we strip away excess internal weight to unlock effortless, lived-in movement tailored specifically to your natural texture. Stop letting traditional salons dilute who you are. Claim your alternative hair transformation and wear your subcultural identity with fierce, unapologetic confidence.

Frequently Asked Questions

What is the difference between a wolfcut and a classic shag?

The main difference lies in weight distribution and graduation. A wolfcut features dramatic crown volume that disconnects sharply before tapering down into wispy, feathered ends, creating an aggressive silhouette inspired by the mullet. A classic shag distributes layers more evenly from root to tip, blending face-framing fringe sections into textured mid-lengths for a softer, rock-and-roll finish. Both celebrate movement, but the wolfcut leans far more extreme in its crown separation.

Can I get an alt hair style if I have fine or thinning hair?

Yes, fine hair often benefits tremendously from alt hair styles because strategic razor carving builds immediate tactile volume. Instead of standard thinning shears that remove bulk blindly, an alternative specialist uses blunt perimeter weight lines and internal micro-layers to prop up limp crowns. Pairing these techniques with lightweight sea salt sprays or silica texture dust gives finer hair dramatic, structural lift without collapsing under heavy styling products.

How do I ask my hairdresser for an alternative haircut without getting a generic style?

Request specific structural techniques rather than generic layered haircuts. Ask for internal weight removal, razor-carved texture, and deliberate disconnections between the crown and perimeter. Bring visual references showing unstyled, real-world texture on models with your exact curl or wave pattern. Clarify where you want key features to sit, such as micro bangs hitting above the brow or sharp temple fades that contrast against flowing back lengths.

Are alt hair styles difficult to style and maintain every morning?

Not if the structural cutting is done properly. Great alt hair styles rely on your natural growth patterns, meaning morning styling often takes under five minutes. You do not need round brushes or complex blowout routines. A quick spritz of water to reactivate wave memory, followed by a pinch of matte clay or root dust, instantly restores grit. The goal is intentional lived-in chaos, not sterile perfection.

Which alternative haircuts work best with natural curls and textured waves?

Shags, wolfcuts, and curly mullets thrive naturally on wavy, curly, and coily hair. Because textured curls have natural spring and buoyancy, internal weight removal eliminates the dreaded pyramid shape instantly. Carving out density behind the ears and through the crown lets individual curl clusters bounce freely, delivering wild, stage-ready volume without requiring daily heat styling or chemical straightening treatments.

Can someone pull off alternative cuts in a professional corporate workplace?

Absolutely, provided the silhouette is tailored to balance rebellion with clean perimeters. Disconnected undercuts can easily remain hidden beneath longer top sections during office hours and revealed after work. Dark monochrome tones, subtle micro-fringes, and textured layers can look exceptionally striking and architectural when paired with sharp corporate tailoring, proving countercultural expression and professional careers are never mutually exclusive.

Posted on

Sea Salt Spray: Alt-Styling Guide for Gritty Volume

Sea Salt Spray: Alt-Styling Guide for Gritty Volume

Stop treating your sea salt spray like a holiday accessory. Most tutorials promise sun-kissed waves, but we know you aren’t looking for a trip to the coast; you’re looking for a riot. If you’ve been struggling with flat, limp hair that loses its shape before you’ve even reached the gig, you need a different approach. Using sea salt spray for hair texture isn’t about looking soft; it’s about weaponising your wolfcut with aggressive, gritty volume that actually stays put.

It’s frustrating when your alternative style feels more polite than punk because your product leaves your strands feeling like a crunchy, dry mess. We agree that generic beauty industry advice just doesn’t cut it for subcultural styles like shags and wolfcuts. This guide promises to transform your routine by teaching you the expert art of injecting raw, long-lasting grit into your hair. We will explore the specific techniques needed to master wet versus dry application and how to achieve Death Grip levels of volume that hold through every movement.

Key Takeaways

  • Forget beach waves; learn how sea salt spray for hair texture works by swelling the hair cuticle to create immediate, gritty thickness in flat strands.
  • Master the difference between wet and dry application to choose between a lived-in feel or maximum subcultural grit.
  • Use the “upside down” technique and strategic sectioning to inject aggressive volume into the crown and layers of your wolfcut or shag.
  • Discover how to revive your style for day two and keep your texture sharp through the intensity of a festival mosh pit.
  • Level up your styling game with “Death Grip” levels of hold that celebrate your individuality without the dreaded crunch of traditional products.

Beyond the Beach: Why Sea Salt Spray is the Ultimate Alt-Hair Weapon

Most brands want you to believe that sea salt spray belongs on a breezy coastline during a summer holiday. They’re wrong. For those of us in the alternative scene, sea salt spray for hair texture is a tactical tool used to weaponise a wolfcut or a shag. It’s a mineral-based texturiser designed to mimic the rough, gritty feel of ocean air without the annoying sand. The unique mineral composition of sea salt allows it to bind to the hair, creating a tactile roughness that makes aggressive layers stand out rather than falling flat.

This isn’t just about ‘beach waves’. That’s a limited marketing term that ignores the raw potential of subcultural styling. Using sea salt spray for hair texture allows you to bypass the generic advice and focus on what matters: grit. Whether you’re a metalhead, a punk, or someone who simply refuses to conform, texture is the ultimate equaliser. It’s gender-inclusive and identity-affirming; it doesn’t care who you are, only that your hair has enough ‘grip’ to tell a story.

The Anti-Polished Aesthetic

The mainstream is currently obsessed with the ‘clean girl’ look, featuring slicked-back buns and high-shine finishes. We aren’t. Our aesthetic is deliberately rebellious and unapologetically gritty. For us, ‘messy’ isn’t an accident; it’s an expert-led style choice that signals you belong in the pit, not a corporate office. Sea salt spray is essential for creating that ‘lived-in’ vibe from day one. It strips away the artificial softness of freshly washed hair, replacing it with a raw energy that feels authentic to the underground.

Texture vs. Hold: Understanding the Difference

It’s vital to understand that texture and hold are different beasts. Hairspray is designed to freeze a shape in time; it’s static and often feels plastic. Sea salt spray is about movement and grit. It provides a matte finish that looks natural under stage lights, helping you achieve those Death Grip levels of texture without the greasy shine of traditional pomades.

Because it doesn’t set like a glue, your hair remains ‘re-scrunchable’ throughout the night. If your volume starts to drop mid-set or whilst you’re in the mosh pit, you can simply work your hands through your layers to reactivate the salt crystals. This flexibility is what gives alternative styles their longevity. You aren’t fighting against your hair; you’re giving it the structural integrity to move with you.

The Science of Grit: How Salt Transforms Flat Strands

Don’t just spray and hope for the best. To master your style, you need to understand why salt works. When you apply sea salt spray for hair texture, you’re initiating a physical reaction on every individual strand. Salt crystals adhere to the hair shaft and swell the cuticle, creating instant thickness. This structural change is essential for anyone sporting a modern mullet haircut, as it provides the necessary “bite” for those short, aggressive layers to stand up and stay there.

Sea salt also acts as a natural degreaser. It absorbs the natural oils that usually cause fine or limp hair to collapse under its own weight. By soaking up sebum, the salt allows your hair to maintain its volume for hours. This is particularly useful amongst alternative subcultures where hair needs to survive the heat of a gig without turning into a greasy mess. It’s about creating a foundation of friction that keeps your hair from lying flat.

Cuticle Swelling and Volume

At a microscopic level, salt crystals create a rough surface on the hair. This friction prevents strands from sliding past each other, which is how you achieve that coveted shaggy look. Osmosis in hair care is the process where moisture moves out of the hair shaft to balance the salt concentration on the surface, resulting in a drier, more tactile feel. Whilst this sounds intense, it’s the secret to that “rough” texture that defines the alt-aesthetic.

Many fear that salt will leave their hair feeling like straw. This is a common myth based on outdated, low-quality formulas. Modern sprays are designed with a careful mineral balance to protect the hair whilst they texturise. If you want to dive deeper into how products interact with different hair types, our Hair Courses offer expert insight into the technical side of alternative styling.

Protecting Your Vivid Colour

Maintaining vivid hair colour requires a specific strategy when using salt products. Salt can be abrasive, but the real danger to your pigment is a disrupted PH balance. Sprays that are too alkaline will blow the cuticle wide open, causing your neon pinks or deep teals to bleed out in the shower. Always look for PH-balanced formulations that keep the cuticle tight whilst still providing that gritty finish.

To avoid long-term pigment fade, rinse your hair thoroughly after a day of heavy styling. Letting salt sit on your strands for days can lead to dehydration, which makes the hair porous and less able to hold onto dye. A quick rinse with cool water is usually enough to remove the crystals without stripping your identity-affirming shades. This keeps your colour punchy and your texture sharp for your next session.

Wet vs. Dry Application: Mastering Your Texture Strategy

Don’t limit yourself to one method. The way you apply sea salt spray for hair texture dictates whether you look effortlessly cool or ready for a riot. It’s about control. Applying to damp hair builds a foundation of volume from within the strand, whilst dry application creates a surface-level grit that looks unapologetically raw. Understanding when to use each technique is what separates a professional finish from a flat mess.

For those seeking maximum root lift, the “blow-dry hack” is your secret weapon. Mist the spray directly onto damp roots before drying. The heat expands the salt crystals, propping up the hair at the base for a structural height that won’t collapse. You can also “cocktail” your spray by layering it with other products. If you need more hold, apply salt spray first for grit, then finish with a small amount of Death Grip to lock the shape. Dosage matters too: start with 3 to 5 pumps for fine hair, whilst thicker manes can handle 8 to 10 sprays without feeling weighed down.

The Damp Start: Subtle, Natural Flow

Applying to damp hair is the best route for a softer, wavy shag. It allows the product to distribute evenly as the hair dries, preventing any “patchy” texture. Follow these steps for a natural alternative aesthetic:

  • Mist towel-dried hair from mid-lengths to ends.
  • Scrunch the hair upwards towards the scalp to encourage natural movement.
  • Let it air-dry to achieve that “woke up like this” vibe.

This method is particularly effective for those with naturally curly or wavy hair types. It defines the curl pattern whilst adding enough “bite” to keep the layers from looking too polished. It’s the perfect foundation for a lived-in look that feels authentic.

The Dry Finish: Aggressive, Gritty Chaos

When you need instant impact, go for a dry finish. This technique is the absolute secret to a wolf hair cut with maximum “bite” and separation. Spraying onto bone-dry hair creates immediate friction, allowing you to piece out specific sections and create that iconic, jagged silhouette. It’s less about flow and more about aggressive, textured chaos.

The “scrunch and blast” technique involves squeezing the hair with your palm whilst applying a quick burst of heat from a hair dryer to instantly freeze the gritty texture in place. This creates a matte, high-impact finish that stays sharp through a full day of movement. It’s the go-to method for anyone who wants their alternative cut to look as rebellious as it feels. By focusing on the ends and the crown, you can create a silhouette that defies gravity and celebrates your individuality.

Sea Salt Spray: Alt-Styling Guide for Gritty Volume

How to Style Your Wolfcut or Shag with Sea Salt Spray

Forget the round brush. Polished finishes are for people who want to look like they’ve never been to a gig. To get the best out of sea salt spray for hair texture, you need to use your hands; brushes only smooth out the grit you’ve worked so hard to create. Start by sectioning your hair into manageable chunks. Focus your energy on the crown and those face-framing layers that give your cut its aggressive shape.

The “Upside Down” technique is your best friend for injecting volume into the under-layers. Tip your head forward, mist the spray through the lengths, and scrunch upwards towards the scalp. This creates a foundation of lift that supports the top layers. Once you’re upright, manipulate individual “flicks” in your wolfcut to sharpen the silhouette. Pinch the ends of the disconnected layers with a small amount of product to create a jagged, intentional look that refuses to blend in.

Defining the Wolfcut Layers

Wolfcuts rely on the contrast between the short, choppy top and the longer “tail” at the back. If that tail looks limp, the whole aesthetic falls apart. Use sea salt spray for hair texture to bridge the gap between these disconnected sections. By adding grit to the longer lengths, you ensure the hair has enough “bite” to hold its shape without looking stringy or greasy. Focus on the mid-lengths to keep the movement fluid but controlled; this prevents the hair from hanging flat against your neck.

The Shag Resurrection: 70s Grit, 2026 Style

Our shag hairdressers know that the secret to a modern shag is the “halo” of texture around the head. You want volume that radiates outwards. To avoid “flat-head” syndrome, concentrate your product on the mid-lengths rather than just the very top. This creates a balanced silhouette that feels heavy in the right places whilst maintaining that rebellious, non-conformist edge.

If you have a heavy fringe or curtain bangs, salt spray is a game-changer. A light mist provides a non-greasy finish that keeps hair from clumping together. It allows your fringe to move naturally whilst maintaining enough structure to stay out of your eyes during a set. If you’re ready to commit to a new look, book your next Wolfcut with our expert team to get the perfect foundation for your style.

Maintaining the Edge: Pro Tips for Long-Lasting Texture

Your style shouldn’t die just because the gig ended. Mastering the use of sea salt spray for hair texture means knowing how to keep that grit alive through the aftermath. Day two hair is often where the best alternative shapes are born. If your layers feel flat after a night of sleep, don’t reach for the shampoo. Instead, apply a light mist of salt spray and hit it with a blast of cool air from your dryer. This reactivates the minerals, lifting the hair away from the scalp without the need for a full restyle.

Embracing the “Death Grip” mindset means accepting that your hair will have a tactile, slightly tangled quality. This isn’t a mistake; it’s the foundation of the identity. The friction created by the salt is what allows a wolfcut to maintain its height and separation through movement. If you’re constantly trying to brush it smooth, you’re fighting the product. Let the texture build. The more “lived-in” it feels, the more authentic the silhouette becomes.

Eventually, every style needs a reset. You’ll know it’s time for a deep cleanse when your hair starts to feel “tacky” or heavy rather than gritty. Mineral buildup can eventually dull your colour if left too long. Use a clarifying treatment once a week to strip back the salt and product residue; this gives your strands a fresh start for your next round of styling.

Festival and Gig Readiness

When you’re three days deep into a festival, salt spray is your best friend. It’s a superior alternative to dry shampoo for alt-styles because it adds volume whilst absorbing sweat and oil. We’ve seen this in action with stage hair for musicians, where texture has to survive the intense heat of stage lights and mosh pits. Organise a small “touch-up kit” with a travel-sized spray to keep your fringe from clumping during long days in the pit.

The Heavy Metal Hairdresser Philosophy

We believe hair is the ultimate form of self-expression. It’s why we champion gender-neutral styling and encourage our community to experiment with unconventional shapes. Whether you’re rocking a shag or a jagged mullet, your hair should be a reflection of your subcultural pride. We provide the technical expertise, but the attitude is all yours. Ready to take your texture to the next level? Book in for a textured cut and let’s weaponise your style.

Weaponise Your Style

Mastering sea salt spray for hair texture is about more than just volume; it’s about reclaiming your identity from the polished mainstream. You’ve learned that grit is a tactical choice. By understanding the science of cuticle swelling and the difference between wet and dry application, you can now inject aggressive, long-lasting energy into every layer of your wolfcut or shag. Don’t fear the tangles or the matte finish. Those are the marks of a style that refuses to conform.

We bring our backstage festival styling expertise directly to the chair, providing a gender-inclusive safe space for every alternative identity. As alternative hair specialists, we know that your hair is your loudest statement. It’s time to ditch the generic advice and embrace the raw, underground aesthetic you deserve. Your texture should be as loud as your music.

Book Your Textured Wolfcut or Shag at Heavy Metal Hairdresser and let us help you find your edge. Stay loud, stay gritty, and never settle for flat hair again.

Frequently Asked Questions

Does sea salt spray work on straight hair for texture?

Yes, sea salt spray is one of the most effective tools for adding grit to naturally straight hair. It works by creating friction between individual strands, which prevents them from sliding past each other and lying flat. For straight hair, applying to damp roots before blow-drying provides the most structural lift. It transforms “slippery” hair into a workable, gritty canvas that is perfect for maintaining the jagged layers of a mullet or shag.

Will sea salt spray dry out my hair or cause damage?

Salt is naturally dehydrating, but professional-grade formulas are balanced with conditioning agents to mitigate this effect. It won’t cause long-term damage if you use it correctly and maintain a solid hydration routine. If your hair is already chemically treated or naturally brittle, look for sprays that contain added oils. Using a hydrating mask once a week ensures your strands stay supple whilst you enjoy that rebellious, matte texture.

Can I use sea salt spray every day on my wolfcut?

You can use it daily, but we recommend “refreshing” your style rather than layering heavy amounts of new product every morning. Over-application can lead to mineral buildup, which eventually makes the hair feel heavy and tacky rather than gritty. A light mist on day two is usually enough to reactivate the salt crystals already in your hair. If you do style daily, ensure you use a clarifying shampoo once a week to reset your strands.

Is sea salt spray safe for bleached or vivid coloured hair?

It is safe, but you must be mindful of the pH balance of your chosen product. Some sea salt spray for hair texture options can be slightly alkaline, which might cause vivid dyes to fade faster by opening the hair cuticle. Always opt for professional, pH-balanced sprays to protect your neon or pastel shades. Rinsing with cool water after a long day of styling helps keep the cuticle closed and your identity-affirming colour punchy.

How do I stop sea salt spray from making my hair feel crunchy?

Crunchiness is usually a sign of over-application or a formula with too much alcohol. To avoid this, start with just a few pumps and build the texture gradually. You can also “cocktail” the spray by applying a tiny amount of hair oil to your ends first. Once the hair is dry, give it a final scrunch with your hands to break any “cast” formed by the salt. This leaves the hair feeling gritty and textured but still touchable.

What is the difference between sea salt spray and sugar spray?

The primary difference lies in the finish and the level of “bite” they provide. Sea salt spray creates a matte, gritty finish with significant volume, making it the go-to for aggressive alternative styles. Sugar spray offers a shinier finish and a softer, more “grippy” hold that feels less drying. While sugar is great for polished waves, salt is the undisputed king for anyone seeking that raw, lived-in energy essential for shags and wolfcuts.

Can I use sea salt spray with a hair dryer or diffuser?

Using heat is actually the secret to achieving maximum volume. When you apply sea salt spray for hair texture to damp hair and then use a diffuser, the heat causes the salt crystals to expand. This process props up the hair at the root, creating a structural height that air-drying alone cannot match. For an alternative, messy look, use a diffuser on a low heat setting to encourage jagged movement without creating unwanted frizz.

How do I wash out sea salt spray properly?

To fully remove mineral deposits, you should use a clarifying shampoo once a week. Regular shampoos can sometimes leave behind a residue, especially if you have been layering product for a festival or a long weekend. Focus the shampoo on your scalp and mid-lengths to break down the salt and sebum. Always follow up with a deep conditioner or a hydrating treatment to restore the moisture balance that the salt provides during the styling process.

Posted on

How to Add Texture to Fine Hair: Gritty Volume Guide

How to Add Texture to Fine Hair: Gritty Volume Guide

Fine hair isn’t a curse that condemns you to a lifetime of limp, child-like strands; it is a blank slate for absolute chaos. Most stylists will tell you to play it safe with volumising foams that leave you looking like a polished mannequin, but we know that doesn’t hold up when the pit opens at Bloodstock. You are likely tired of your style collapsing before the first set is even over. Learning how to add texture to fine hair isn’t about chasing shine or soft bounce. It’s about building a foundation of grit that refuses to quit.

We’re here to help you ditch the greasy, heavy products and embrace a high-impact, rebellious aesthetic. This guide reveals how to transform flat hair into a textured masterpiece using alternative styling techniques and products with a serious bite. We will dive into why the wolfcut is the ultimate weapon for fine-haired legends and how to master the Death Grip aesthetic for a look that stays aggressive all night. From gritty powders to layered cutting secrets, you’re about to get the blueprint for hair that finally matches your energy.

Key Takeaways

  • Learn how aggressive layers like the wolfcut remove weight to create natural lift and movement in flat hair.
  • Discover exactly how to add texture to fine hair using gritty, lightweight products that won’t leave your style feeling greasy or weighed down.
  • Master styling techniques like the ‘Rough Dry’ to ensure your hair maintains its chaotic, high-impact shape throughout the day.
  • Find out why ‘Death Grip’ levels of hold and vivid hair colours are essential for creating the perception of thicker, more aggressive texture.
  • Stop following traditional salon rules and start using a foundation of grit to build a look that reflects your independent spirit.

Understanding Fine Hair and the Quest for Gritty Texture

Fine hair is a diameter problem. It is a common mistake to confuse fine hair with thin hair, but they aren’t the same thing. Thin hair refers to the density of follicles on your scalp, whilst fine hair describes the actual thickness of each individual strand. You can have a massive amount of hair and it still feels limp because the strands themselves are delicate and lack structural integrity. This is why your hair often looks ‘child-like’ or loses its shape the moment you step out of the house. It’s frustrating to spend an hour styling only to see it collapse into a flat, uninspired mess before you’ve even reached the venue.

Traditional volumising products are usually designed for a mainstream, polished look. They focus on ‘plumping’ the hair with slippery polymers that create a soft, bouncy finish. This might work for a generic blow-dry, but it’s a disaster for alternative styles. When you’re trying to figure out how to add texture to fine hair for a shag or a wolfcut, you don’t want bounce; you want bite. You need a rebellious solution that replaces that unwanted silkiness with raw, unyielding friction.

The Science of Friction and Hold

Fine hair strands are naturally smooth. They slide past each other like silk ribbons, which is exactly why your style refuses to hold its height. To fix this, you have to introduce roughness to the hair cuticle. By creating microscopic levels of unevenness on the surface, the strands can finally stack and support one another instead of sliding into a heap. This mechanical interaction is what allows you to build a shape that actually stays put. Hair grit is the essential mechanical friction required to stop layers from sliding flat and maintain an aggressive, alternative shape.

Why Mainstream Advice Fails the Alt Scene

Most salon advice obsesses over ‘healthy shine’ and ‘silky results’. For those of us in the underground scene, shine is often the enemy of style. Over-conditioning is a frequent trap for fine-haired legends; it coats the strands in heavy silicones that weigh everything down and kill any chance of volume. We don’t want our hair to feel like a shampoo commercial. We want it to feel authentic, raw, and lived-in. Embracing matte finishes and gritty textures is the only way to achieve a ‘Death Grip’ level of hold. When you ditch the polish and start using products that provide real texture, you gain the confidence to wear bold, layered cuts that reflect your true identity.

The Foundation: Cuts That Inject Chaos into Thin Strands

Mainstream salons love a safe, blunt bob. They will tell you that layers are the enemy of fine hair and that keeping it all one length is the only way to avoid a ‘stringy’ look. It is a myth designed to keep you looking polished and predictable. In reality, a heavy, one-length cut is the fastest way to make fine hair look like a wet blanket. When you are figuring out how to add texture to fine hair, the secret lies in strategic weight removal. By carving out bulk from the internal sections, you create the space needed for the remaining hair to spring upward. It is about engineering lift, not just cutting length.

Removing weight isn’t about thinning the hair out until it’s transparent. It’s about a technical process called internal layering. This involves cutting shorter, hidden sections beneath the top canopy of your hair. These internal layers provide the structural integrity that fine hair lacks on its own. They literally push the outer layers out and up, creating the illusion of a much denser, more aggressive mane. It is a bold approach that prioritises movement and attitude over traditional perfection.

The Power of the Shag and the Wolfcut

The wolf hair cut is the ultimate texture generator for fine strands. It relies on a series of short, choppy layers that act as a scaffold. These shorter pieces sit underneath the longer ones, propping them up and preventing that dreaded limp appearance. Similarly, the shag haircut uses disconnected layers to create a gritty, rock-inspired silhouette. This disconnection is vital; it breaks up the visual weight and forces the hair to move in a chaotic, non-uniform way. If you want a style that survives the energy of a live show, you need a foundation that embraces this controlled mess.

Alternative Fringe Techniques

A fringe is a high-impact way to manipulate the perception of density. Instead of a wispy, safe bang, we opt for micro-fringes or heavy, shattered edges. Point-cutting is the weapon of choice here. By cutting into the ends at an aggressive angle, we remove the ‘ledge’ and create a jagged finish that looks thicker because of the varied lengths. A textured fringe draws the eye to the face and adds immediate visual weight where it matters most. It turns a flat style into a rebellious statement. If you’re ready to ditch the boring advice, explore our alternative styling world and find a cut that actually fits your identity.

Product Warfare: Choosing Tools for Maximum Grit

Fine hair is a lightweight fighter. It cannot handle the heavy hitters that thicker hair thrives on. If you load up on dense creams or buttery waxes, your style will surrender before you even leave the house. The golden rule for how to add texture to fine hair is simple: lightweight formulas with high-impact results. You want products that offer structural support without adding physical mass. It is about creating chemical friction, not heavy coatings that lead to a flat, greasy collapse.

Salt sprays are the gold standard for a reason. They provide that jagged, ‘crunchy’ grit that defines the alternative aesthetic. Whilst sugar sprays are an option, they often lean too far into the ‘soft’ category. Salt opens the cuticle slightly, giving you the raw edge needed for an aggressive wolfcut. Texture powders are your tactical weapon for targeted lift. They create ‘dirty’ grit at the roots, allowing you to sculpt height that refuses to budge. Do not wait for day three to use dry shampoo. Apply it to clean hair as a volume builder. It adds a matte, airy quality that makes the hair look twice as thick from the start. To find these types of high-performance formulas from a curated selection of modern beauty brands, check out BÆR.

Start your routine with a lightweight mousse whilst the hair is damp. This creates a ‘skeleton’ for the style to hang on once it is dry. You must avoid any product containing heavy oils or silicones. These ingredients are the primary causes of ‘slumping’ in fine strands. When applying your salt spray, mist it from a distance. Do not drench the hair or you will end up with a matted mess that is impossible to manage. You want a light, even coat to prep the surface for the heat and movement to come.

Finishing Tools for the Alternative Edge

Matte clays are the only choice for an authentic underground look. Greasy pomades will turn fine hair into a slicked-down disaster. A matte finish absorbs light, making the hair appear more dense and textured than it actually is. Texture sprays are the perfect alternative for people who hate the stiff, plastic feel of traditional hairspray. They offer a flexible hold that allows for movement whilst maintaining the ‘Death Grip’ you need to keep your shape. Layering is the final secret. A bit of powder at the roots, a mist of salt spray during the dry, and a touch of matte clay to finish. This multi-layered approach ensures your texture survives the energy of the mosh pit.

How to Add Texture to Fine Hair: Gritty Volume Guide

Styling Techniques for the Mosh Pit and Beyond

Once you have the right products, the real magic happens in the application. Traditional styling often relies on round brushes and precise sectioning. This is too polished for our scene. If you want to know how to add texture to fine hair that survives a headlining set, you need to get your hands dirty. Forget the smoothing nozzle. Your fingers are the best tools you own for creating natural, chaotic movement that doesn’t look like you’ve tried too hard. It is about working with the hair, not forcing it into a clinical shape.

Diffusing is often associated with curls, but it is a secret weapon for fine, straight hair too. By using a diffuser to ‘scrunch’ the hair whilst drying, you force the strands into irregular patterns. This creates a foundation of ripples and waves that adds massive visual volume. If you need even more height, try internal back-combing. Instead of teasing the surface, create small ‘knots’ at the root underneath the top layer. This provides invisible lift that keeps your style from looking flat without the obvious frizz of traditional teasing. It is a structural fix that stays hidden whilst doing all the heavy lifting.

The Art of the Scruffy Blow-Dry

A scruffy blow-dry is the antithesis of the salon blowout. Follow this three-step process for maximum grit:

  • Step 1: Apply your chosen prep product, like a lightweight mousse or salt spray, to damp hair.
  • Step 2: Flip your head upside down. This uses gravity to pull the roots away from the scalp.
  • Step 3: Blast with high heat but low airflow. High air will just blow the fine strands flat; low air allows the texture to set.

Avoid brushes entirely. Brushing smooths the cuticle, which is the opposite of what we want. Use your hands to rake and scrunch as you dry. Finally, use the ‘cool shot’ button. Cold air locks the hair cuticle in its new, chaotic position, ensuring the volume doesn’t immediately deflate. Investing in a dryer that offers precise speed and temperature controls makes dialling in this kind of rough texture much simpler; find out more about advanced styling appliances built for tailored control. This method builds a raw foundation that is ready for any alternative style.

Survival Styling: Keeping Texture at Festivals

Festivals are the ultimate test for fine hair. By day three, the combination of sweat and dry shampoo can make things tricky. To refresh your look without a shower, mist your hair with a tiny bit of salt spray and scrunch it back to life. If you know you won’t have time to style in the morning, sleep in braids. Use the ‘pancake’ technique by gently pulling at the edges of each braid loop to make it look massive and wide. When you undo them, you will have an aggressive, crimped texture that lasts all day. If a beanie has crushed your volume, flip your head and shake out the roots with some texture powder. For more expert tips on maintaining your edge, book a session with our alternative specialists.

Maintaining Your Alternative Edge and Professional Support

Fine hair maintenance is a constant battle against gravity and transparency. Whilst we have covered the specific cuts and gritty products needed for impact, professional upkeep is the final piece of the puzzle. Regular ‘dusting’ is vital. This isn’t a traditional trim that removes length; it is a precise removal of split ends that prevents your hair from looking wispy at the perimeter. Keeping the ends crisp and strong ensures that your internal layers have a solid foundation to sit on. It keeps the hair looking dense and intentional rather than neglected.

Communication is your best tool when you are in the stylist’s chair. Most mainstream hairdressers hear the word ‘volume’ and immediately think of soft, bouncy blow-dries. That is not our world. When discussing how to add texture to fine hair, tell your stylist you want ‘grit’ and ‘friction’. Use descriptors like raw, jagged, or aggressive. You want layers that stack on top of each other to create mechanical lift. A stylist who understands alternative subcultures will know exactly how to carve those shapes without trying to ‘beautify’ or smooth out your rebellious edge.

The Colour Illusion

Colour is a structural weapon in your quest for maximum texture. Opting for vivid hair colour does more than just signal your identity; it creates the perception of depth. Multi-tonal shades and ‘root shadows’ are particularly effective for fine-haired legends. By keeping the base of the hair slightly darker, you create an illusion of density at the scalp. There is also a physical benefit to lightener known as the ‘bleach swell’. The chemical process slightly expands the hair cuticle, making individual strands feel thicker and giving them a rougher surface that holds onto styling products with far more tenacity.

Finding Your Style Master

You need a specialist in alternative hair who won’t flinch when you ask for a disconnected mullet or a shattered shag. Finding a gender-neutral, inclusive salon is about more than just the aesthetic; it is about finding a safe space for authentic self-expression. Ask your hairdresser how they handle textured layering and whether they prioritise the ‘dry cut’ for fine hair. A dry cut allows the stylist to see exactly how your fine strands react to weight removal in real-time. This level of professional support ensures your style remains a high-impact masterpiece that reflects your independent spirit every single day.

Master the Chaos and Claim Your Texture

Fine hair is no longer a limitation once you stop fighting its nature and start manipulating its structure. You have ditched the slippery, mainstream products and embraced aggressive, internal layering. Now, you know exactly how to add texture to fine hair for a look that survives the loudest mosh pits. It is about building a foundation of grit that holds up from the first set at Bloodstock to the final encore. Your hair is a canvas for rebellion; it’s time to treat it like one.

Your style should be as loud as your music. Don’t settle for limp, child-like strands when you can have high-impact volume that reflects your true identity. As specialists in gender-neutral alternative cuts and expert vivid colour work, our team understands the nuances of subcultural style. We have styled bands for Download and Bloodstock; now it’s your turn. Book your transformation with the UK’s alternative hair experts and step into a space where being different is celebrated. Your most rebellious hair days are just beginning.

Frequently Asked Questions

Can I really have a wolfcut if my hair is very fine?

Yes. Wolfcuts are actually ideal for fine hair because the aggressive layering removes weight and creates structural lift. Instead of a flat curtain, you get a stacked, architectural shape. The key is internal layering that props up the top sections. This technique transforms limp strands into a high-impact silhouette that looks much denser than it actually is. It is the ultimate solution for anyone craving an alternative edge.

What is the best product to add grit to fine hair without it feeling greasy?

Texture powders and dry shampoos are the ultimate tools for non-greasy grit. These products absorb excess oils whilst providing a matte, ‘dirty’ friction at the roots. Unlike heavy waxes or pomades, powders are virtually weightless. They allow you to sculpt height that stays put without that dreaded clumping. For a maximum hold that survives the energy of a live show, we recommend a layered ‘Death Grip’ approach.

How often should I wash fine hair if I want to maintain texture?

You should aim to wash fine hair every two to three days to maintain the best gritty texture. Washing every day strips the hair of natural oils and any product build-up that actually helps hold a style. Use a dry shampoo on non-wash days to manage any unwanted shine. This keeps the strands feeling slightly rougher, which is exactly what you need for an authentic, lived-in alternative aesthetic.

Does sea salt spray damage fine hair over time?

Sea salt spray can be drying if used excessively, but it isn’t inherently damaging when applied correctly. The salt works by opening the cuticle to create friction. To protect your strands, use a lightweight, silicone-free conditioner on wash days. This balances the crunch of the spray whilst keeping the hair healthy. It is a vital tool for anyone learning how to add texture to fine hair without resorting to heavy creams.

How do I stop my fine hair from going flat after an hour?

The secret is layering your products and avoiding moisture-heavy finishes. Start with a lightweight mousse on damp hair to build a skeleton, then finish with a matte texture spray. If you rely on a single product, the weight will eventually cause the style to slump. Ensure you use a ‘cool shot’ on your hairdryer to lock the cuticle in place. This creates a structural bond that effectively resists gravity.

Is back-combing bad for fine hair?

Traditional back-combing can be harsh, but internal teasing is a safer way to get lift. Instead of roughly scraping the surface, create small, hidden knots at the base of the hair. This provides a structural cushion that supports the rest of the style. Always use a proper wide-tooth comb to gently brush it out before washing. This technique gives you that rebellious height without causing long-term breakage or unwanted frizz.

How can I add texture to fine hair without using heat?

Braiding damp hair overnight is the most effective heat-free method for adding texture. Use the ‘pancake’ technique by pulling the loops of the braids apart to create wide, irregular crimps. When you undo them in the morning, mist with a salt spray for an instant, gritty finish. This method creates a chaotic, non-uniform wave pattern that looks far more authentic than the results from a traditional curling iron or wand.

What’s the difference between volume and texture for thin hair?

Volume is about the physical height and space your hair occupies, whereas texture is about the surface feel and definition of the strands. You can have volume without texture, which often looks like a soft, polished bubble. For alternative styles, you want both. Texture provides the bite and separation that makes a wolfcut look aggressive. Understanding how to add texture to fine hair ensures your volume doesn’t look like a generic blowout.